How to Edit The Menu in WordPress: Your Simple Step-by-Step Guide
When you buy something through one of the links on our site, we may earn an affiliate commission.
If you're looking for a tutorial to learn how to edit the menu in WordPress, you've come to the right place.
Effective website navigation is important for your readers and your overall SEO strategy.
In this step-by-step tutorial, you'll learn how to edit your menu in WordPress and how to:
- Add and remove items from your menu.
- Place multiple menus on your website.
- Add custom links to your WordPress menu.
- Create nested or drop-down menus for better organization.
Let's get into it.
Contents
How to Edit the Menu in WordPress
To edit a menu in WordPress, sign in to your WordPress admin panel.
Once you're on the back-end dashboard of your website, find the “Appearance” link on the sidebar on the left. Hover your mouse over “Appearance” and then select “Menus”.
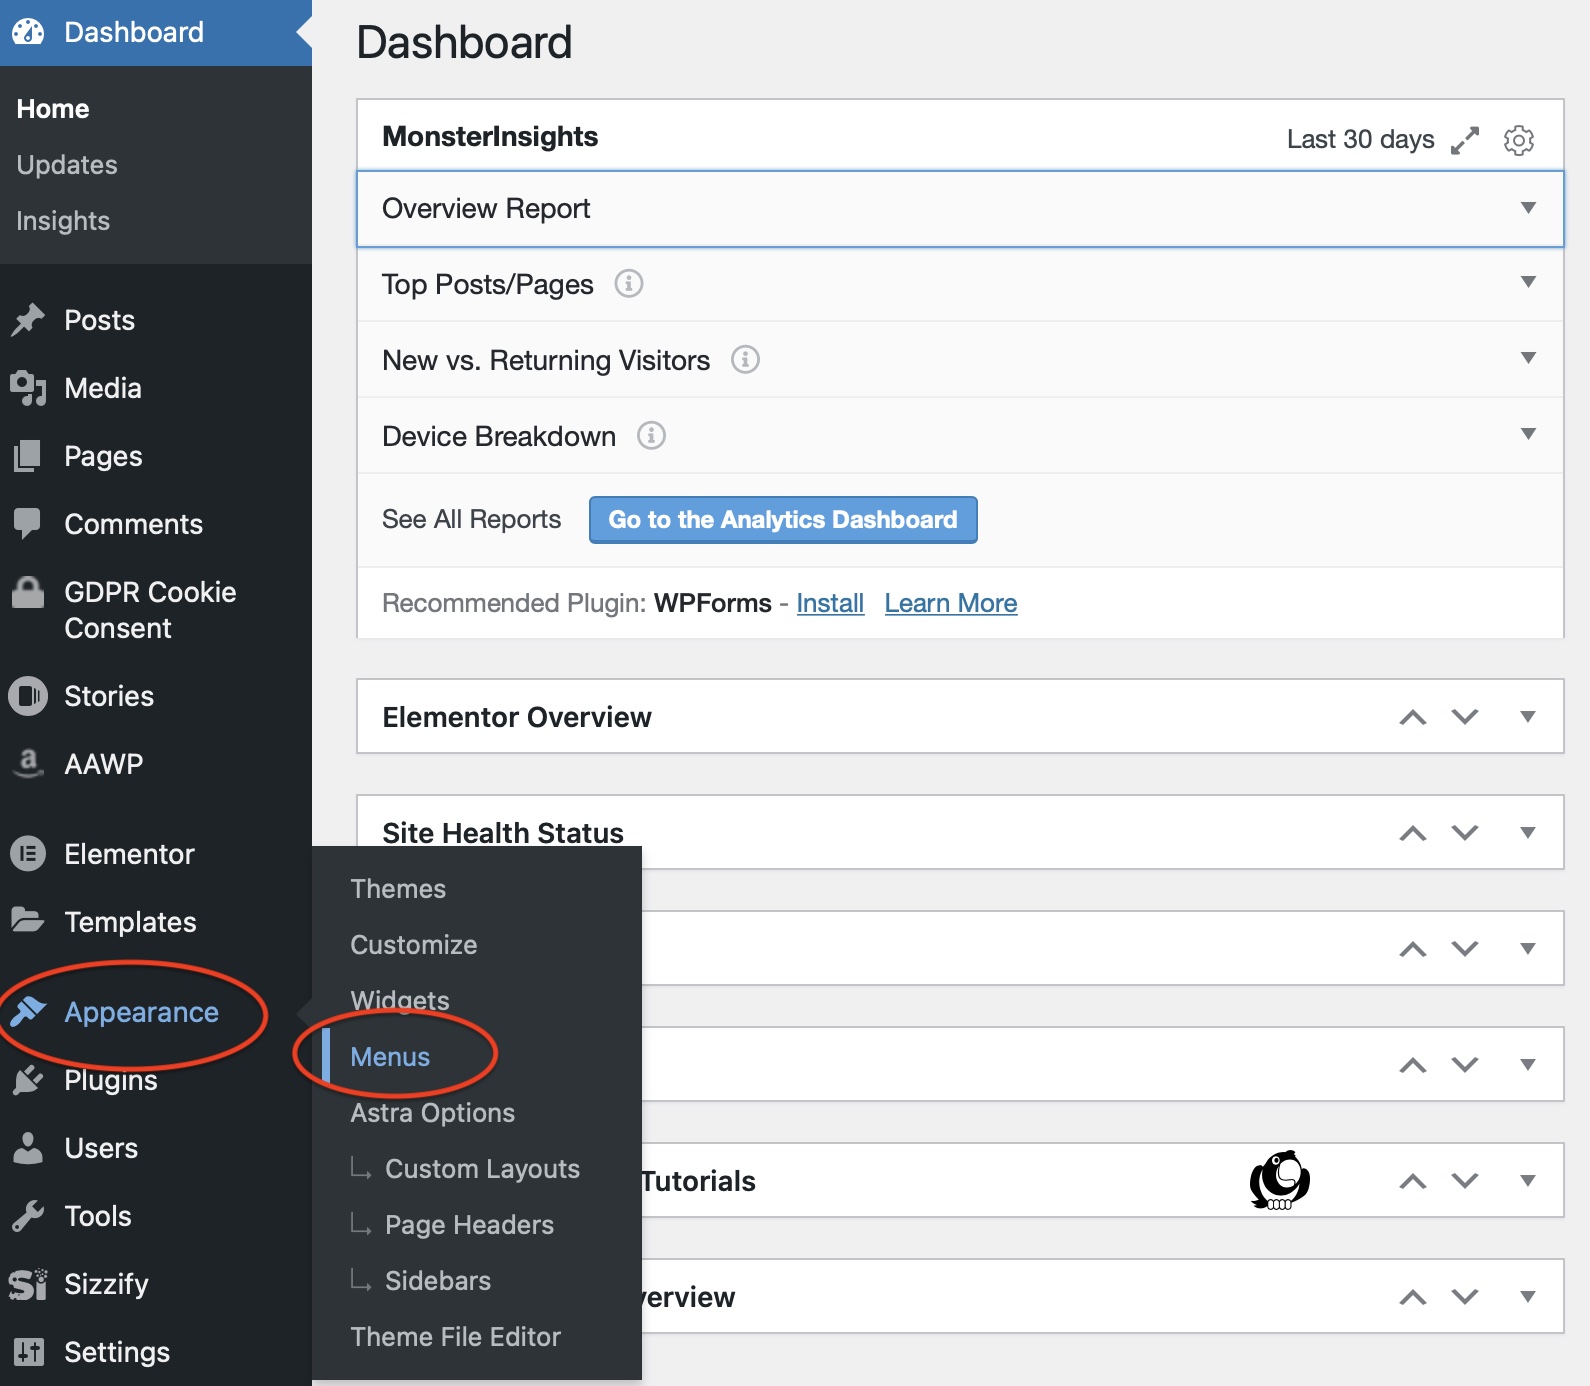
This will bring you to the page where you can edit your existing menus and/or add new menus.
You can have multiple menus for your website. In addition to your main navigation menu, you can also create menus to place in your sidebar or different columns of your footer.
It's up to you to decide what goes on your menu. As a general rule, try to make sure you include the most important pages or posts on your website and your top categories at a minimum.
Ahrefs has a great article about website structure here.
Your main website menu is one of the most important pieces of your website's navigation. An easy-to-use menu helps your website visitors access your most important content easily.
And, perhaps more important than that, clear and effective navigation can have a positive impact on your overall search engine rankings, too.
A well-structured main menu makes it easier for search bots to crawl your website and access your best content. As a result, great navigation can help you rank in Google.
What You Can Put in Your WordPress Menu
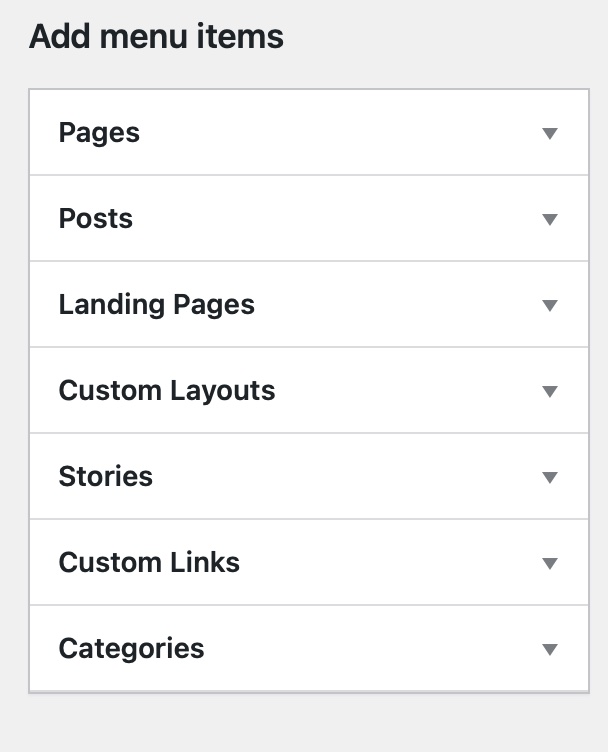
You can add any link to your WordPress menu.
Popular items include your website categories and landing pages, but you can put any link you want in your menu.
If you want to link to a page or website that isn't included in your URL, you can use the “Custom Links” option to link to anywhere. You can give links a custom title so it doesn't even look like you're linking off of your website.
Customizing your menu fonts, colors, and sizes is done through your website theme.
However, not all themes are built alike.
If you want an easy-to-use, super lightweight, and fully customizable WordPress theme, we highly recommend Astra. Check out our Astra theme review below.
Astra Theme ReviewAdding New Menu Items
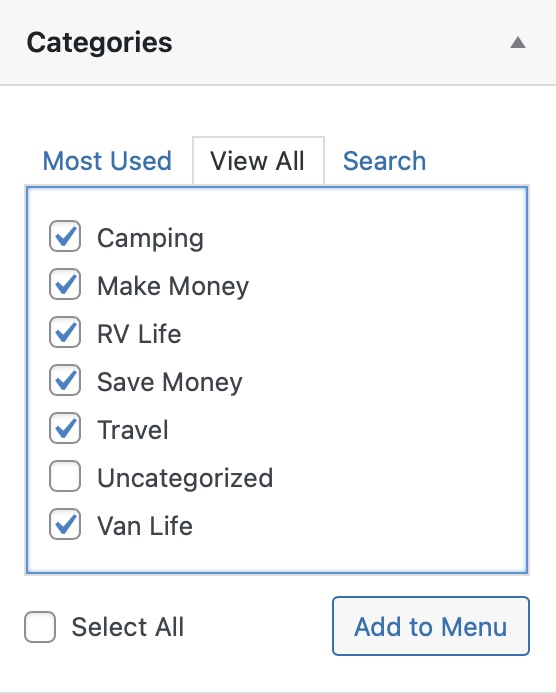
Instructions for adding new menu items will be the same for every type except custom links. To add a new menu item, click the drop-down for the item that you want to add.
You can toggle this box by “Most Used” items in that category or “View All”.
If you're not seeing an item that you want to add, make sure you're under the “View All” tab.
Then, select the checkbox for the item you want to add and click “Add to Menu”.
Once you add the items to your menu, you'll see them in order on the right-hand side.
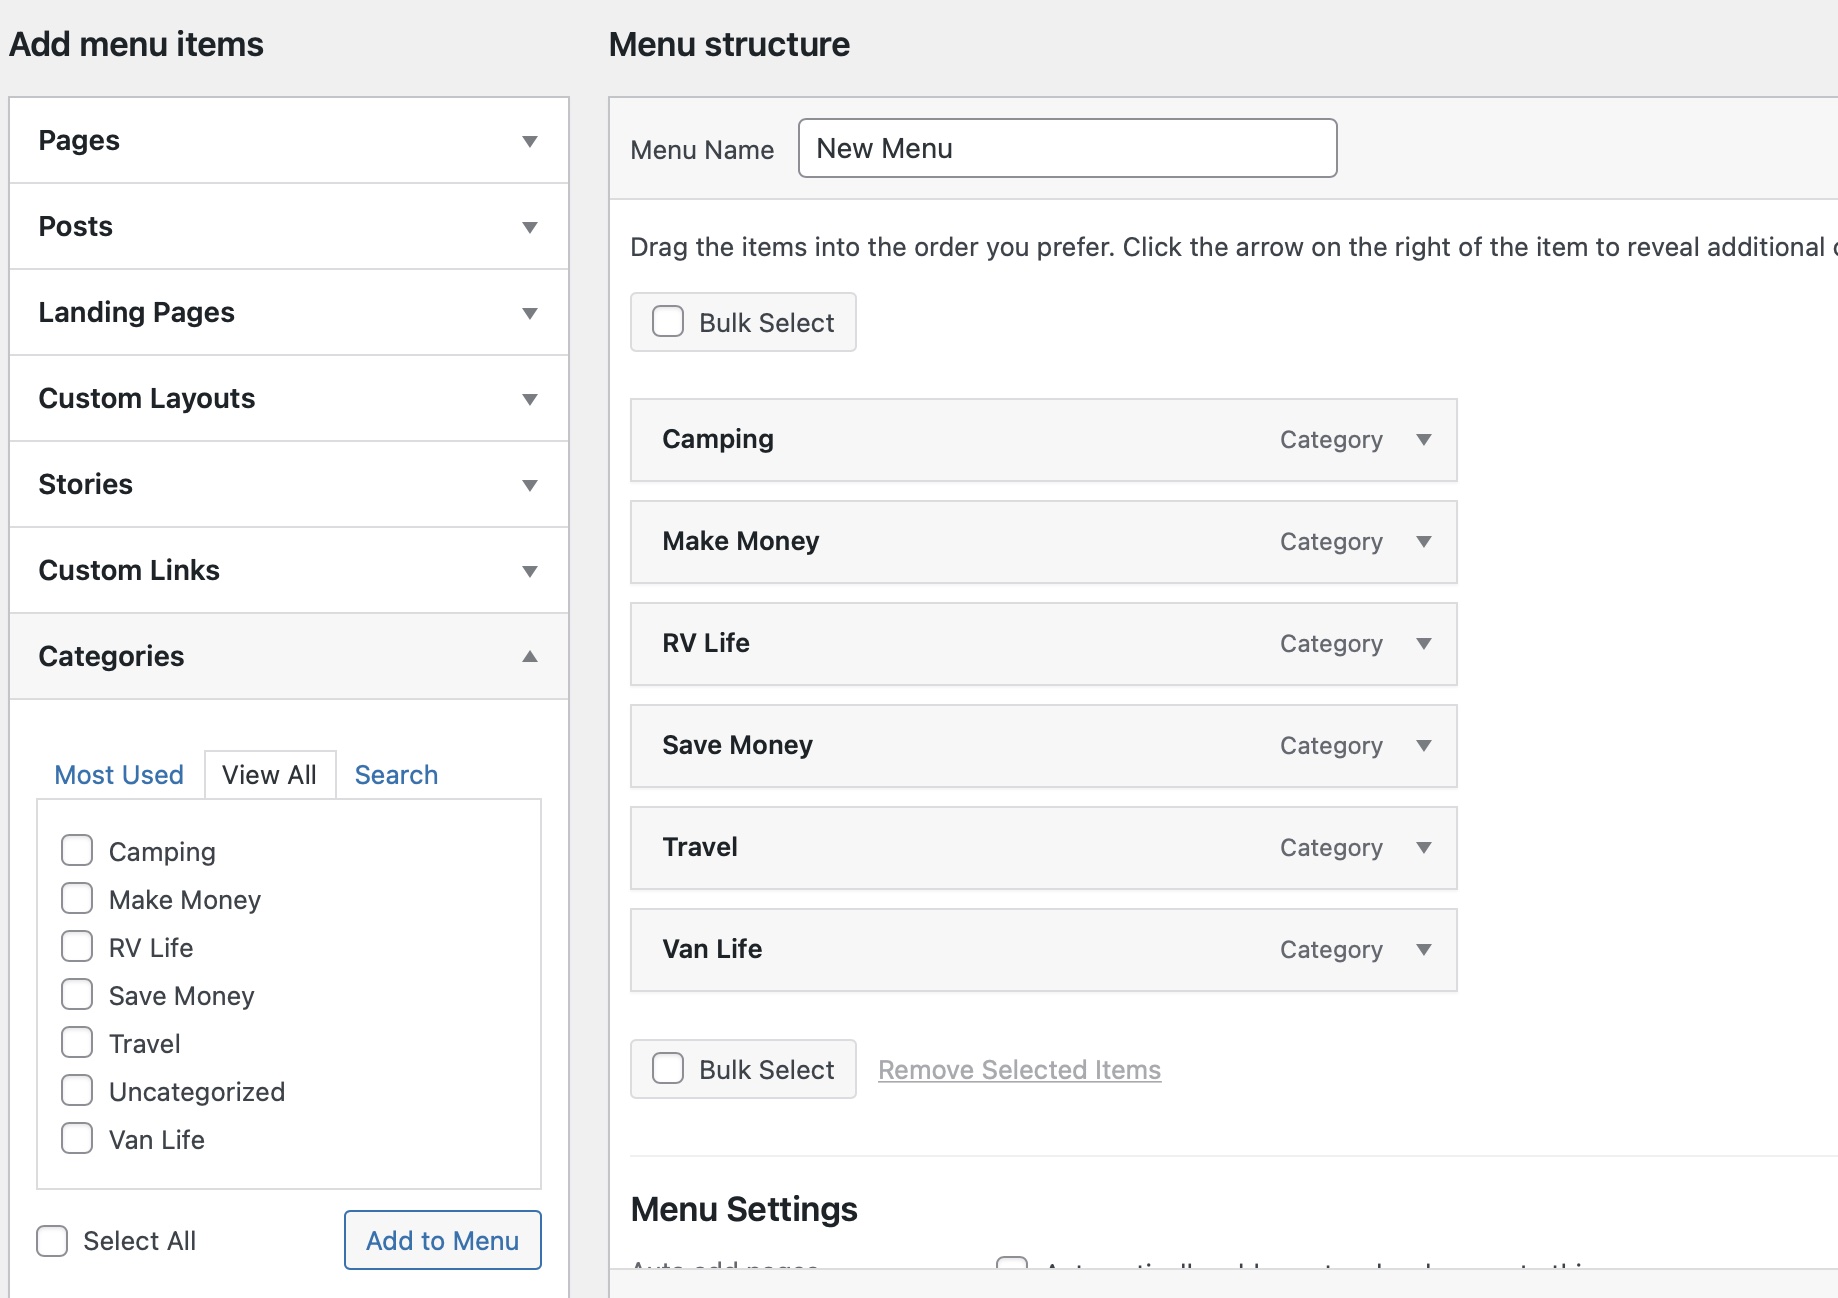
From here you can click and drag to rearrange your menu items, rename them, and depending on your theme, you may also be able to assign custom CSS to each item.
Once you are finished editing, be sure to click “Save Menu” at the bottom. If you forget to click “Save Menu”, you'll have to do it all over again.
How to Remove Items from a WordPress Menu
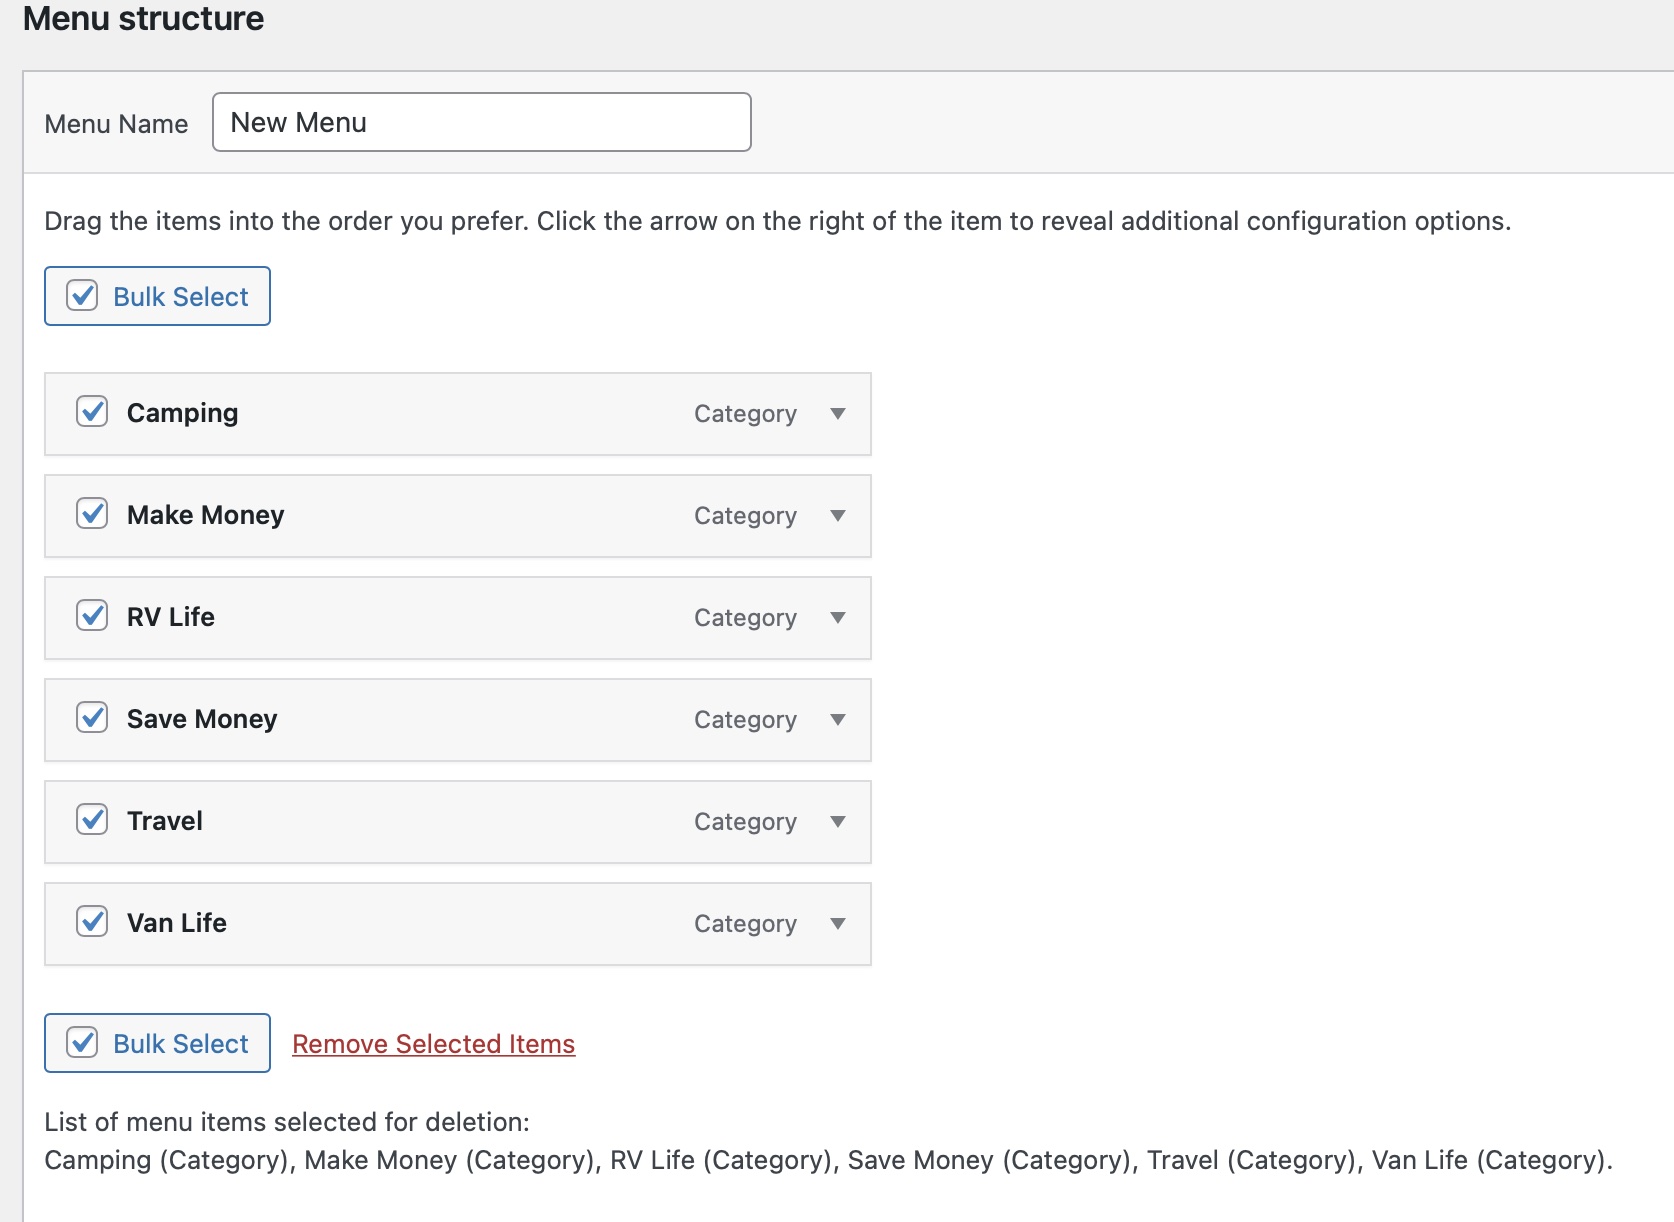
To remove certain items from your WordPress menu, click the checkbox labeled “Bulk Select”. Once you check this box, each menu item will display a checkbox next to the title.
Check off the items that you want to remove and click “Remove Selected Items”.
After you remove unwanted items from your menu, be sure to click the “Save Menu” button at the bottom right-hand side of your menu editing screen.
How to Add Custom Links to a WordPress Menu
Adding a custom link to your WordPress menu is a great way to add external links, links to your off-site landing pages, or create custom-organized drop-down menus.
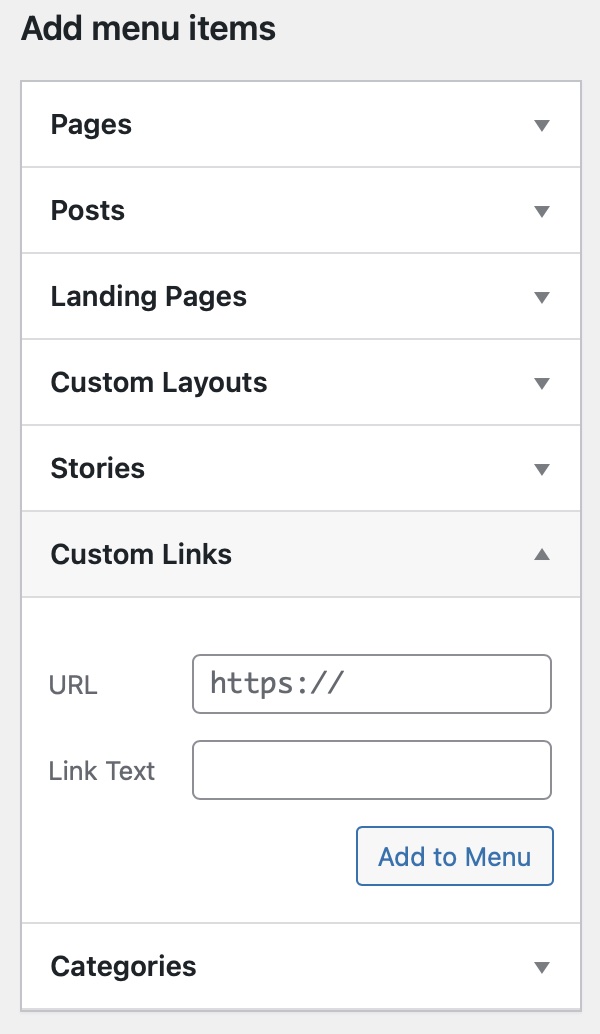
To add a custom link, click the “Custom Links” toggle to open this menu section.
Type in the full URL, including the “https://” into the URL box.
The “Link Text” box is the name for your menu item. Whatever you type here is what will be displayed on your menu for website visitors to see.
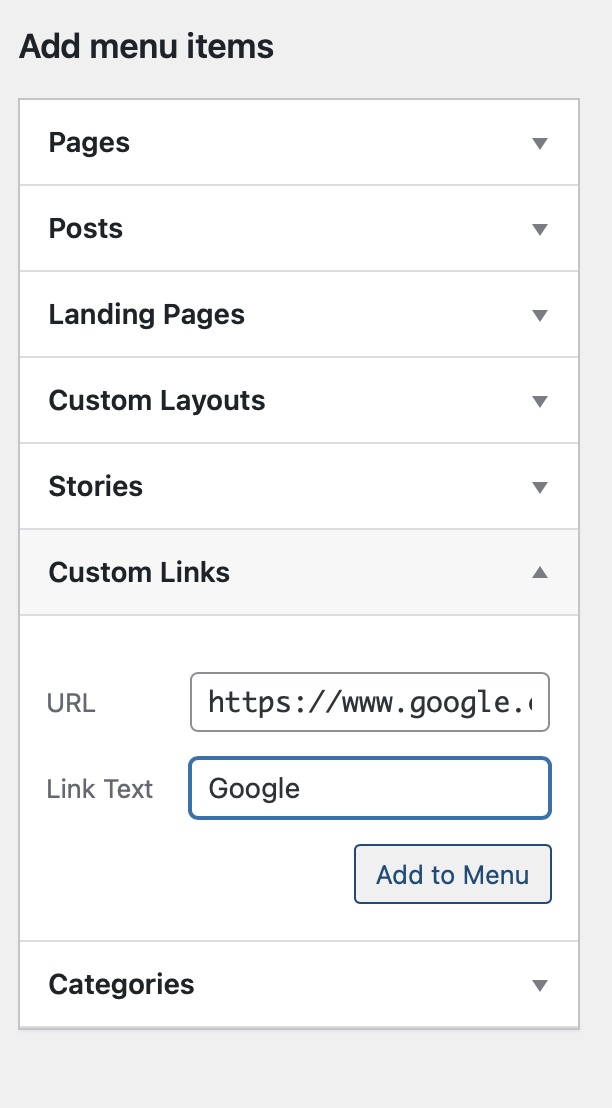
Then click “Add to Menu”.
Once your custom link is on your menu, you can click the drop-down arrow to edit the link, the link text, or add custom CSS.
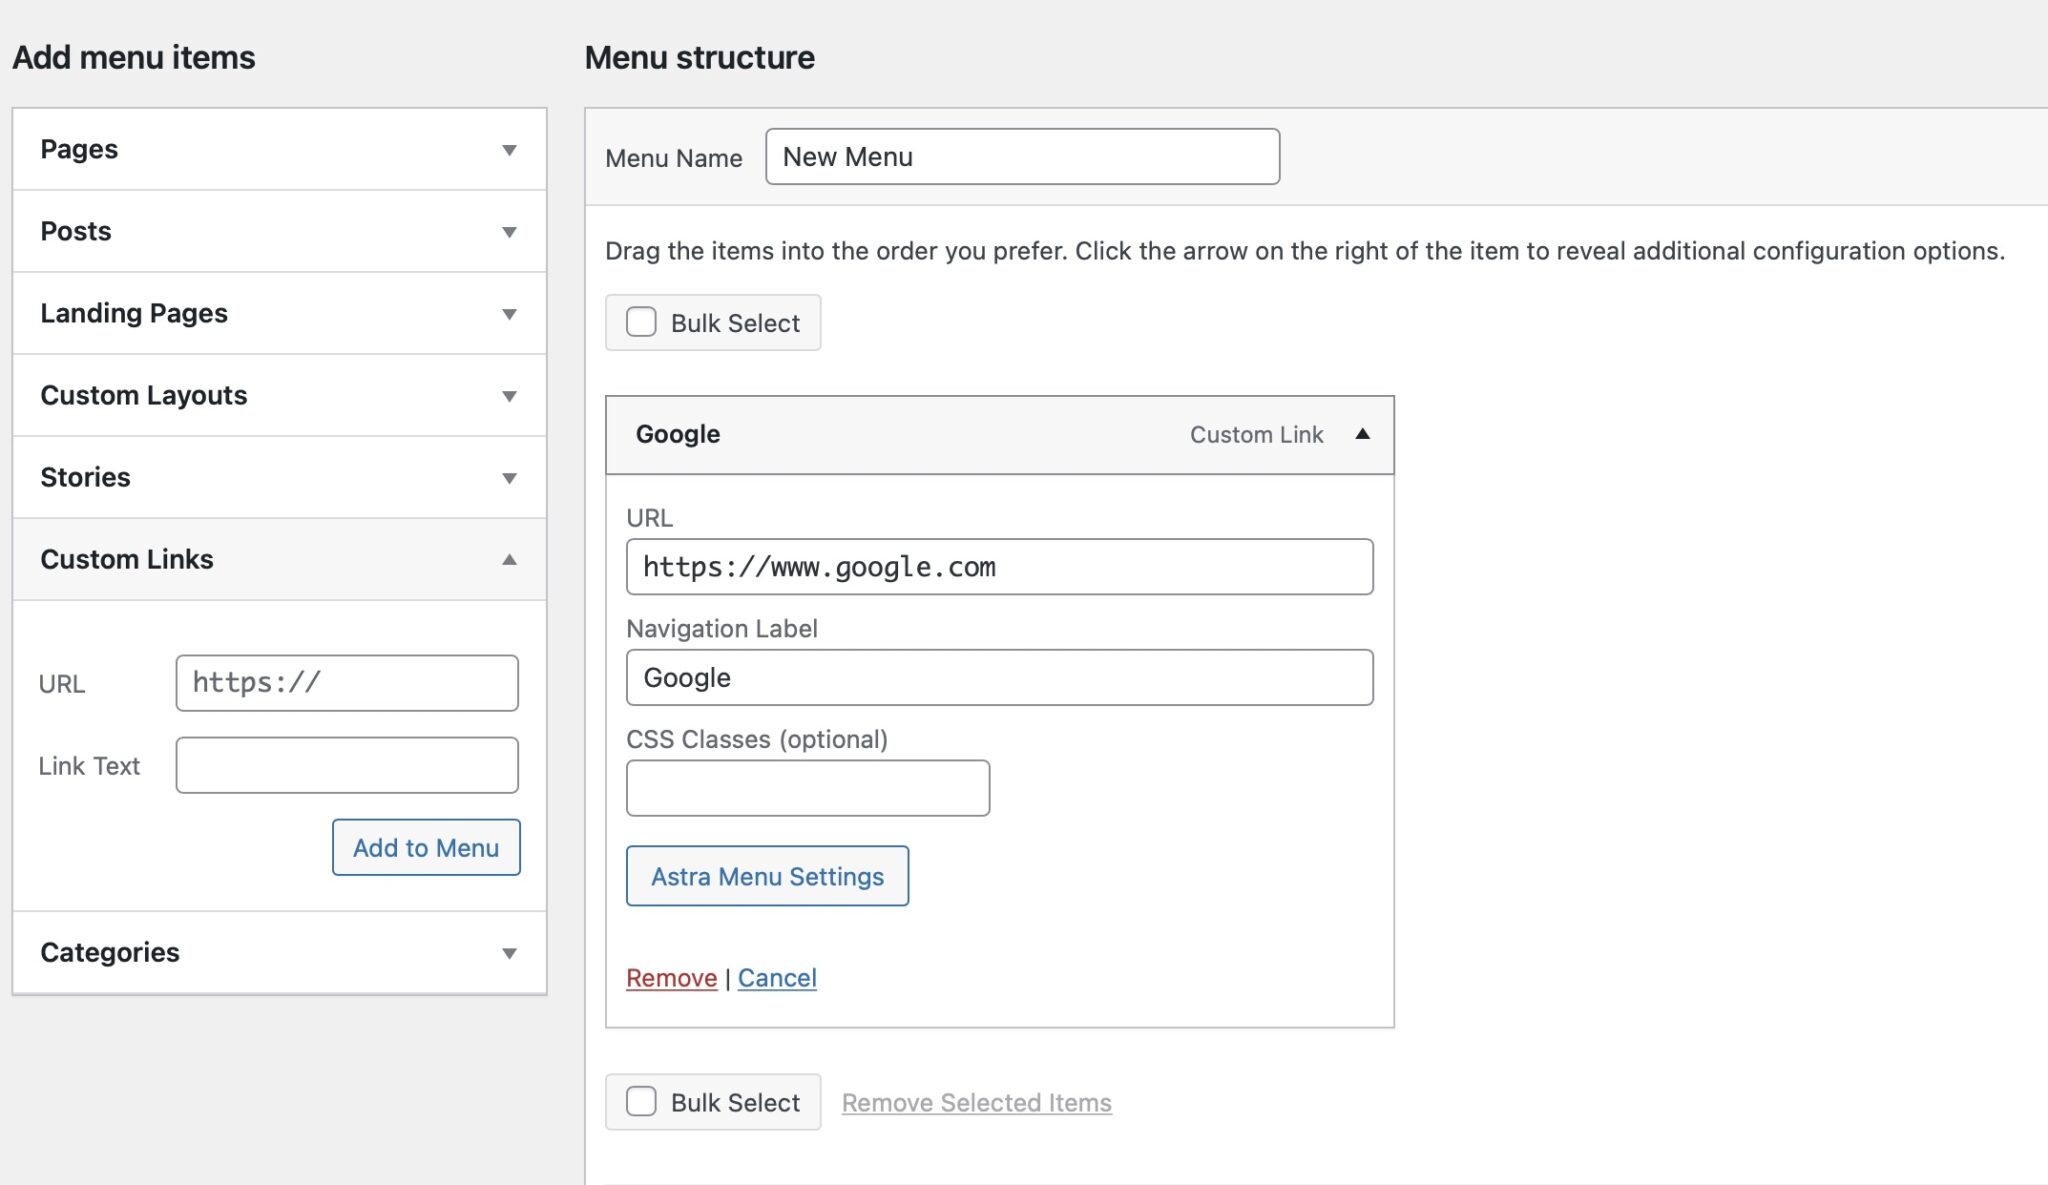
You can also use a custom menu to create a menu drop-down for organization.
Using a drop-down allows you to add more content to your menu without it looking too busy or bulky from the website visitor's perspective.
As always, click “Save Menu” when you're done.
Adding sub-items to your WordPress menu creates drop-down menu items for organization and ease of use.
There are many ways you can use this feature. My favorite way to use this feature is for things like categories or my resource pages.
Let's use categories for this example.
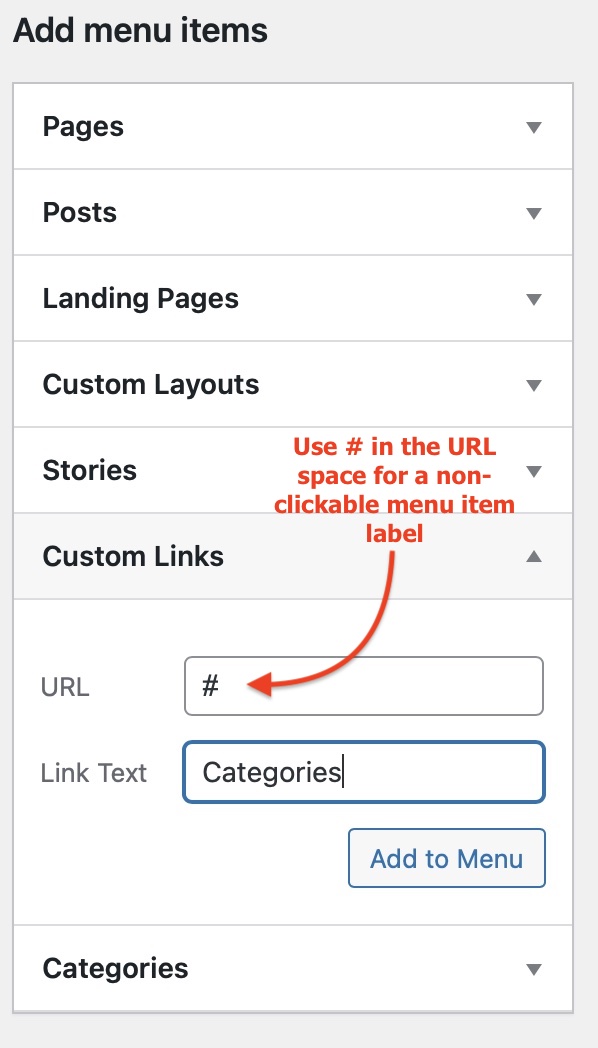
First, open the “Custom Link” dropdown. If you don't want the item title to be clickable, type a “#” in the URL box.
Then, title your custom link item. For this one, I used “Categories”. Then click “Add to Menu”.

Next, toggle down the “Categories” option and select the categories that you want to add to your drop-down menu, and select “Add to Menu”.
From here, you can click to drag and drop your menu items to get them in your preferred order. To nest them, simply drag them a little bit to the right and they will nest where you want them to go.
You can even nest multiple times by dragging farther to the right.
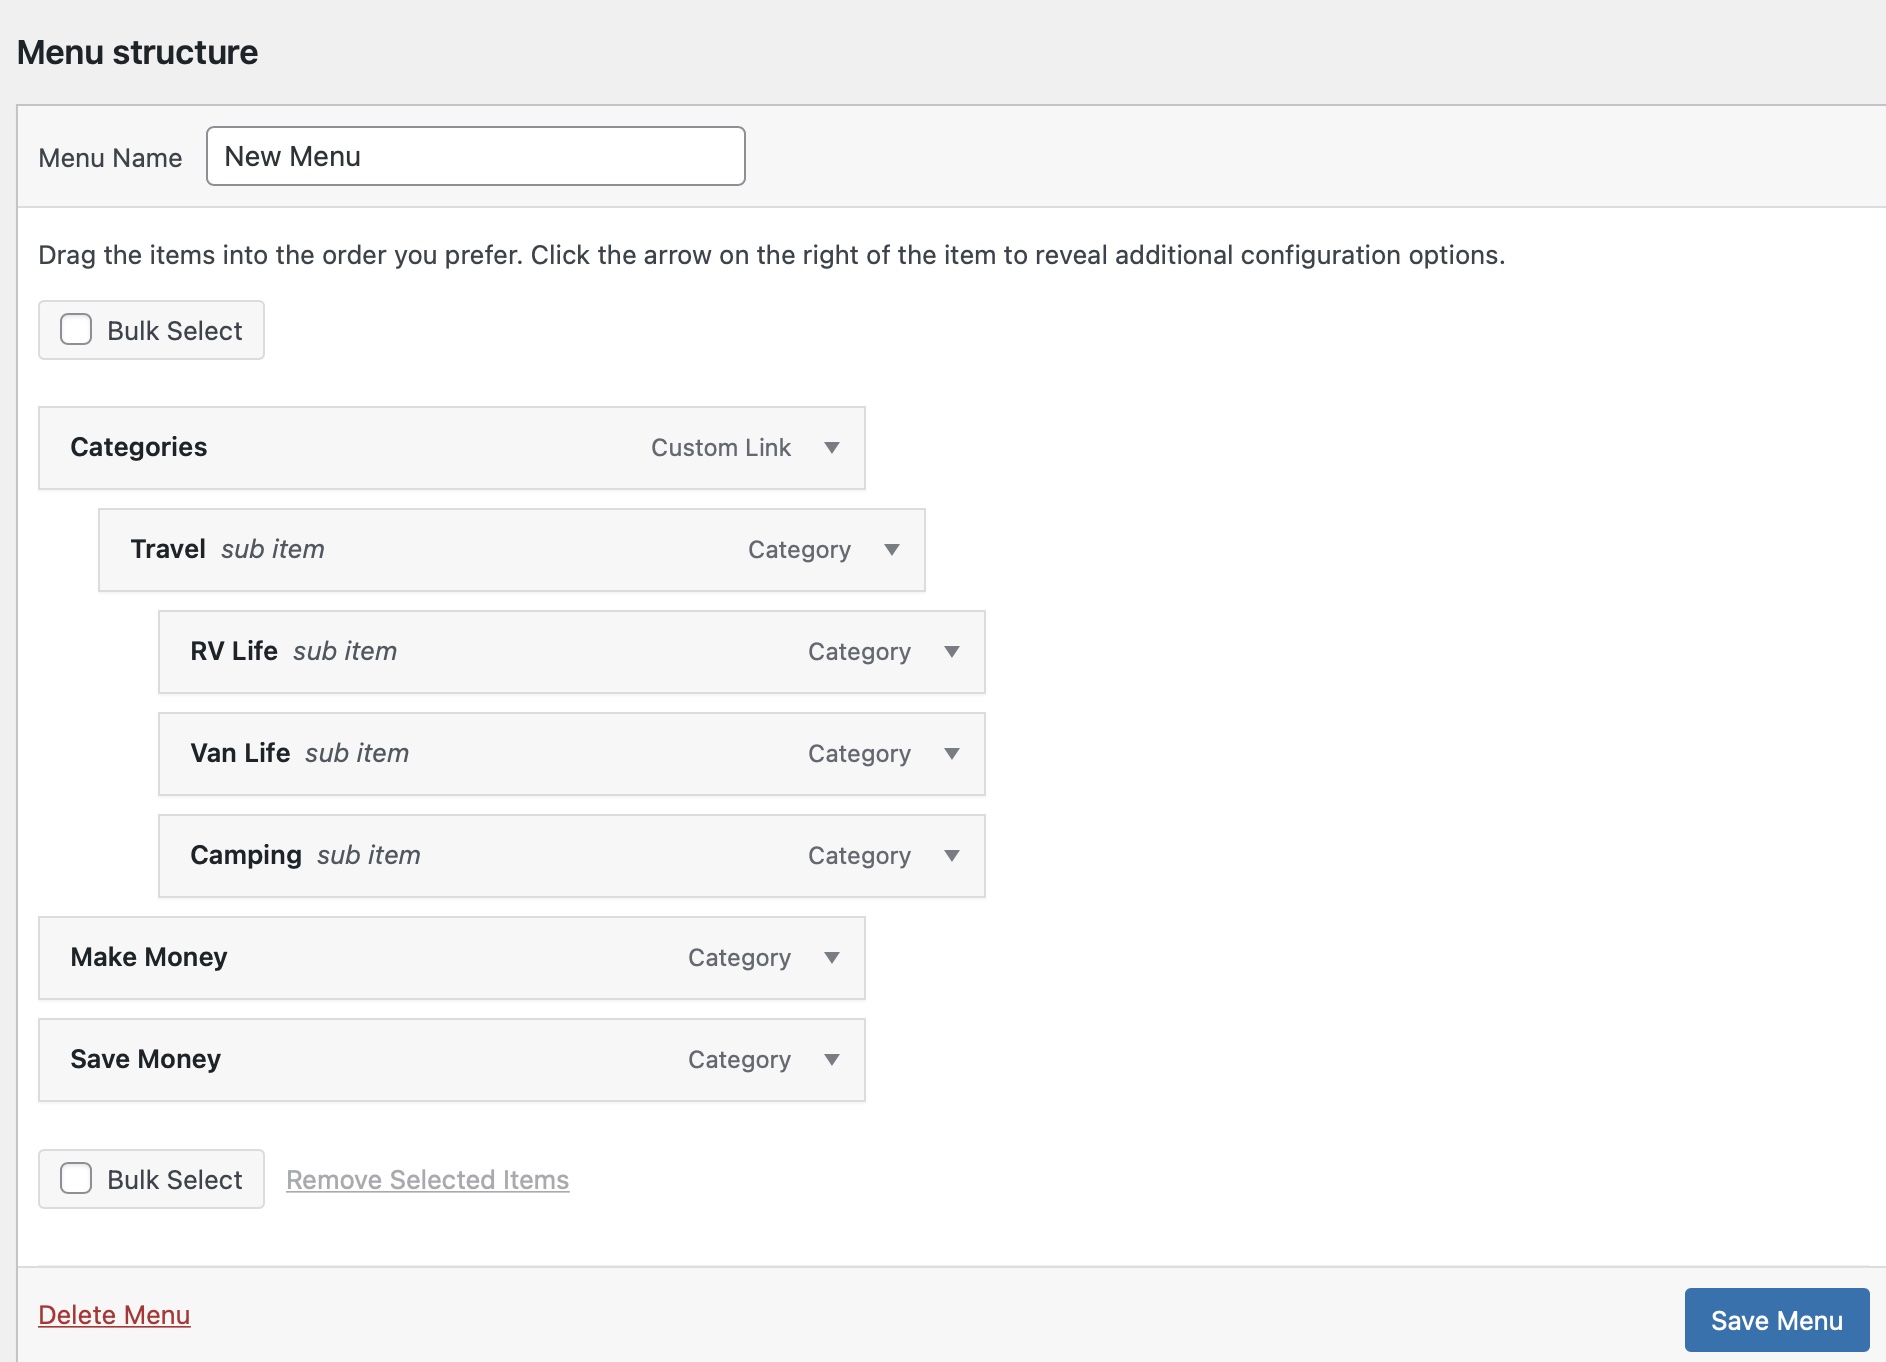
In this example, I nested all my categories under “Categories”. And then I further nested “RV Life” “Van Life” and “Camping” under the “Travel” Category.
Here's what that looks like on the front end of my website.
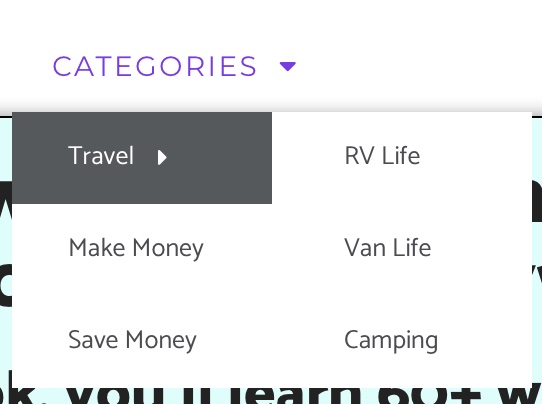
You can edit the appearance of your menu in your website's theme and customizer settings.
Additional Menu Settings

Depending on your theme, your website may support multiple menus.
At the bottom of your menu editing screen, you will be able to select additional settings for your menu. “Primary Menu” is the menu that is displayed at the top of your website on every single page by default.
Making Multiple Menus for Different Locations
Once you edit your primary menu in WordPress, you might want to create additional menus to place in other areas of your website.
For example, you might want to create a footer widget menu to hold links for things like:
- Privacy Policy
- Affiliate Disclaimer
- Contact Us Page
And if you'd like to know how to edit the footer in WordPress we've got you covered!
At the top of the “Menus” page in WordPress, you can select which menu you want to work on. Or if you haven't made any menus yet, click “Create a New Menu”.
Name your menus appropriately so you always know exactly which one you're working on.
Do you want to create a custom sidebar (or remove it) for your WordPress website? Learn how to add a sidebar in WordPress.
And always save your changes. I've said that a lot… because I've spent a lot of time editing menus only to have to redo them because I forgot to click “Save”. WordPress doesn't save menu drafts as it does for posts.
Wrapping Up
Learning how to edit your menu in WordPress is pretty straightforward. And, as you can see, you can do a lot with your menus.
You can customize the colors, background, and fonts of your menus in your WordPress theme settings. We have a list of the easiest WordPress themes here if you're looking for a user-friendly theme.
The Primary menu should serve as your high-level website navigation. Include things like your categories, top posts or pages, and/or your “About” and “Contact” page.
Your footer menu should hold things like your legal pages, contact pages, and any additional high-level pages you want to include on each page of your website.
P.s. There may also be a time when you also want to know how to hide a page in WordPress and for that we have you covered as well!
Want to learn step-by-step how I built my Niche Site Empire up to a full-time income?
Yes! I Love to Learn
Learn How I Built My Niche Site Empire to a Full-time Income
- How to Pick the Right Keywords at the START, and avoid the losers
- How to Scale and Outsource 90% of the Work, Allowing Your Empire to GROW Without You
- How to Build a Site That Gets REAL TRAFFIC FROM GOOGLE (every. single. day.)
- Subscribe to the Niche Pursuits Newsletter delivered with value 3X per week
My top recommendations


