How to Add a Sidebar in WordPress: 5 Step-by-Step Methods
When you buy something through one of the links on our site, we may earn an affiliate commission.
One of the first things you should consider when building your website is how easily your visitors will be able to navigate. A sidebar is often an important feature that allows users to skip around to the various parts of your site. But do you know how to add a sidebar in WordPress?
Even if you aren't the most tech-savvy person around, you can learn how to add a sidebar in WordPress in just a few steps (and we also have a quick and easy guide on how to remove the sidebar too). There are five simple ways you can go about adding this element to your niche site, and we are going to walk through each of them step-by-step.
Are you ready to learn more about improving the navigation of your site?
Let's get started!
Contents
Choosing a WordPress Theme with Sidebar Options
The first and easiest way to add a sidebar to your WordPress page is to select a theme that allows for plenty of sidebar options.
There are tons of WordPress themes for beginners that you can choose from if you know that you want a sidebar featured to organize your navigation or link to other parts of your website that aren't a part of your main menu.
For example, you might use a sidebar to:
- Showcase your latest blog posts
- Categorize topics
- Post a calendar of events
Designing your website can be quite time-consuming but you can save some time on the creation of sidebars by choosing one of these theme options:
- ColorMag
- Divi
- Trail
- Ink
- Palermo
- Bramble
This is by no means an exhaustive list of all the theme options you could use to install a sidebar widget. This simply gives you a nice selection of themes you could consider if you are open to revamping your website or building around one of these themes to begin with.
Once you have installed your new theme, head to the sidebar and select Appearance. From the menu, select Customize.

If your theme is compatible right off the bat, you will see an option for Global at the top of the Customize menu. This will bring up the ability to select Layout and then Sidebar Layout.
It will bring up a selection of images that you can choose from, depending on the placement of your desired sidebar. For example, you can select a right sidebar or a left sidebar.
Select which one you want to bring up a live preview of what the page will look like with your sidebar.
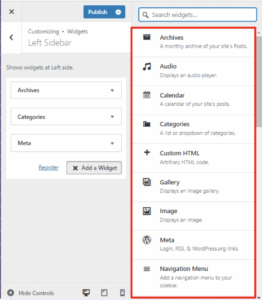
From here, you can add widgets to the sidebar area to customize what your visitors will see. Hit Publish when done.
Editing Sidebar with Widgets in Customizer
Another method for learning how to add a sidebar in WordPress is to utilize the Widgets function. This is very similar to the steps listed above, but it can help if your theme does not have specific sidebar layouts.
You will follow the same first few steps:
- Click Appearance and Customize.
- Select Widgets.
- Select Sidebar.
- Click Add Blocks.
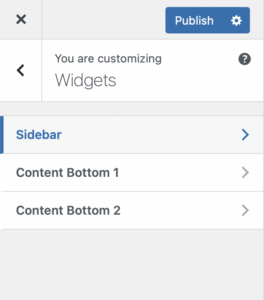
This will open up an entire list of blocks that can be added to your sidebar including quotes or text. It also opens up the possibility of adding a variety of widgets.
You can add social media icons, a calendar, the latest comments on your blog post, and more.
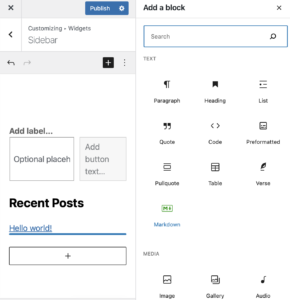
If the widgets don't pop up in the exact order you want them in, it's easy to move them around. Simply drag and drop them into order.
You can even retitle them or delete the titles from each widget.
Don't forget to hit Publish when you are finished perfecting your new sidebar.
Registering the Sidebar with WordPress
This method for learning how to add a sidebar to WordPress is a bit more complex and requires some knowledge of coding.
The first two methods are much simpler. You might also want to consider installing a plugin to help with your sidebar before you try to tackle registering it with WordPress on your own.
However, site owners who have some experience with coding may find this to be a simple process.
If you want to tackle this method, start by preparing to add code to the functions.php file. You will enter register_sidebar() along with the following string of code:

For more detailed instructions on how to label each section of code, WordPress put together a handy instruction template that provides examples.
You can also use this method to add multiple sidebars or a different sidebar. Instead of adding the code as register_sidebar(), you can instead add register_sidebars() to get multiple areas.
Customizing Widgets on the Dashboard
Once you have your sidebar made by adding the lines of code or through the Customizer, it is time to rearrange your widgets.
This can easily be done from the dashboard. Head back to your dashboard and click on Appearances from the menu on the left-hand side. It will open up a window with several options, and you will choose Widgets.
This will open up a new screen with all of the areas where you currently have widgets, including the sidebar and content on the bottom of your theme.
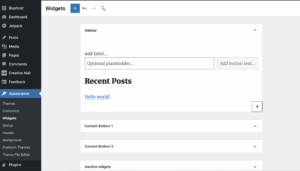
Once you have selected the sidebar option, you can click the tiny + in the bottom right-hand corner of the sidebar area. This will allow you to add blocks and widgets to your custom sidebar.
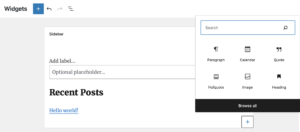
By clicking the black Browse All button, you can see the full list of widgets that can be added to your sidebar.
For this example, I selected a calendar to add to my sidebar. Once you have selected the widget you want to use in your new navigation menu, you can see that you have other options to customize it.
By the way, if you're interested in this kind of customization you may want to check out our step-by-step guide on how to edit the menu in wordpress.
Click the areas to direct the widget up or down in the order that you need it to go.
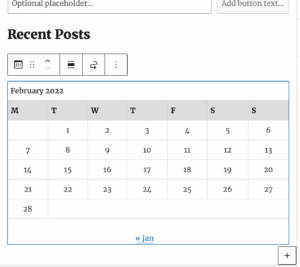
You could also click the six dots and drag your widget into the desired position if you don't want to move it around manually with the arrows.
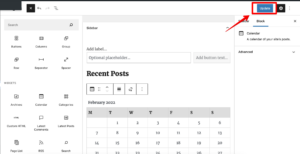
When you finish customizing this section of your site, don't forget to click Update in the upper right-hand corner of the screen.
Custom Sidebar Plugins
If all of the methods above still feel too cumbersome to you, then you might want to try installing a sidebar plugin. These are easy to use and take some of the coding and guesswork out of learning how to add a sidebar in WordPress (check out how to edit code in WordPress here).
Fortunately, many of them are also free options that you can use to improve the navigation of your site.
To get started, head back to the main menu on your WordPress dashboard. On the left-hand side, select Plugins. This will redirect you to the area where you can select and install a new sidebar plugin.
Decide which custom sidebar plugin you want to install and search for it. Select Install. When it is finished, you will need to click Activate to start using it.
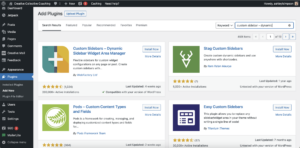
Here are some of our top picks for installing a custom sidebar on your page:
Custom Sidebars – Dynamic Sidebar Widget Area Manager
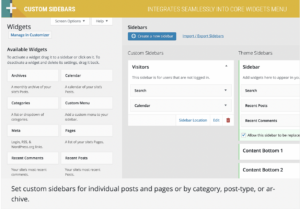
The first WordPress plugin that you may want to consider using is the Custom Sidebars – Dynamic Sidebar Widget Area Manager. It is a lightweight plugin that eliminates the need for involved coding.
This plugin allows you to reconfigure your widgets in a wide variety of ways, including on your:
- Pages
- Posts
- Categories
- Archives
Depending on what version of WordPress you are using, you may also have to install the Classic Widgets plugin to use Custom Sidebars.
I'm on the latest version of WordPress and had to go back through to reinstall this plugin before it would allow me to use the plugin (however it is sometimes possible to rollback WordPress plugins).
Once this is taken care of, you can go to Appearance and Widgets. It will open up a new window that looks nothing like it did before.
It is as simple as a few clicks of the mouse to start designing your new sidebar.
Easy Custom Sidebars
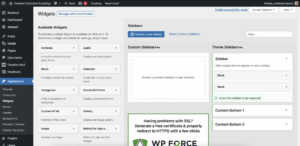
Another great plugin option to adjust your sidebars or navigation menus is the Easy Custom Sidebars. It is a little clunkier to use than the Custom Sidebars – Dynamic Sidebar Widget Area Manager but not impossible.
Compared to registering your code with the WordPress site, it is still a breeze to replace your current sidebars with custom versions.
After installing and activating the plugin, head over to your dashboard. Hover over the Appearances menu and select the Sidebar Replacement option to be directed to an admin screen.
This allows you to create your own custom sidebar by giving it a name and selecting which sidebar you would like to replace on the front end of the site.
Much like the other plugin for custom sidebars, Easy Custom Sidebars allows you to choose where your new sidebar will be displayed. You can select for it to be shown on all pages, on certain pages, and in certain categories.
Click Save Sidebar once all of your fields have been filled out, and then return to the Widget area of your Appearances menu.
Add the widgets that you would like included on your sidebar, and you will be done in no time!
If you get caught up in the process, the WordPress tutorial video at the top of the section should help.
Elementor
Elementor is another great tool that makes creating custom sidebars a cinch. We reviewed this tool in-depth in our Elementor review.
It is designed to help you build your entire website without entering a line of code, and it makes good on the promise.
Utilizing their theme builder is a great way to save time and avoid the confusing strings of code that are sometimes required.
The process is simple:
- Go to Templates and then Theme Builder.
- Select whether you want your new sidebar to display on a single post or single page.
- Choose a pre-made template that contains the sidebar and format you want or choose to create a custom template with two columns and a sidebar widget.
- Edit the sidebar widget and choose the sidebar you want to make changes to.
- Add widgets to your new sidebar area.
- Click publish.
If you prefer to walk through the process with a WordPress tutorial, this video shows you just how easy it is to drag and drop the various elements that you want to include in your sidebar.
Much like the first two plugins designed to help you create custom sidebars, Elementor has a free version you can use. Keep in mind that with this free version, you will not be able to access all templates or the Theme Builder.
Because these are crucial elements to building a sidebar, you may want to consider investing in a paid plan.
There are other programs similar to Elementor, so be sure to do your research on whether this is the right plugin for you. You can also investigate Thrive Architect or Oxygen Builder. Check out our posts on Thrive Architect vs Elementor and Oxygen vs Elementor.
Pricing
Pricing is based on how many sites you intend to use Elementor on. See the breakdown below to learn more about what you can expect to pay to get access to all of the features:
- Personal Plan (1 website): $49/year
- Plus Plan (3 websites): $99/year
- Expert Plan (1,000 sites): $199/year
I would recommend trying Elementor out on the free version before committing to a paid plan. You will have access to more robust features with a Pro plan, but you may be able to navigate around using their user-friendly interface without the need to pay for services.
Get Elementor HereWhich Method Will You Use?
There are tons of options available to you if you want to learn how to add a sidebar in WordPress. Whether you feel comfortable adding your own code or you prefer the simplicity of using a plugin, you can choose which method will ultimately work for you.
The two free plugins mentioned here will get the job done, but Elementor packs a powerful punch if you want to do more than just add custom sidebars to your website. Their drag-and-drop interface makes it ideal for new website builders who want to customize their page as much as possible.
We recommend trying Elementor today if you want to add custom sidebars and set up a unique template for your website!
Try Elementor Today
Get Elementor HereWant to learn step-by-step how I built my Niche Site Empire up to a full-time income?
Yes! I Love to Learn
Learn How I Built My Niche Site Empire to a Full-time Income
- How to Pick the Right Keywords at the START, and avoid the losers
- How to Scale and Outsource 90% of the Work, Allowing Your Empire to GROW Without You
- How to Build a Site That Gets REAL TRAFFIC FROM GOOGLE (every. single. day.)
- Subscribe to the Niche Pursuits Newsletter delivered with value 3X per week
My top recommendations


