When you buy something through one of the links on our site, we may earn an affiliate commission.
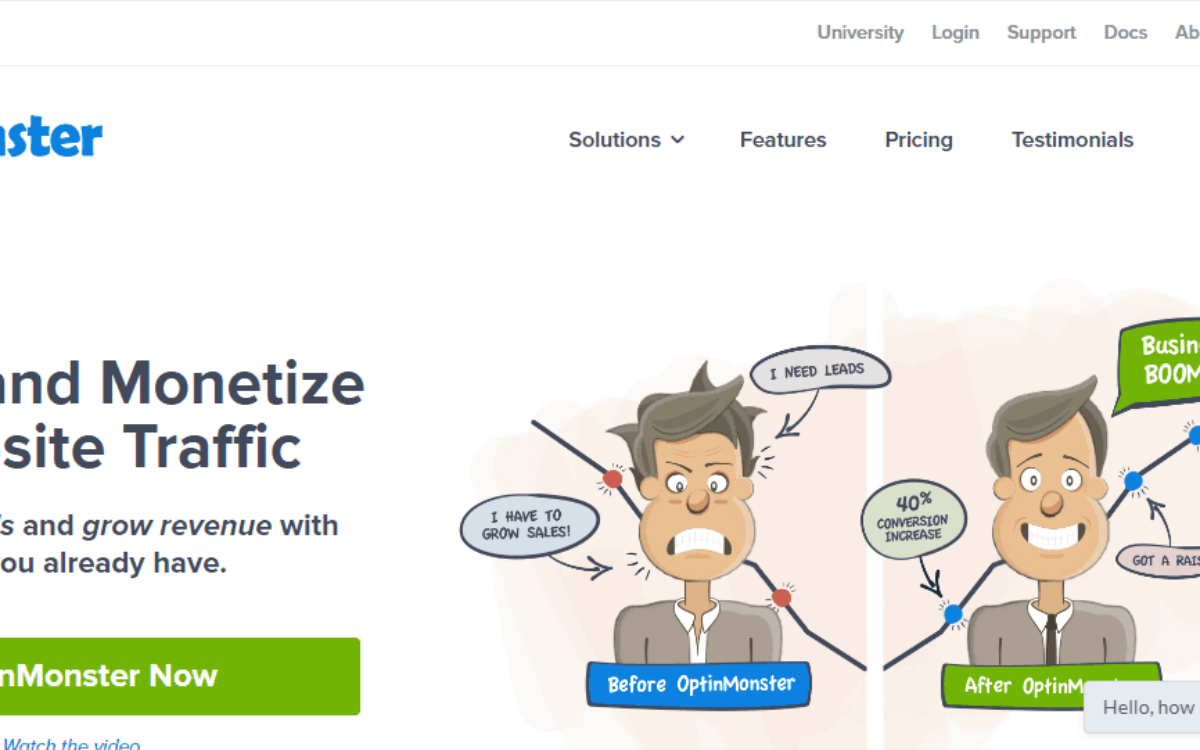
The statement “the money is in the list” is now a cliché on the internet and that proves the importance of building an email list for your business. Regardless of what you do online, you need a list of active subscribers you can always reach out to whenever necessary.
However, building a list is often a daunting task, and if you don’t have a useful tool that’ll simplify the process, it’ll be even more challenging, and that is where OptinMonster comes in.
OptinMonster makes it super easy to ask people to join your list at the right time and place.
Here’s the point:
People cannot give you their email without you requesting it. And you also need to make the request when a visitor is most receptive to joining your newsletter – and to carry out this task effectively, you need a tool to help you create and display beautiful and attention-grabbing email opt-in forms – OptinMonster is such a tool.
In my OptinMonster review, I’ll focus more on all the beautiful features of this list building tool. Then, I’ll go on to show you precisely how OptinMonster works and how you can use it to easily create, target, and manage your email signups.
Oh, and this very website you are on, NichePursuits.com does indeed use OptinMonster, so you can see it in action!
Check Out OptinMonster Right NowContents
OptinMonster Review
-
Ease of Use - 98
-
Stability - 100
-
Customer Service - 93
-
Price - 95
Summary
OptinMonster is by far the best Lead Generation and customer acquisition Platform for WordPress. With an unmatched feature set and an excellent set of proven conversion optimized templates, you can't possibly go wrong with OptinMonster. Check out OpinMonster Now.
Pros
- Several opt-in form types
- Features beautiful In-dashboard analytics so you can always see how your forms are performing
- An excellent variety of pre-made templates for your opt-in forms
- Straightforward to use, streamlined interface
- Well detailed triggering and targeting options, including exit-intent
- Integrates with all of the popular email marketing services
- Pretty easy A/B testing feature
- Detailed targeting features with a lot of flexibility, including the option to create multiple rule sets
- Very easy to manage opt-in forms for numerous blogs from a single dashboard
Cons
- Lacks automatic winner feature on the A/B testing (this is an essential feature)
- You are required to connect Google Analytics to see your stats
- OptinMonster form editor is not drag and drop
- OptinMonster usually comes out to be costlier than many similar WordPress lead building plugins because it uses SaaS billing
OptinMonster Review | A Quick Overview
OptinMonster is a cloud-based lead generation tool which was created by Syed Balkhi and Thomas Griffen in 2013. The software makes it super easy to build beautiful lead capture forms without having any knowledge of coding.
To put succinctly, OptinMonster is an all-in-one email capture and lead generation software and supports all the major opt-in form types.
With OptinMonster, you can easily:
- Create different opt-in form types with their intuitive visual editor
- Connect those forms to your preferred autoresponding service
- Show those forms on your website with detailed trigger and targeting rules
- View analytics and A/B split test your forms for further improvements
Since its launch, OptinMonster has garnered lots of positive reviews from happy users. Its user-friendly interface, customized opt-in form templates, and most importantly the ‘exit intent’ feature made it very popular among other similar tools.
Exit intent is a fantastic option for any serious marketer or website owner, and it wasn’t available in every tool as at when OptinMonster came into existence.
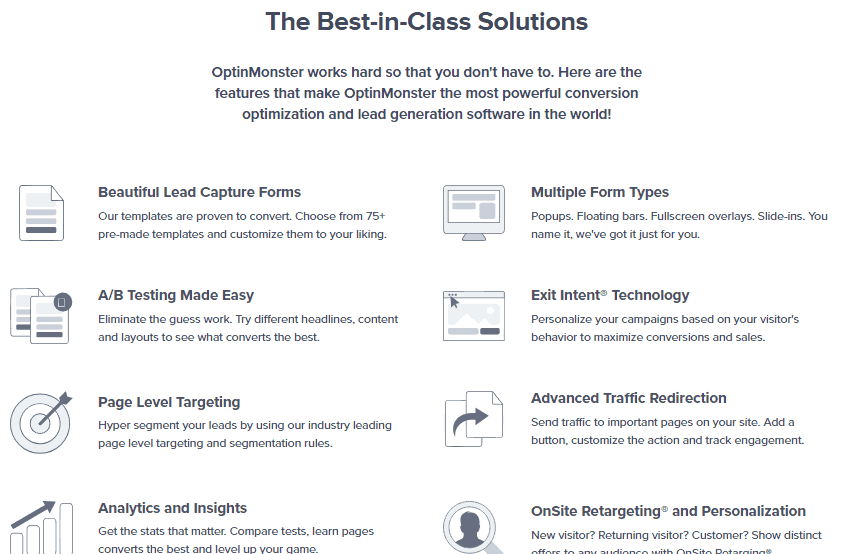
That said, here’s an overview of all the features that come with OptinMonster:
- Beautiful drag and drop form builder for good conversions
- Advanced page-level targeting
- Timely exit intent feature to convert ‘lost’ visitors
- A/B split testing
- Well-timed and beautiful popups
- Detailed analytics for the best results
- Full-screen welcome gate
- 2-step opt-in process with MonsterLinks
- Floating bars as an alternative to popups
- Mobile-specific popups for better conversions
- Attractive sidebar optin form
- Effective and simple scroll boxes
- After-post and in-line opt-in forms
OptinMonster Software | How To Use it to Create An Email Opt-In Forms
To fully demonstrate how OptinMonster works, let’s quickly go through a brief tutorial on how to actually use it to create an email opt-in form.
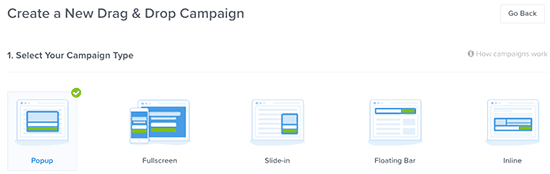
1. Create a new campaign
The first thing is to click the “Create Campaign.” Tab once you login to your account. A campaign is basically a specific type of form, which could be:
- A floating bar on a specific page
- A site-wide lightbox popup
You will likely have multiple campaigns running on a single blog; this is especially if you are promoting different products for different content on your website.
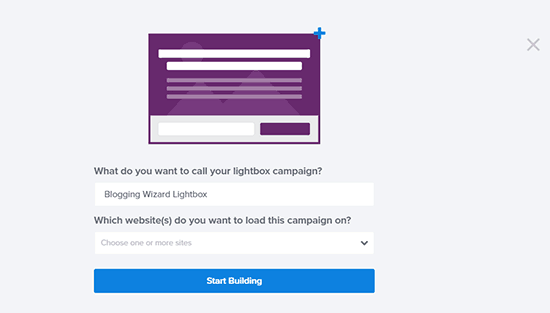
So after you’ve clicked the “Create Campaign” tab, the next step is to choose Your Campaign Type as we discussed earlier:
Depending on the campaign type you’re going for, you can also select a “Campaign Template.”
These templates are impressive because they let you quickly create a relevant opt-in form. My only problem with this is that OptinMonster displays these incredible graphics instead of an actual preview of the template, which makes it difficult to choose the right template for your needs:
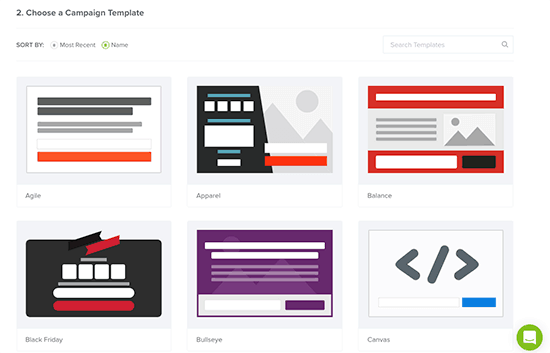
You have lots of options here. For instance, the “lightbox popup” campaign type comes with 25 different templates. And of course, you can always start from a blank template.
Once you’ve selected your preferred template, you will have to:
- Give your campaign a matching name
- Select which blog you wish to display it on (you can also leave it blank to do it later)
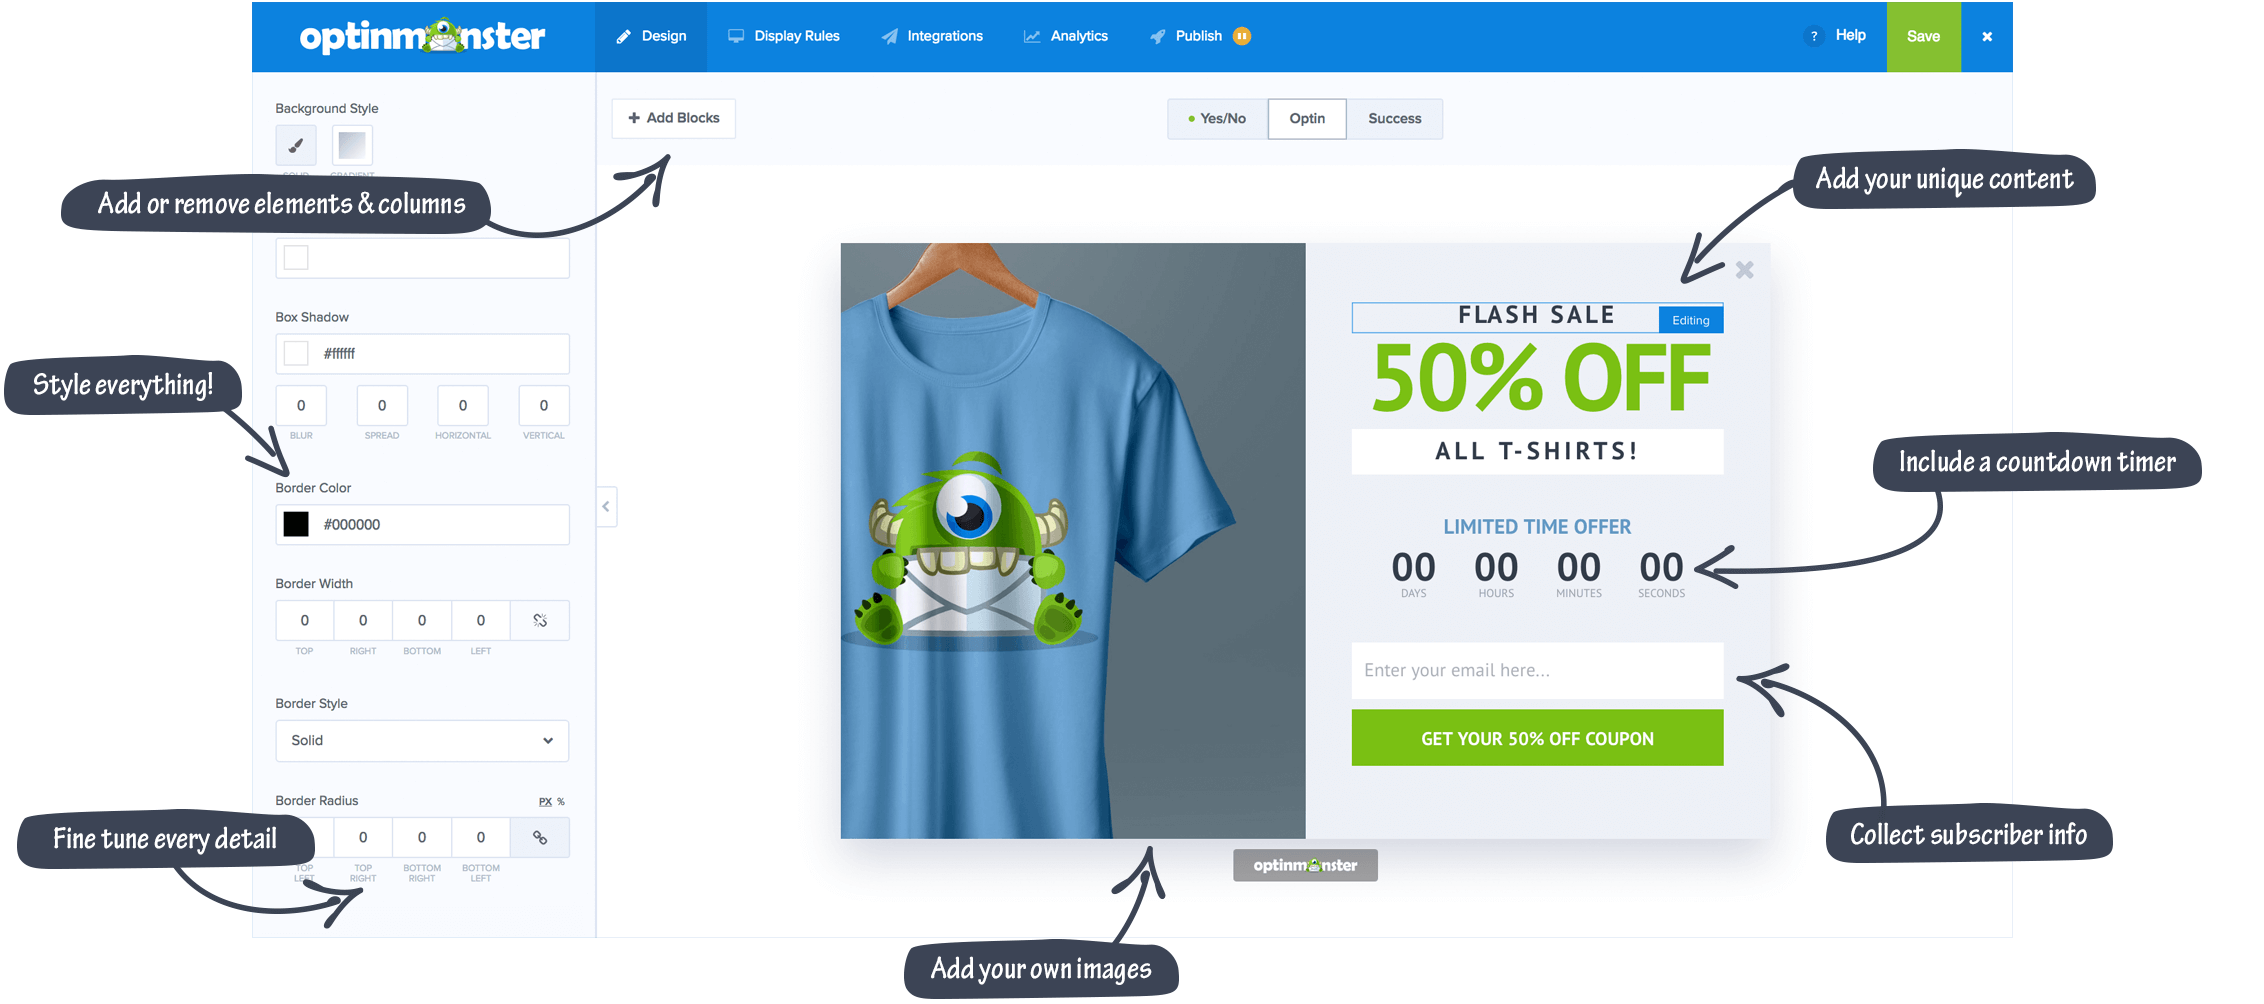
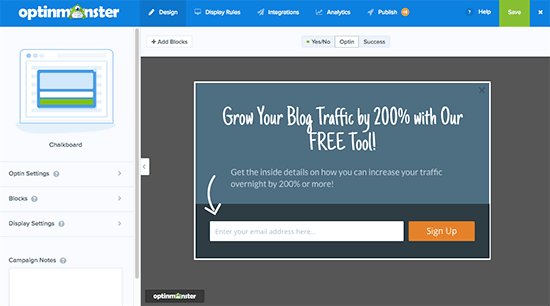
2. Configure your form in the editor
Once you’re done with the steps above, you’ll be taken to OptinMonster editor.
This interface is made up of 2 parts, which include:
- On the left is located the form configuration options, divided into different tabs
- Live preview of your form is shown on the right
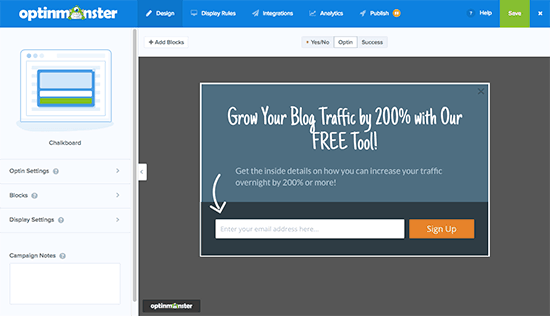
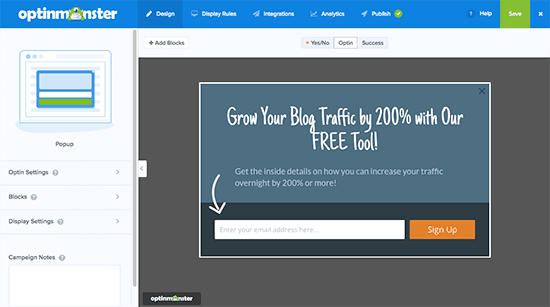
Interestingly, if you decide to change the text on your form at any time, simply click on the live preview and edit it:

Apart from that helpful feature, it also has 7 different tabs from where you can effortlessly configure your email opt-in form. I’ll quickly go through each tab below.
Display Settings Tab
In the Display Settings tab, the main thing that you’re expected to do here is to configure the Cookie Duration.
This will determine how long the form will be hidden if a visitor:
- Submits it (Success Cookie Duration)
- Closes it (Cookie Duration)
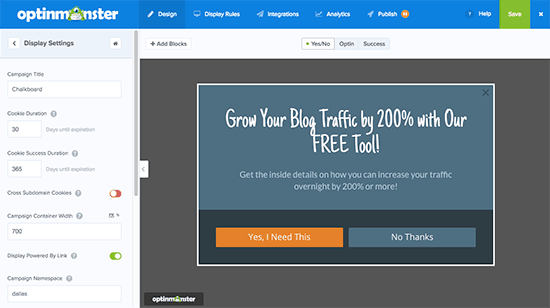
This is a standard feature for most opt-in tools, but it’s essential to use to avoid irritating your users with repetitive popups.
The Optin Tab
The Optin tab is where you will mostly configure the looks of your opt-in form.
On the optin tab, you can configure:
- Whether to show the name field together with to the email field or not
- Fonts
- Form field placeholders
- Custom CSS, if needed
- Colors for all the fields
It’s all spontaneous and done through simple color pickers or toggles:
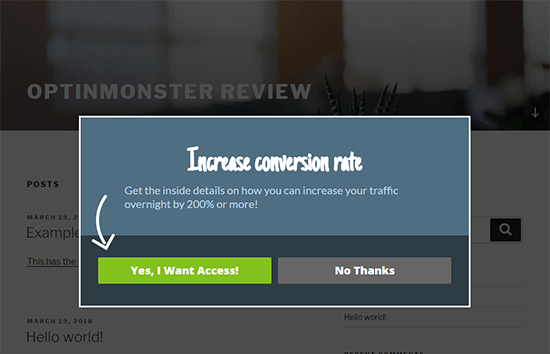
The Yes/No Tab
This is a pretty simple section that allows you to easily activate a negative option opt-out or 2-step opt-in.
When it’s turned on, your site visitors will first need to pick from two yes/no options before seeing the actual opt-in form:
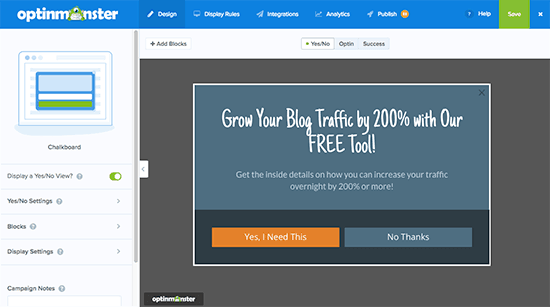
These forms harness the Zeigarnik effect to increase your conversion rate.
However, I personally find these forms horrible when they go too negative with the NO button as you can see here. But they can certainly be effective when done right. And OptinMonster has lots of examples of how to do it right.
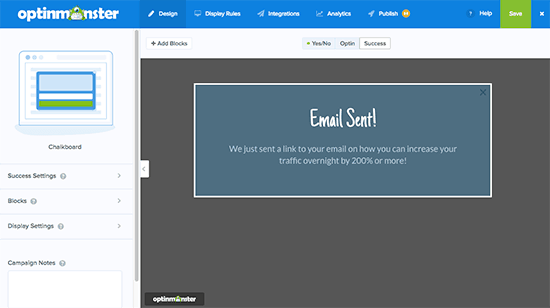
The Success Tab
The Success tab allows you to set what happens after a user submits your form.
Here, you can either:
- Show a success message
- Take them to another page
- Close the campaign and display the current page
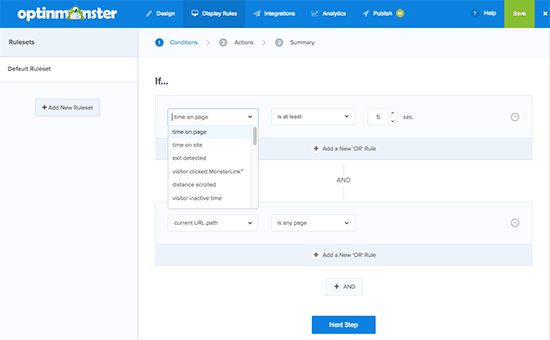
Display Rules Tab
This tab contains some of the most powerful features of OptinMonster.
In a simple term, these allow you to control:
- When your opt-in form comes up
- On what pages your opt-in form displays
- To which types of visitors your opt-in form shows
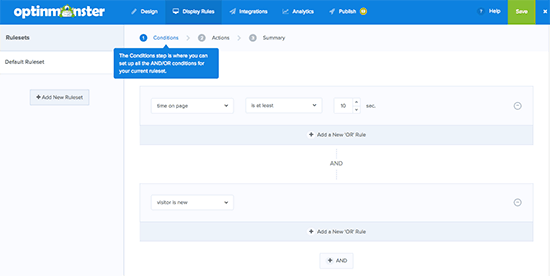
Furthermore, OptinMonster gives you a bunch of options. Your popup can be triggered by:
- Time
- Exit-Intent (this is one of the most popular features of OptinMonster because they trademarked it)
- Click (for two-step optins)
- Scroll-depth
- Inactivity
- Based on the user’s local time (this is a trigger that is very rare)
That’s not all; you also have another big list of targeting options. Apart from the basics like the ability to target specific pages, you can equally target by:
- Campaign interactions
- Pageviews
- Geolocations
- Visitors using Adblock
- Referrer
- Specific URL anchor/parameter
- Cookie
And here’s my favorite feature:
You can create a lot of different rulesets for a single campaign; this is a feature that’s lacking on most other similar tools.
This means you could create a single ruleset that tells the campaign to show:
- On page A
- Activated by exit-intent
And a second ruleset that triggers the same campaign to show:
- On page B
- Only for US visitors
- After 2-seconds
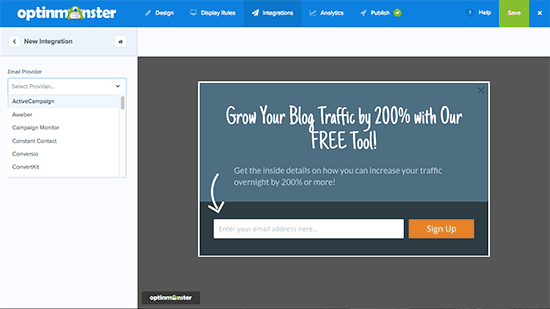
The Integrations Tab
This is where you can sync up to your favorite email marketing service, of which OptinMonster has a very long list:
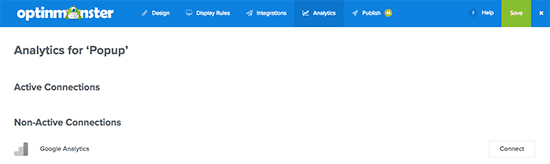
The Analytics Tab
Finally, the Analytics tab allows you to easily connect OptinMonster to your Google Analytics account to configure tracking. It’s somewhat strange that OptinMonster compels you to connect to your Google Analytics account to view data when no other tool does it this way.
But for the fact that most webmasters nowadays are probably using Google Analytics, I don’t see this as a big downside.
3. Publish your opt-in form
Once you’re done configuring your form, the next step is to click the Publish button located in the top right corner.
After which you’ll decide on which site to publish it to and also choose the platform:
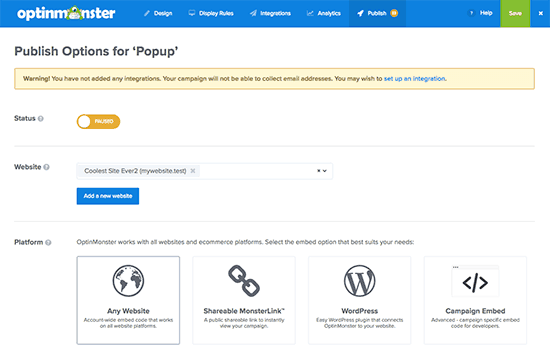

Additionally, while you can add OptinMonster to any type of site through a code snippet, there’s equally a dedicated OptinMonster plugin that simplifies the entire process.
To use the plugin, just input your API key (which you can effortlessly create in your OptinMonster account).
After that, you can now manage your campaigns right from the WordPress dashboard:
And then your popup will instantly start showing!
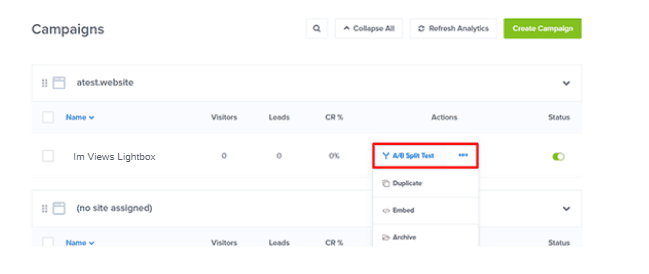
Creating A/B Split Tests, Viewing Analytics, And Managing Your Campaigns
After your campaign is live, you can still carry out some other critical actions from the campaign’s management area.
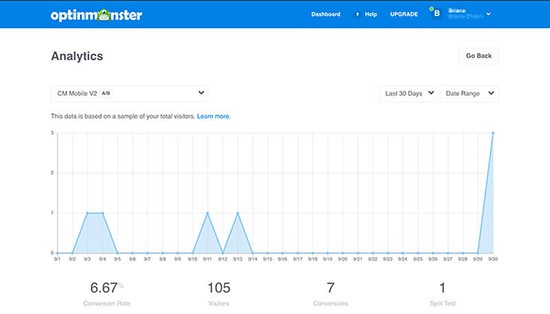
First of all, you can always see conversion rate stats from your OptinMonster account:
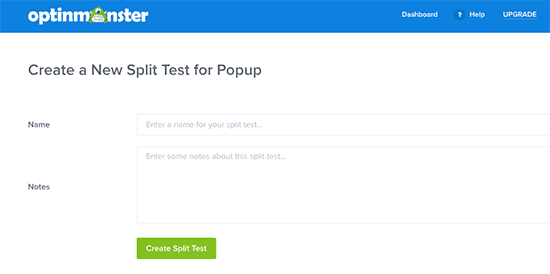
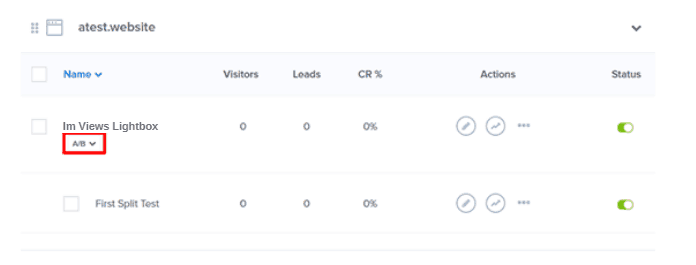
Then, if you decide to improve on those rates, you can quickly set up a new A/B split test:
And when you set up a new split test, you will be taken to a page where you’ll have to enter your split test’s name and notes. Then, you’ll be redirected back to the normal campaign editor to set up your variant:
The most helpful thing here is that you can test everything. This means that beyond the basic text changes, you can equally test how your conversion rate is affected by different display rules.
Then, you’re also able to view how the 2 compare in your main dashboard:
Why You Should Get OptinMonster Today
We’ve talked about the entire OptinMonster interface in the last section. So in this section, I want to talk about some specific things I think OptinMonster does better in comparison to other tools, which is why I suggest you give it a try.
1. It lets you create a variety of different campaign types
If you wish to experiment with different opt-in forms beyond the regular lightbox popup, OptinMonster gives you ample options (and you may be interested to learn how OptinMonster compares with other options in our list of the best WordPress popup plugins around).
You can go super overboard with fullscreen fillers or popups – or you can go with something a bit less disturbing such as a:
- Floating bar
- Slide-in
- Sidebar opt-in form
- Inline/after post opt-in form
And one really awesome feature of OptinMonster is its dedicated mobile popup campaign (just ensure to use display rules to prevent Google’s mobile popup penalty):

2. OptinMonster is ideal for people with multiple blogs
This won’t apply to everybody actually – but if you operate multiple blogs, the fact that OptinMonster is a cloud-based tool instead of a WordPress plugin will make your life a lot easier.
Because with a WordPress plugin, you’re always required to log in to each website’s dashboard to manage its opt-ins – and that wastes a lot of time.
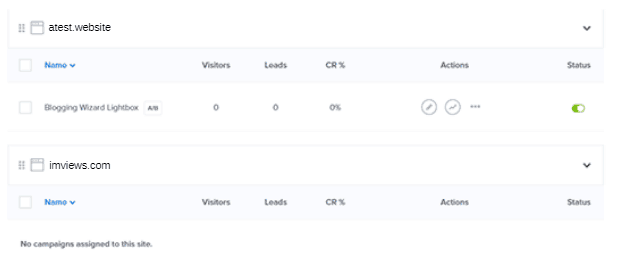
On the other hand, OptinMonster makes it possible to easily manage all of your sites and opt-ins from a single interface:
If you’re already struggling to manage multiple blogs, this will definitely make your life a lot more convenient.
3. The pre-built templates make it super easy to get started
Except you’re a designer, staring at a blank canvas probably fills you with a deep sense of terror (maybe you don’t feel that way, but that’s how I usually feel in such case!).
Which is why I so much love and use templates. And good enough, OptinMonster doesn’t disappoint at all when it comes to templates.
And depending on the type of form you’re creating, OptinMonster will usually give you anywhere from 12 to 25 premade templates, which you can use as a base:

Then, you’re just required to use the simple visual editor and customize the colors, text, and images, and you’re good to go!
Crazy right?
That’s much better than trying to create everything from scratch.
4. OptinMonster’s interface is sleek and amazing
Another thing I admire about OptinMonster is the user interface. It makes building your opt-in forms less challenging than most other similar tools I’ve used.
So instead of clicking around to a lot of different screens as you do in most WordPress opt-in plugins, OptinMonster puts pretty much all of the functionalities into a set of tabs – and no page reloads are required (helping make it our choice for best opt-in plugin for WordPress):
Regardless of being one interface, it never feels messy, and you’ll never sacrifice any functionality. I doubt if there’s any argument that, compared to something like Thrive Leads (a similar tool), OptinMonster’s interface is a lot more straightforward.
5. The dedicated WordPress plugin makes for easy implementation
Understandably, you might be a bit worried that OptinMonster will be challenging to integrate with WordPress because it’s a cloud SaaS tool instead of a WordPress plugin.
But you don’t have to be!
OptinMonster was actually launched as a WordPress plugin, and the developers haven’t really forgotten their WordPress roots.
Excitingly, OptinMonster provides a dedicated WordPress plugin that allows you to manage your campaigns from your WordPress dashboard.
It’s pretty simple and, aside from the fact that you will still need to create opt-ins in the cloud interface, you’ll never discover that OptinMonster was not a dedicated WordPress plugin.
6. It offers detailed targeting options, and you can apply multiple rules
One of the features of OptinMonster that made it a preferred choice over other similar list building tools is its explicit targeting and triggering rules, which we’ve pretty much covered earlier.
But in addition to that, you also have access to in-depth features that allow you to create everything from “exit-intent triggers” to targeting based on geolocation or cookie:
And the really cool feature is the fact that you can actually set up multiple display rules for each of your campaigns and even A/B split test different display rules against each other to figure out which combinations work best.
7. Easy A/B split testing makes optimization accessible to anyone
A/B split testing is a potent tool that helps you enhance your opt-in forms effectiveness by letting you test two or more variants against each other to find out which one performs better.
Interestingly, OptinMonster makes it super easy to set up A/B tests for your opt-in forms right from your dashboard. With just a few clicks, you can to test all aspects of your opt-in forms, including different targeting and triggers.
However, the only notable feature that’s not here is the “Automatic Winner” functionality, which allows you to set criteria to declare the higher-performing opt-in form the winner automatically.
While skipping this functionality is not a deal breaker per se, it does make things a bit more automated and Thrive Leads (OptinMonster’s strong competitor) does offer this feature.
OptinMonster Pricing | How Much Does it Cost?
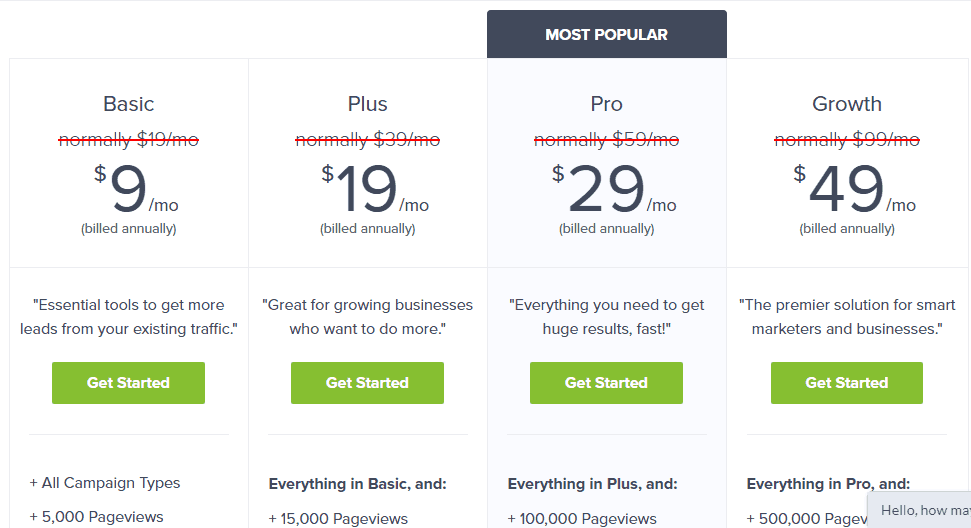
OptinMonster currently has 4 different paid plans. Unfortunately, OptinMonster currently has no free version.
The plans start at $9/month ($108 billed annually) and go up to $49/month (billed annually).
And each plan comes with a different feature list, and some of the features I mentioned in this post are not available in the more affordable tier, so you have to pay attention to the features if a specific function was what drew your attention.
Finally, it’s worth mentioning that, OptinMonster now has a page view limit that increases with each plan.
Is OptinMonster Worth Your Money?
OptinMonster isn’t the most cost-effective way to build an email list, but it’s one of the most flexible, stress-free, and powerful.
Therefore, if you can afford it, I think OptinMonster is fortified with the best feature sets that you’ll find in any similar tool. And for the fact that you can manage all of your websites from a single dashboard makes it the best option for busy webmasters running more than one site.
Alternatively, if you’re low in budget, then you might consider another tool like Thrive Leads.
While you’re required to manage each site separately with Thrive Leads, and while it lacks some of the more advanced targeting functionality you’ll see in OptinMonster, it’s equally a one-time fee for lifetime updates, which makes it more pocket-friendly over the long haul, especially if you’re only running one website.
But apart from that, it’s also mighty in its own way!
Frequently Asked Questions About OptinMonster [FAQ]
1. Who is OptinMonster built for?
OptinMonster is ideal for bloggers, marketing agencies, eCommerce websites, and all small businesses. If you really desire to grow your email list, enhance your website conversions, and significantly minimize cart abandonment, then OptinMonster is for you.
2. Am I required to have coding skills to use OptinMonster?
NO!
With OptinMonster, you're able to create and customize attractive lead capture opt-in forms from their vast collection of templates without any coding skill. It has a user-friendly interface, so you can easily create and A/B test high converting lead-capture forms on your own without hiring a developer.
3. What do I need to use OptinMonster?
You can use OptinMonster on nearly every website platform on the web, and it easily integrates with most major email marketing services out there. You're only required to have a website where you can embed custom JavaScript in the body of your site’s pages.
4. Can I also use OptinMonster on a client website?
Yes, you're 100% free to use OptinMonster on your client websites. You can register for their Growth Plan to get extra features such as Sub-Accounts, Account Management, Custom Branding, and everything else you'll need to deliver a great experience for your clients.
OptinMonster Review | Conclusion
As you can see, OptinMonster is one of the best tools you can get for your online business. It does not matter what business you’re doing on the internet, you need active leads – and OptinMonster will make the process of generating those leads effortless for you.
I especially love the fact that you can create and manage your pop-up campaigns via a purpose-built interface – which means that you’re no longer constrained by the limitations of doing everything via the WordPress dashboard.
Moreover, the new features that have been added to OptinMonster make it undoubtedly the best email opt-in and custom popup creation software for WordPress users. Thanks to the varied collection of attention-grabbing templates, a feature-rich editor, and the different settings that control when your popups displays, on which pages they’re showing, and who can see them.
OptinMonster will help you to take your lead generation efforts to a greater height, and I’ll really suggest you give it a try immediately.
Check Out OptinMonster NowFinally, I’ll love to know if you’re also using OptinMonster for capturing email subscribers on your website. Do share your experience with us on the comment section. And if you like this post, kindly help us spread the word by sharing it with your friends.
Related Posts


Want to learn step-by-step how I built my Niche Site Empire up to a full-time income?
Yes! I Love to Learn
Learn How I Built My Niche Site Empire to a Full-time Income
- How to Pick the Right Keywords at the START, and avoid the losers
- How to Scale and Outsource 90% of the Work, Allowing Your Empire to GROW Without You
- How to Build a Site That Gets REAL TRAFFIC FROM GOOGLE (every. single. day.)
- Subscribe to the Niche Pursuits Newsletter delivered with value 3X per week
My top recommendations