4 Ways To Create Affiliate Links In WordPress: Add Manually Or Use Plugins?

When you buy something through one of the links on our site, we may earn an affiliate commission.
You’ve started a website with WordPress and started creating some great engaging content.
Now you need to add affiliate links to your posts. But, how do you do it?
In this article, I’m going to show you some free and simple methods to create and add affiliate links in WordPress. I'll also share some paid options that could be the more effective ways to save time.
[toc]
Contents
- 4 Methods for Inserting Affiliate Links in WordPress
- Rules About Amazon Product Images, Prices, and Reviews
- How to Create Amazon Tracking IDs
- How to Manually Insert an Amazon Affiliate Link
- How to Create Affiliate Links in WordPress with a Plugin
- How to Use Amazon OneLink
- 3 Important Affiliate Link Settings
- Affiliate Disclosures
- How To Add Affiliate Links To WordPress
4 Methods for Inserting Affiliate Links in WordPress
To start off with, here are four different ways you can add affiliate links to a WordPress website.
This might be a personal blog, an affiliate website, or an ecommerce store. These methods will work for any type of WordPress site.
1. Manually
Manually inserting links is the most straightforward way to add affiliate links to your WordPress site, and it's the method used by most users.
It’s free and only requires you to copy and paste your link from an affiliate program into your blog posts.
The downside is that it can take quite a long time, especially when you have a lot of articles and links to add.
When should you use this method?
You should start adding affiliate links to your blog manually as soon as possible.
If you’re focusing on the Amazon Associates Program, there are a lot of options for adding affiliate links using WordPress plugins. However, to use these plugins, you need access to the Amazon API, which only becomes available after qualified sales on Amazon.
So, the sooner you add links manually and start making commissions, the sooner you can use a plugin to add links.
2. Using a Plugin
Using a WordPress affiliate linking plugin to add affiliate links has many benefits.
It can save you time and increase your affiliate commissions. This is because many of the plugins can do more than add links.
They can also add:
- Clickable images
- Product detail boxes
- Product comparison tables
- And more
More advanced features like click tracking are also possible with some of these affiliate link plugins.
Some popular affiliate link plugins for Amazon include:
- AAWP
- AmaLinks Pro
- EasyAzon
Later in this post, I’ll show you how to create Amazon affiliate links with the premium plugin AAWP.
When should you use this method?
As soon as you can use the Amazon API and have the budget for it.
The sooner you use a plugin to add affiliate links, the more efficient the process will be to add affiliate links to your site.
3. Link Cloaking
Link cloaking is a means of turning a long and ugly affiliate link into a friendly and readable pretty link.
You can do this in WordPress with a link cloaking plugin such as ThirstyAffiliates or PrettyLinks.
There’s a lot of debate and confusion about whether you should cloak Amazon affiliate links. Some people swear by it, whereas others have gotten their Amazon Associate account banned for violating the terms of use.
Also, cloaking Amazon affiliate links might not be the most efficient way of adding affiliate links in WordPress, because it adds another step to the process.
However, there are some benefits of using this method when using other affiliate programs. For example, once you’ve added a link with Thirsty Affiliates, you can update all mentions of a product or keyword on your site with an affiliate URL.
Some link cloaking tools, such as Pretty Links, also offer click tracking so you can determine which affiliate links on your site get the most clicks.
[button url="https://www.nichepursuits.com/thirstyaffiliates"]Try Thirsty Affiliates Free Here[/button]
or
[button url="https://www.nichepursuits.com/prettylinks"]Try Pretty Links Free Here[/button]
When should you use this method?
This method is best used when you want to link to a static sales page or home page of an affiliate product.
Best cases for this are SaaS tools or single product websites that offer independent affiliate programs.
4. Using a Service
Another method is to use a service like Geniuslink.
This service and WordPress plugin localize your links so you can make commissions internationally, an excellent way to increase your affiliate revenue.
Geniuslink automatically turns new and old product links on your WordPress blog into affiliate links, saving you time inserting different links for each country.
You also get a dashboard with advanced affiliate link tracking so you know which links and posts are performing the best. The only real disadvantage is that the more clicks you get, the more money it costs per month.
When should you use this method?
It’s best to use a service like Geniuslink when your affiliate blog is more established.
When your WordPress blog is new, the few clicks you get will unlikely convert into a commission, so you might want to wait until you have more traffic before using a service like Geniuslink.
Rules About Amazon Product Images, Prices, and Reviews
When adding Amazon product images and other details to your website, there are some important rules you need to know about and keep!
It’s against Amazon's policy to download and host Amazon product images from your WordPress hosting.
This is also the case for product prices and customer reviews.
The only way you can show images and these other details is through the methods I shared above. That is, by manually copying and pasting the image code that Amazon provides or using their API.
If you add any of these things a different way, it might violate the Amazon Associates policy and result in a banned account.
How to Create Amazon Tracking IDs
Before you can add affiliate links with Amazon, you’ll need to sign up for an Amazon Associates account here.
Then, after you log in, you’ll need to create and select an Amazon Tracking ID.
Tracking IDs allows you to differentiate between products, categories of products, or even websites.
Hover over your account name and click 'Manage Your Tracking IDs.'

You’ll see your Tracking ID selected here and you can add a new one by clicking the “Add Tracking ID” button.

In the popup box, add some text for your Tracking ID. It can be anything you like, but it needs to be unique. If your preferred tracking ID is already in use, Amazon will make some suggestions.
Then click the Create button.
This example tracking ID is to assign the blog it’s for and the current year.

The Tracking ID ends with -20 to assign it with the .com version of Amazon. Other international Amazon sites have different numbers, for example, the UK is -21.
Once you’ve created your Amazon Tracking ID, select in from the box on the same page.

Now you can start creating Affiliate links for different products on Amazon.
How to Manually Insert an Amazon Affiliate Link
To insert Amazon affiliate links manually, make sure you’re logged into your Amazon Associates account.
Copy And Paste From SiteStripe Bar
Browse to an Amazon product page and you’ll see the Amazon SiteStripe along the top of the page.

You can select Text, Image, or Text+Image to get a different type of output.
Then choose the Tracking ID you want from the dropdown.

Which URL length you choose is down to preference, but there are some pros and cons for both.
The Short URL will look cleaner when your visitors hover over the link, but if you ever need to update your tracking ID, you’ll have to change every URL manually again.
Also, if you ever decide to sell your website, the new owner will have a colossal task switching out every link, which could put off buyers.
If you want to make it easier for yourself or a new owner in the future, then use the Full Link.
Click on Get Link and you’ll see the link for you to copy.
Now go to your blog post in WordPress and highlight the text you want to be an affiliate link.

[list type="number"]
- Paste the Amazon affiliate URL in the URL field
- Select all three options below - Open in new tab, nofollow, and sponsored
- Then click Submit
[/list]
For image links, past the code generated by Amazon into an HTML block, like this.

Add any other links or image links you want in your blog post and hit publish.
Here’s what your links will look like on the published post.

Create Links Inside Your Associates Account
Another way to browse products and generate links manually is from inside your Amazon Associates account.
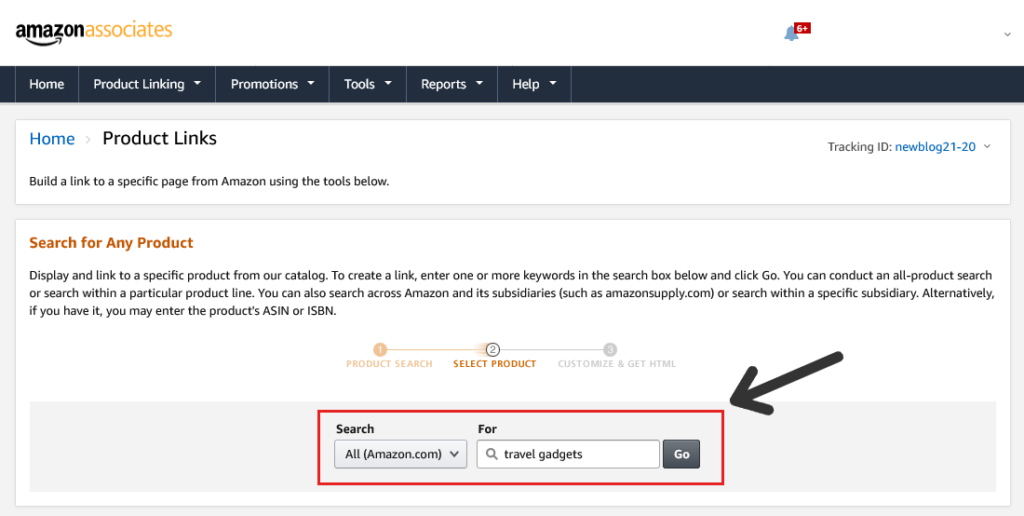
Navigate to the Product Links page from the navigation bar in your Associates account.
You can then use the search box to find the products you’re promoting from your website.

Scroll through the products and click on the arrow on the Get Link button.

You’ll see a popup with your affiliate link to copy.

If you want to make customizations to your link or get image links, click on the Build Link button.
Amazon Native Shopping Ads
The last type of affiliate links you can manually add to WordPress are Native Shopping Ads.
These are text links with images that show products related to the text in your articles.

This is a simple way of adding links to your blog posts by adding a small piece of code to your site. You only have to add the code once, and the Native Shopping Ads will show on every post.
Here’s how to add them to the bottom of every post using a WordPress plugin.
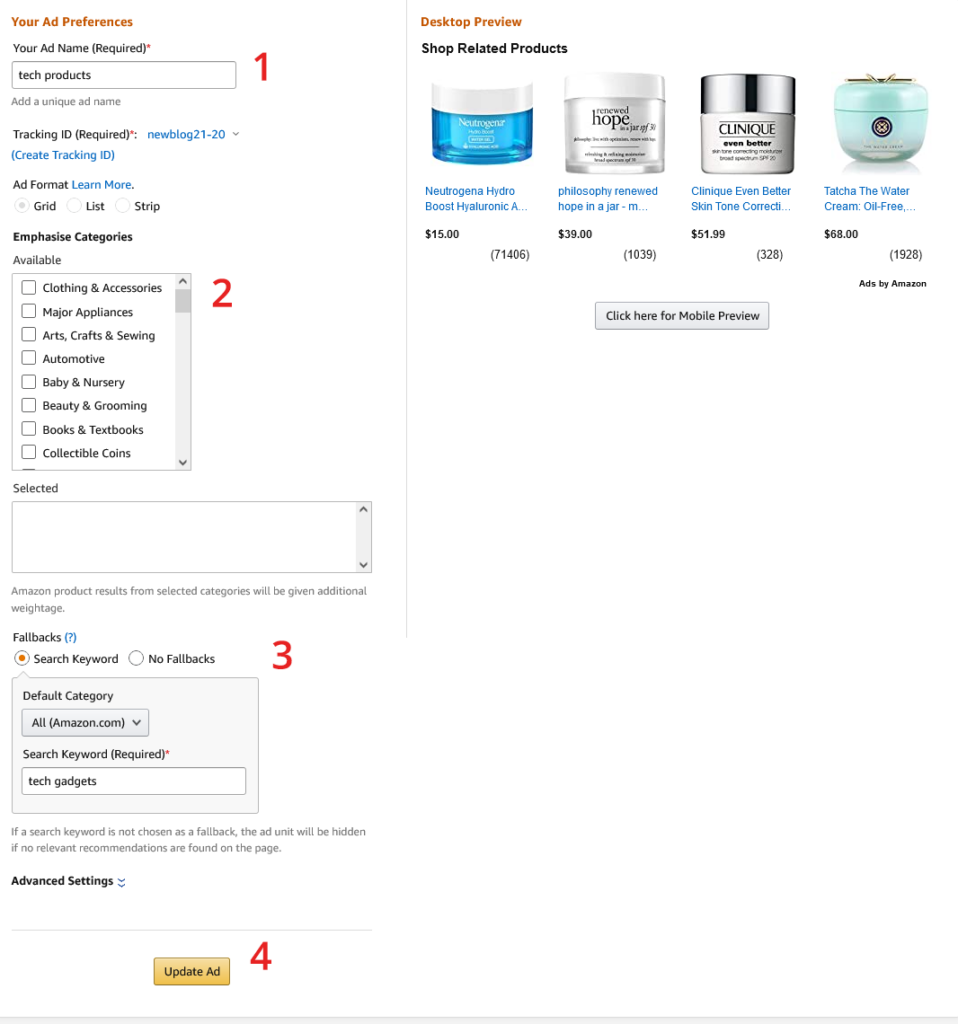
First, create the code by navigating to the Native Shopping Ads page, under Product Linking in the navigation bar.
Then click Recommendation Ads at the top of the page.

On the next page, select your settings to generate the code for Native Shopping Ads.

- Give your Native Shopping Ad a name, choose the correct Tracking ID and Ad Format
- You can also select multiple product categories to narrow down what products will be displayed (optional)
- Then under Fallbacks, choose search keyword and add a generic keyword that describes the products you promote
- Click Update Ad
You’ll see a popup with your Native Shopping Ads code.

Copy the code and head over to your WordPress admin to install a plugin.
On the plugins screen, search for Add Widget After Content.
Install and activate the plugin and navigate to its settings under Appearance > Widget After Content.
You can choose where you don’t want the Native Ads to show (and you may be interested in our guide to native ad platforms). By default, they’ll show up on every page of your site.
To only display them on blog posts, select everything except “post” and click Save Changes.

Now, you will see a new widgets area called After Content under Appearance > Widgets.
Add the HTML block to this widget and paste the Native Shopping Ads code you copied earlier and click Update.

Now, Native Shopping Ads will show on each blog post you publish.

Don’t be alarmed if you don’t see them showing straight away.
Sometimes it can take several hours to a few days for the code to pick up the right products to show.
How to Create Affiliate Links in WordPress with a Plugin
There are also plugins that you can use to add affiliate links to content in WordPress.
These are mostly paid plugins but many come with free trials so you can test them out before committing!
AAWP
AWWP is a really helpful plugin for Amazon affiliate sites - you can read our full AAWP review here or visit their site for more info here.
It supports localization for 20 countries, custom templates, and affiliate click tracking with Google Analytics.
Here’s how you can add an Amazon product box to your affiliate review post.
Download the plugin from your account and upload it to your WordPress site.

Activate the plugin and enter your AAWP license key.

Then click on the Amazon API tab and enter your Amazon API Key and Secret Key, choose the Country and Tracking ID, and save your settings.

Then to add a product details box into your blog posts, choose the post you want and add the shortcode: [amazon box=”ASIN"] replacing ASIN with the Amazon product ASIN code.
Like this.

Update your post and take a look.

There are many settings you can experiment with to add or remove information, customize colors and layouts.
AmaLinks Pro
Similar to AAWP, AmaLinks Pro allows you to add Amazon product feature boxes, text links and images, and more.
They also have a cool feature for those of you who don’t yet have access to the Amazon API, so you can use the plugin even before making a sale on Amazon.
Read our AmaLinks Pro Review here.
Lasso
Lasso is another Amazon affiliate plugin with lots of customizations available.
You can add attractive product detail boxes, images, and links and it will even tell you about broken affiliate links you have.
Lasso can also be used with other affiliate programs, making Lasso one of the few plugins for managing multiple affiliate accounts from one place.
We did an interview with Matt Giovanisci about Lasso if you'd like to hear more about it from the plugin's creator.
TableLabs
TableLabs lets you create Amazon product comparison tables in record time.
Product comparison tables are a great way to increase commissions by showing a list of products you’re reviewing at the top of the post.
It will also track clicks and conversions based on how many times a visitor sees a table vs how many clicks the table gets.
How to Use Amazon OneLink
Amazon OneLink is a free feature made by Amazon for Amazon Associates to turn their links into localized international links.
An excellent way to increase your affiliate revenue once your affiliate site gets more traffic from countries outside the US.
In fact, ProBlogger founder Darren Rowse used OneLink to earn an extra $1500 in a three-month period after implementing the tool. You can read his case study here.
To add OneLink, you’ll first have to apply to the Amazon Associates program in other countries.
The most obvious ones would be:
- UK
- Canada
- Australia
To find out which countries you should apply for, you could check your Google Analytics to see where your traffic from other countries is coming from.
Once you’ve created your international accounts, you can connect them to your US account.

Here’s a complete guide on the Amazon website.
After you’ve connected your other accounts, every time someone outside the US clicks on one of your affiliate links, they’ll be redirected to their local Amazon store.
3 Important Affiliate Link Settings
Whether you’re adding affiliate links manually or with a plugin, there are a few link settings you’ll want to enable.
Whichever plugin you decide to use, make sure you check the plugin settings to enable each of these.
These settings are called URL attributes which are used for SEO purposes and to prevent your visitors from completely leaving your site.

Open in New Tab
The target attribute or open link in a new tab should be set to _blank.
Adding a link manually in Gutenberg is simply enabled by selecting 'Open in new tab.'
Adding this setting to your links will open the affiliate product in a new tab or window, which keeps the reader on your website longer.
Nofollow
The nofollow rel attribute prevents Google from following the affiliate link.
Nofollow should always be selected when linking to affiliate products or your website could receive a manual penalty. That means your site could stop showing up in Google results.
Sponsored
The sponsored rel attribute is fairly new, which Google has deemed important for assigning affiliate links with.
It is only a recommendation from Google though so it doesn’t seem as important as nofollow.
Affiliate Disclosures
It is required by the FTC to state clearly that links on your website can generate a commission.
The FTC website outlines the details in a reasonably informal article here.
For more details on what your Amazon affiliate disclosures should say and how to add them, you can follow this full guide here.
How To Add Affiliate Links To WordPress
There are several ways to create affiliate links in WordPress. Most new bloggers will add them manually until they can use a plugin.
There are lots of plugins to choose from, but they mostly offer the same thing, speeding up the process and potentially increasing commissions.
There are many places to insert your affiliate links on your website, social media, and YouTube.
If you haven’t yet started your affiliate blog, check out our full guide on how to start a blog. Once you’ve built your site and started getting traffic, you can add affiliate links and start making money.
Good luck!
Want to learn step-by-step how I built my Niche Site Empire up to a full-time income?
Yes! I Love to Learn
Learn How I Built My Niche Site Empire to a Full-time Income
- How to Pick the Right Keywords at the START, and avoid the losers
- How to Scale and Outsource 90% of the Work, Allowing Your Empire to GROW Without You
- How to Build a Site That Gets REAL TRAFFIC FROM GOOGLE (every. single. day.)
- Subscribe to the Niche Pursuits Newsletter delivered with value 3X per week
My top recommendations


