Google Analytics for Blogger Needs: Your Survival Guide To GA4

When you buy something through one of the links on our site, we may earn an affiliate commission.
This is a complete guide on Google Analytics for blogger, niche site, and affiliate marketing site owners.
Plus, if you haven't yet switched from Universal Analytics to Google Analytics 4, then this is the guide for you.
This is an important move to make because Universal Analytics will be discontinued on July 1, 2023. You'll want as much historical data in GA4 as possible, so the earlier you switch, the better.
This guide will cover:
- Some differences between UA and GA4
- How to create a Google Analytics account and GA4 property
- How to add GA4 tracking ID to your WordPress blog
- Main GA4 features and how to use them
- And lots more related to Google Analytics for bloggers.
Let's dive in.
Contents
Universal Analytics vs Google Analytics 4
There are many differences between Universal Analytics and Google Analytics 4, mainly because they built it from the ground up and it functions in a completely different way.
Here's a look at some key differences when it comes to blog Google analytics:
Reports interface
Reports in GA4 have a completely new look and many of the reports we're familiar with in Universal Analytics are no longer available, have different names, or are in different locations in GA4.
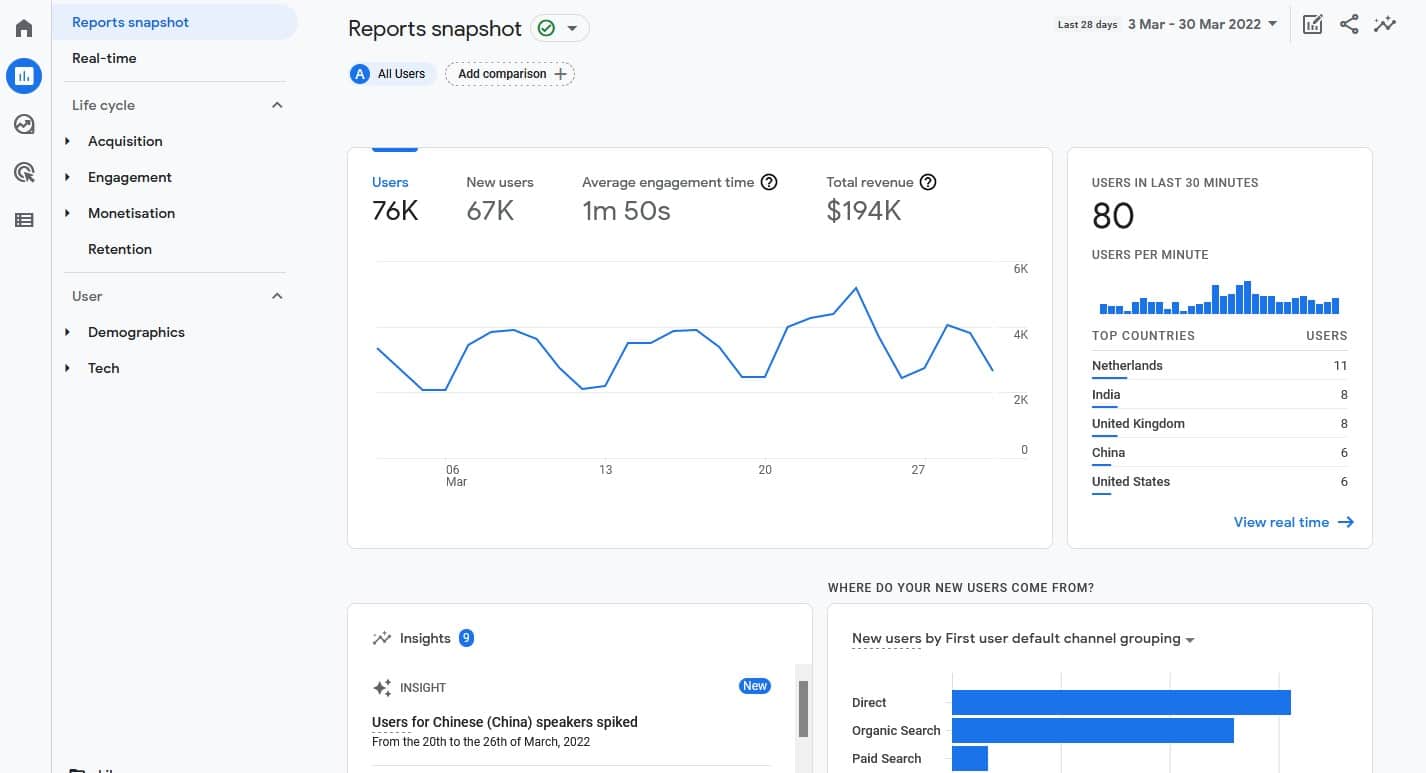
Many of the reports in GA4 only show up once you start collecting data for a long enough time.
Measuring method
GA3 (aka Universal Analytics) measures data using page views and sessions and is stored as hits.
Hit types include tracking hits, event tracking hits, and eCommerce hits.
GA4, however, measures data using events and parameters. This means that page views and sessions are collected as events, which can provide more detailed information.
Parameters offer extra information that can specify actions a user takes or add additional context to events.
Data Streams
Data Streams are part of the new functionality in GA4, which is where it collects data. A Data Stream can be used for a website, iOS app, or Android app.
You can also make adjustments with how data is collected by customizing Data Stream settings, the tracking code, and at the property settings level.
Where UA had views and filters, you can filter GA4 data directly on your reports with a great level of detail.
Enhanced Measurements
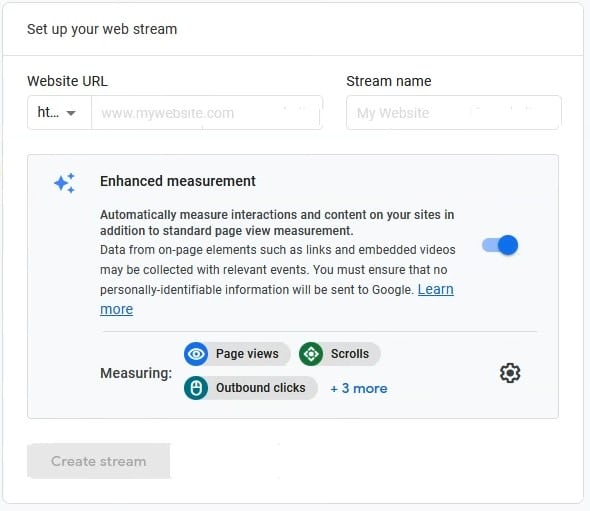
Within the blog Google Analytics Data Stream, Enhanced Measurements are extra events that your website tracks, which you can toggle on or off, but are set to “on” as default.
These include:
- Page views (always tracked)
- Scrolls – Captures the event when a user scrolls to 90% of the page.
- Outbound clicks – Captures outbound link clicks to other websites.
- Site search – Collects search terms performed through your website search facility.
- Video engagement – Collects interactions like play and progress on embedded videos on your site.
- File downloads – Captures file download events when visitors download files from your site.
Create a Google Analytics Account and GA4 Property
Head over to analytics.google.com and log in to your Google account. If you don't already have a Google Analytics account, you'll see something like this:
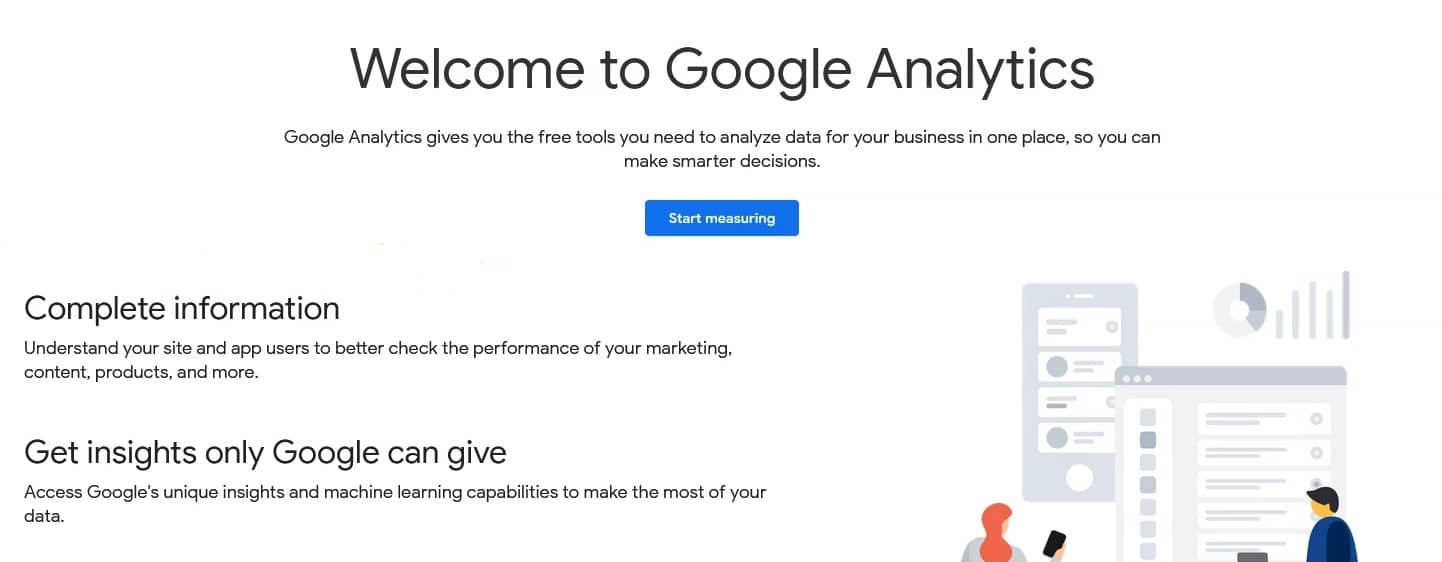
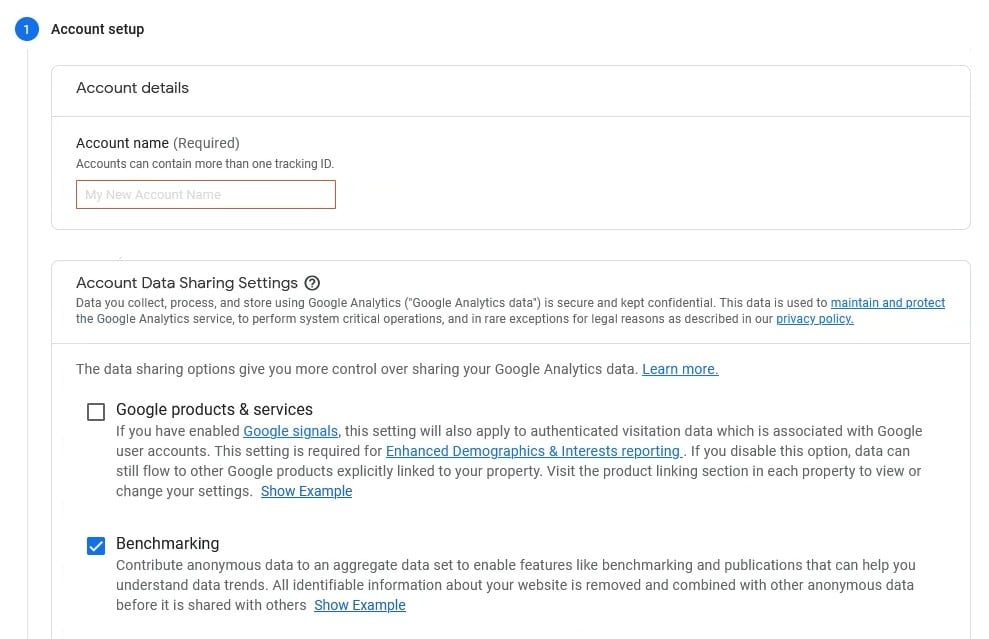
Click the button and you'll be prompted to name your account and check some (optional) boxes on the next page.
Continue on in Google Analytics 4 and click create property:
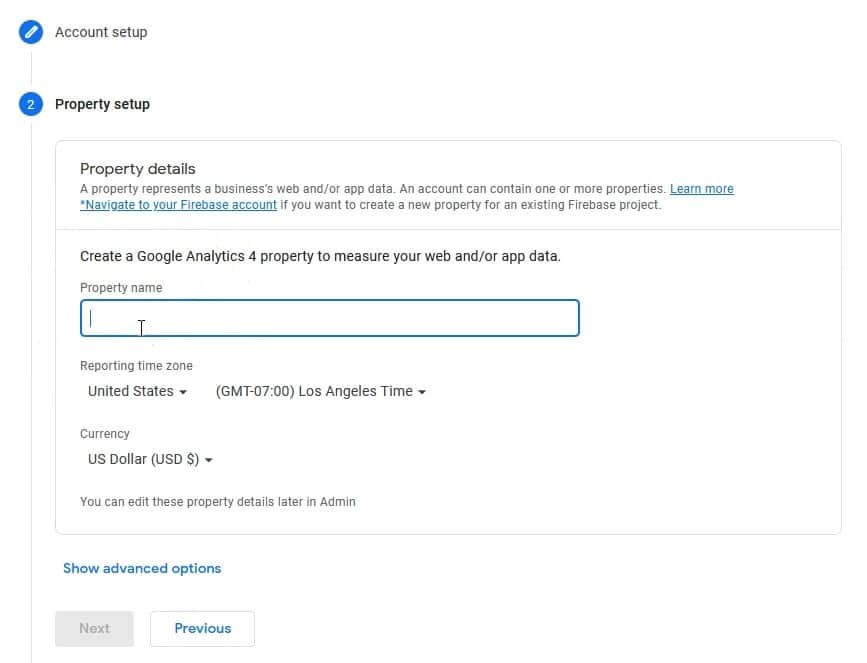
Click Next to answer a few questions about your business:
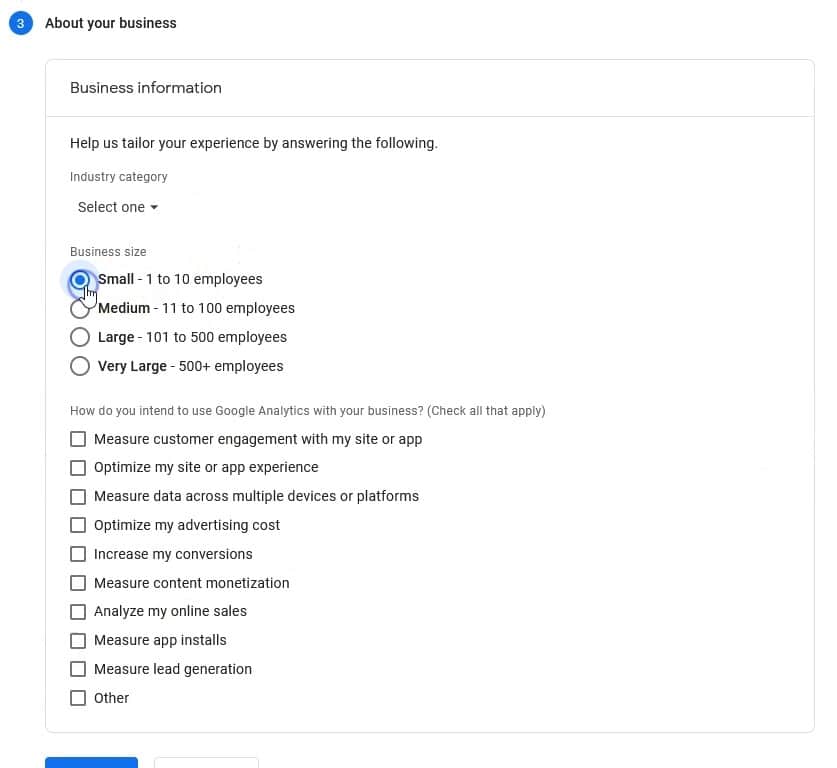
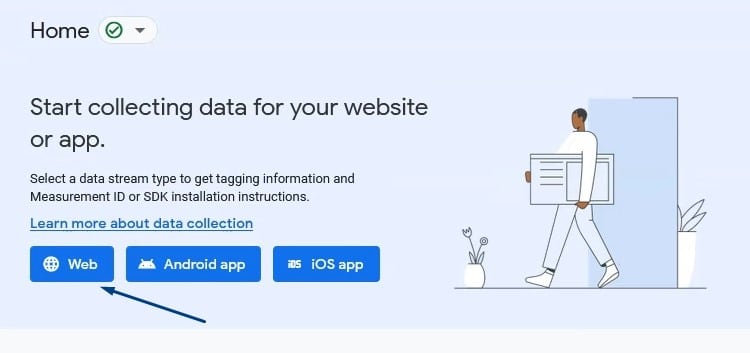
Now it's time to create a data stream, which will provide you with a Measurement ID and tracking code to collect data.
You can access the stream setup by clicking Web from the home page, or by navigating to Admin > Data Streams under the property you're working on.
Enter your Website URL and Stream Name and click Create Stream. The Enhancement measurement section should all be checked as default:
The next screen is where you'll find your Measurement ID and Tracking code:
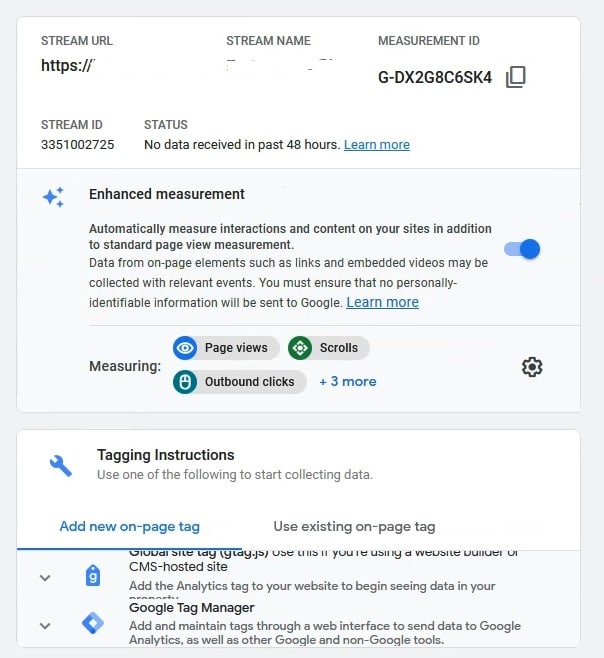
Let's move on to the next section where I'll show you how to add these to your WordPress website.
How to Add Google Analytics 4 to WordPress
Adding Google Analytics code to WordPress is a vital step when launching a new blog.
You only need to add the tracking code to your WordPress blog once. You'll then be able to see how many people visit your blog and how they interact with your blog post content.
Read on for detailed instructions to add Google Analytics manually or skip to the next step if you'd prefer to use a plugin (and if you're curious to use other blogging platforms, check out how to add Google analytics to Wix).
Insert Google Analytics Tracking Code Manually
From the Web stream details page, scroll to the section that says Tagging Instructions > Add new on-page tag and click the arrow:
Highlight and copy the code in the box:
The next step requires you to have a child theme, so make sure you have a child theme active and you have a copy of the header.php file from the main theme.
Now head over to WordPress and navigate to Appearance > Theme Editor and select the header.php file.
Paste the code you copied directly under the <head></head> tag and click Update file:
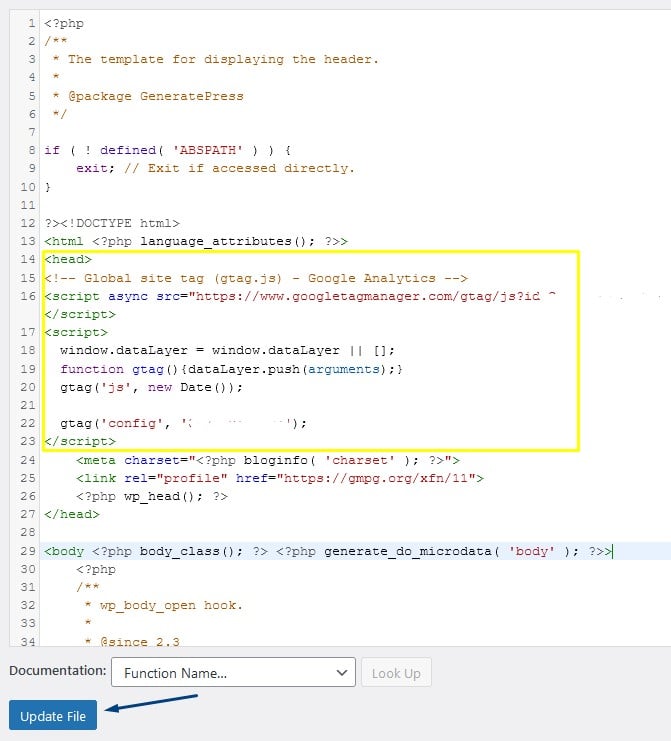
You can go to the home page of your site and check the source code to check that it has added the code correctly:

Add Google Analytics Using a WordPress Plugin
Here's how to use the best Google Analytics plugin for WordPress if you don't want to mess around with editing WordPress files.
You can also access your Google Analytics data from inside WordPress with a plugin.
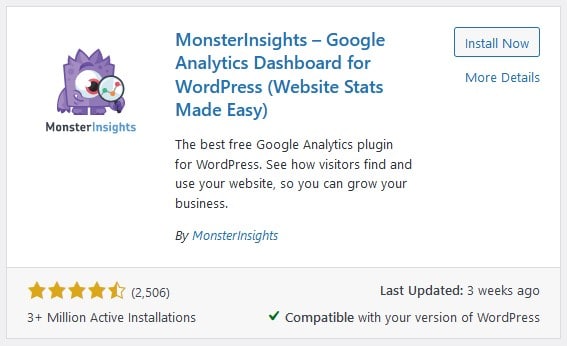
Log in to your WordPress admin and go to Plugins > Add New and search MonsterInsights:
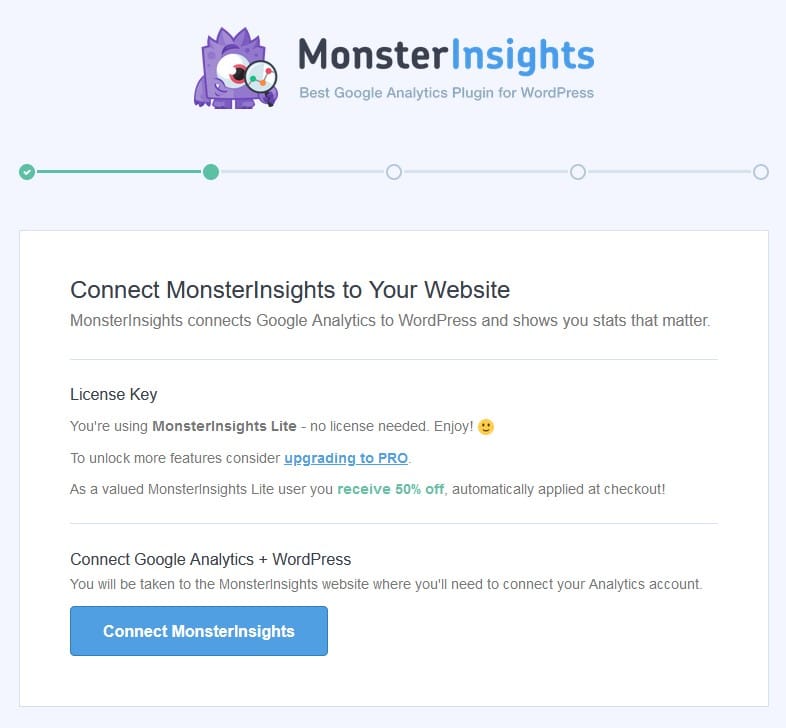
Launch the setup wizard and select Publisher (blog), click Save and Continue, then click the Connect MonsterInsights button:
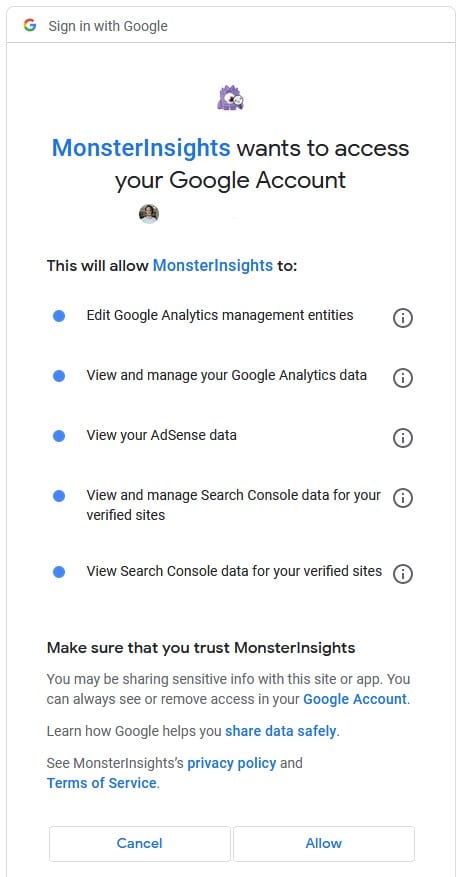
Select your Google account where your blog Analytics property lives and click Allow on the next page:
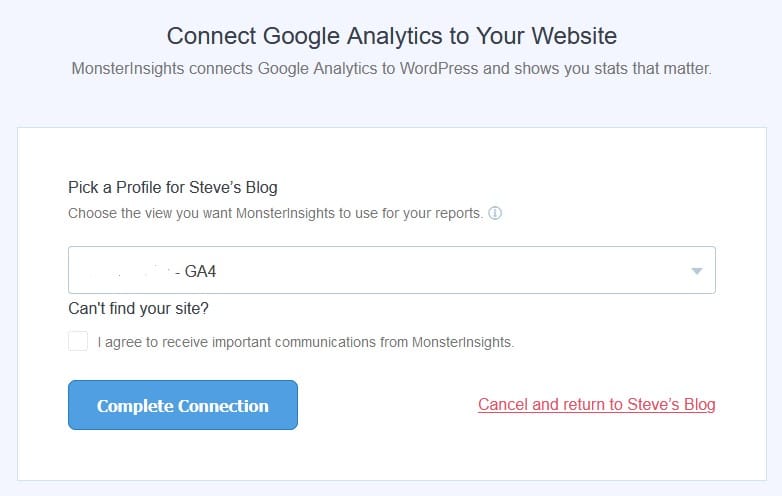
Choose your Google Analytics 4 property from the dropdown and click Complete Connection:
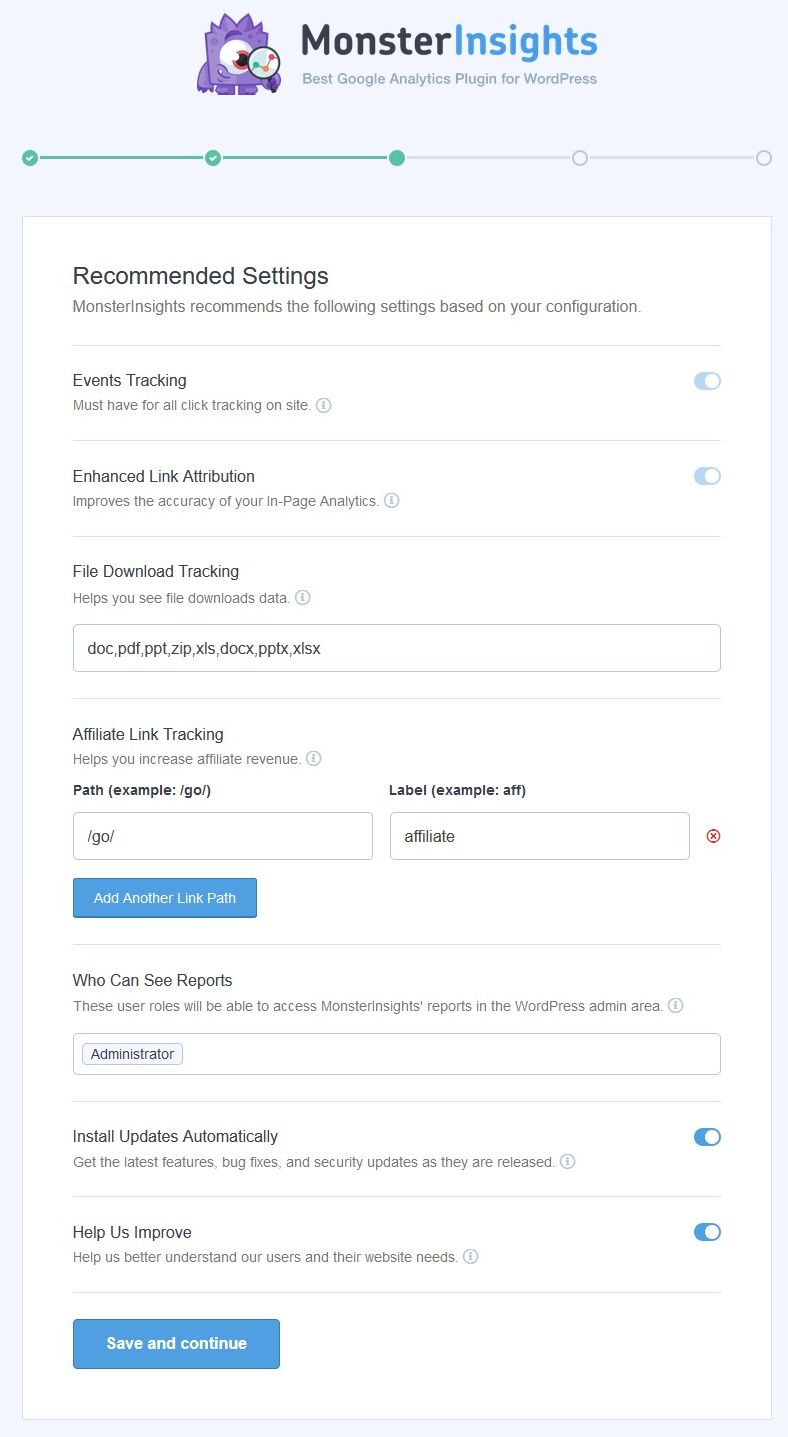
The next page offers some extra settings you can customize to your preferences. Click the Save and continue button when done:
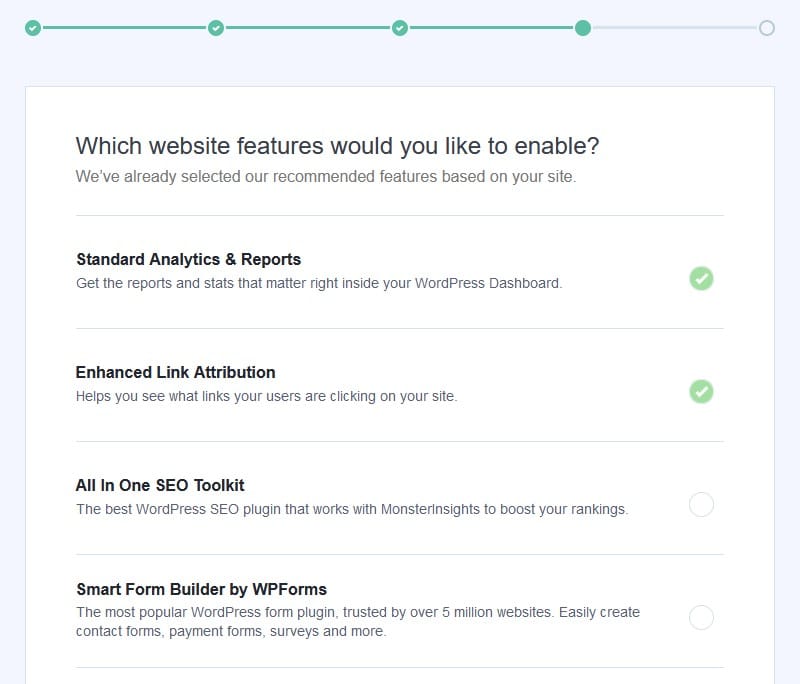
You can uncheck the options on the next step unless you know you want them:
Click the next step and you are done. Your Google Analytics code will be installed on your blog and you can access and track blog Traffic reports from the MonsterInsights dashboard.
Get Started With MonsterInsights Here!
Also check out our blog post MonsterInsights vs Google Site Kit for a full comparison.
Verify Everything Works
Now you want to make sure everything works by going back to Google Analytics dashboard and checking your Real-time reports.
Open up your website home page in an incognito window, then from Google Analytics, navigate to Reports > Real-time:
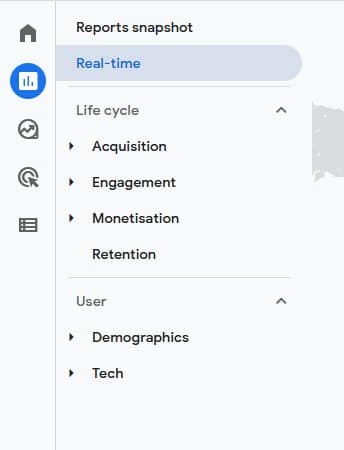
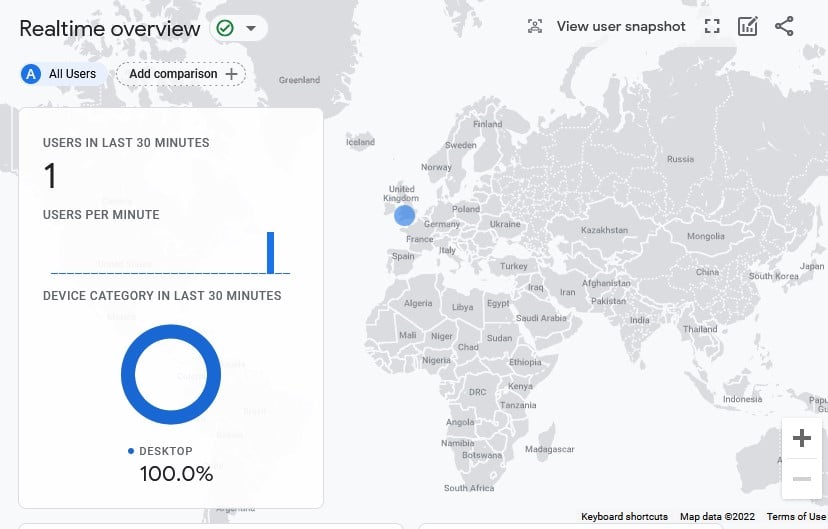
If tracking is working, you'll see an active user is currently on your website:
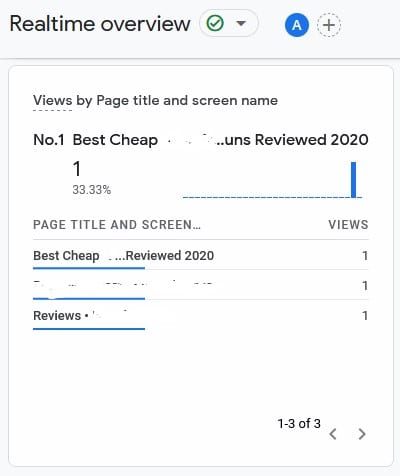
You can click on a page or blog post on your site to see Google Analytics recognize the interaction:
If nothing is showing, you'll need to check that the tracking code was installed correctly or you might need to wait a few minutes for GA4 to register the activity.
Search Console Connection
When you look at the data between Google Search Console vs. Google Analytics, it provides you with more valuable insights into your blog's performance.
And you can connect Google Search Console and GA account together to access the data from one place.
Here's how to activate it.
First, you'll need to have added a Search Console property and verified your website in GSC.
You can do this by adding an HTML meta tag in the header of your WordPress site or using a plugin like Yoast.
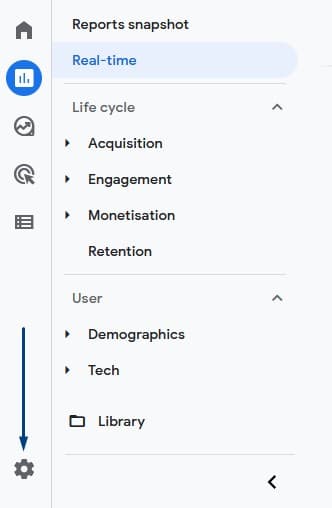
Once you've done this, navigate to the settings page in Google Analytics by clicking the gear icon in the bottom left:
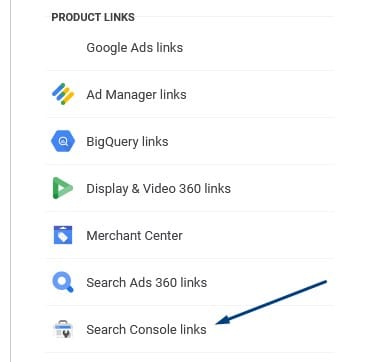
Then under the property column, scroll down and click Search Console Links:
Click on Link and then choose the search console property by clicking Choose accounts:
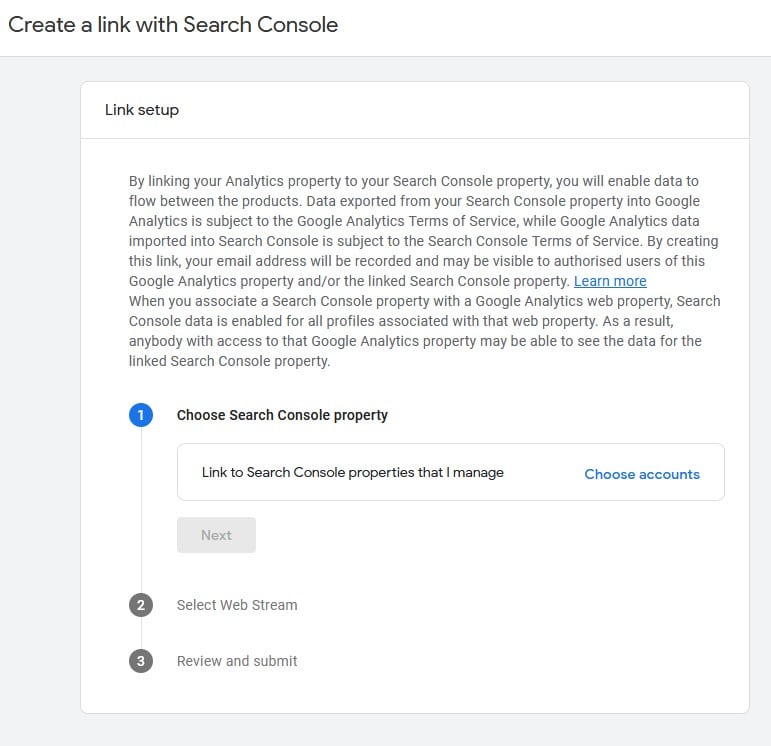
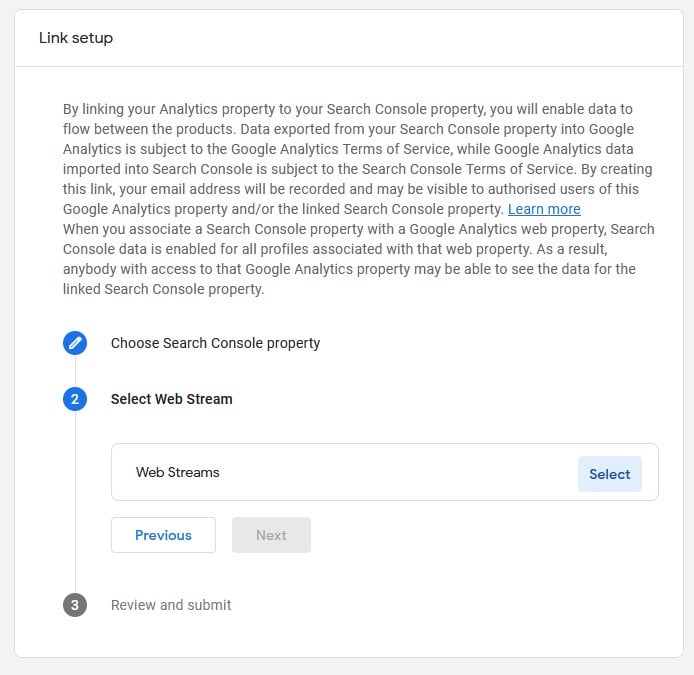
Then Select your Web Stream in the next step:
Finally, review your settings and confirm everything by clicking Submit:
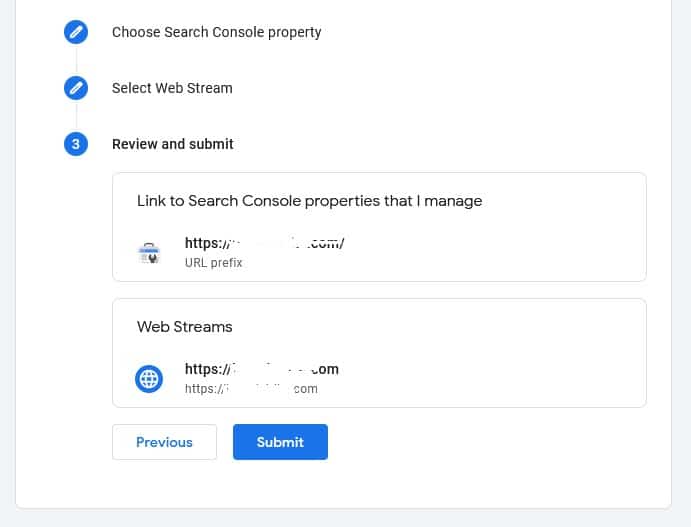
This will connect both accounts together and you'll be able to see Search Console data by navigating to Reports > Acquisition > Acquisition overview.
From this page, you'll see 2 new tiles called Google organic search traffic and Google organic search queries:
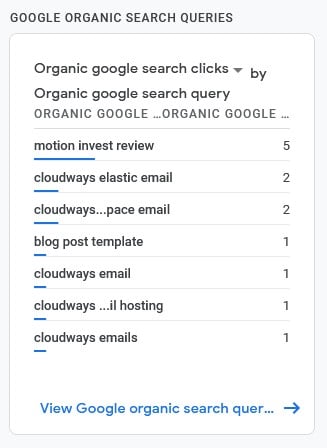
You can click on each of these to see a more detailed page of your Search Console data, including graphs and a list of top-performing landing pages or keywords your successful blog post and site is ranking for:
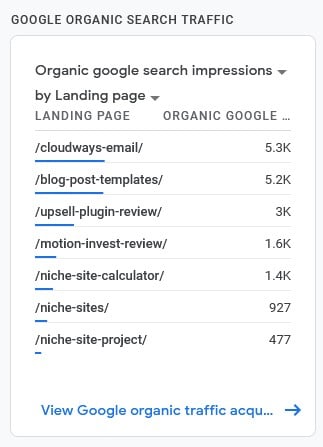
Read this next if you are wondering “What does Google Search Console do?“.
How to Use Google Analytics for Blogs
Here you'll learn all the different pages and sections of Google Analytics 4, understand how your visitors interact with your website, and more.
Google Analytics 4 Home Screen
The home page provides personalized content that applies to your behavior in Google Analytics.
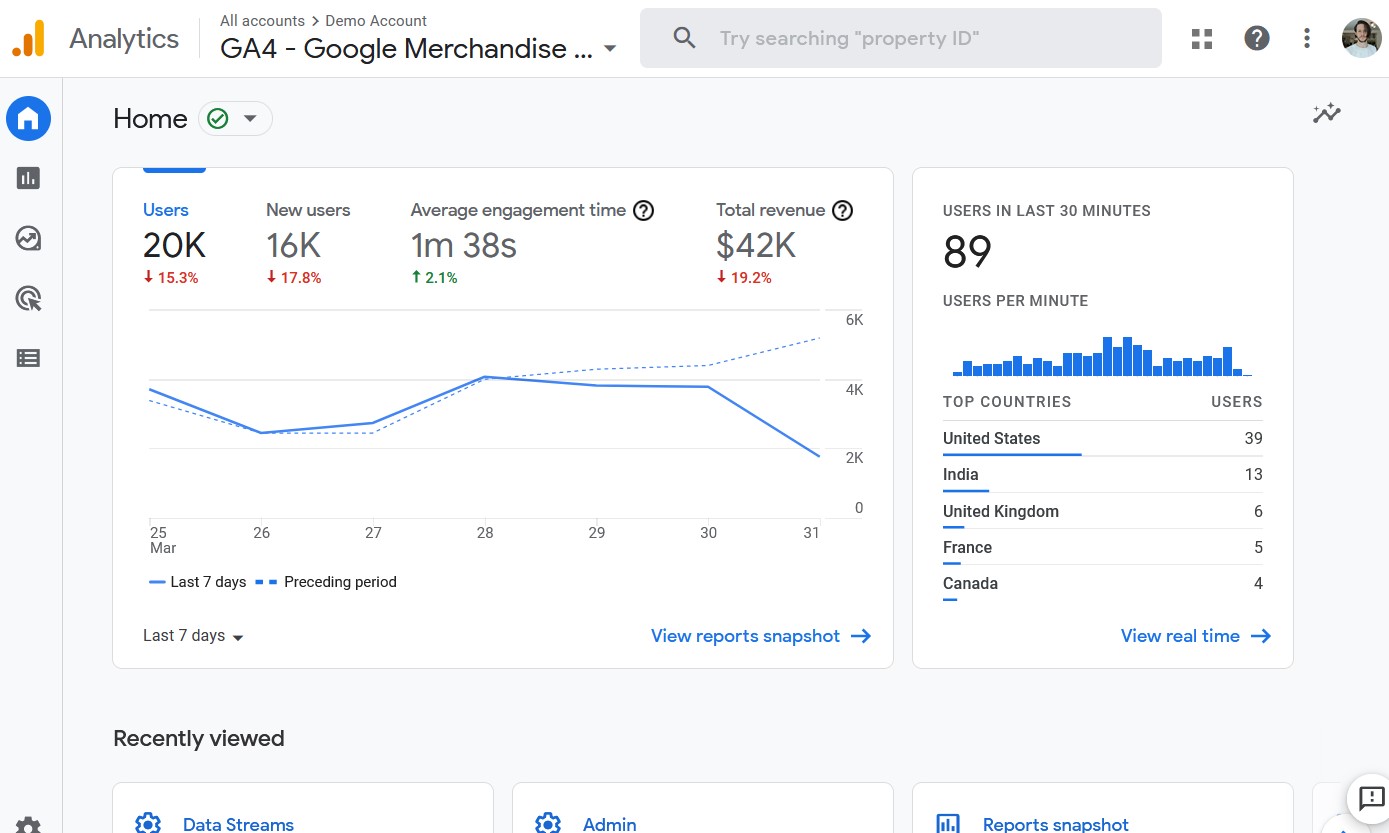
Overview
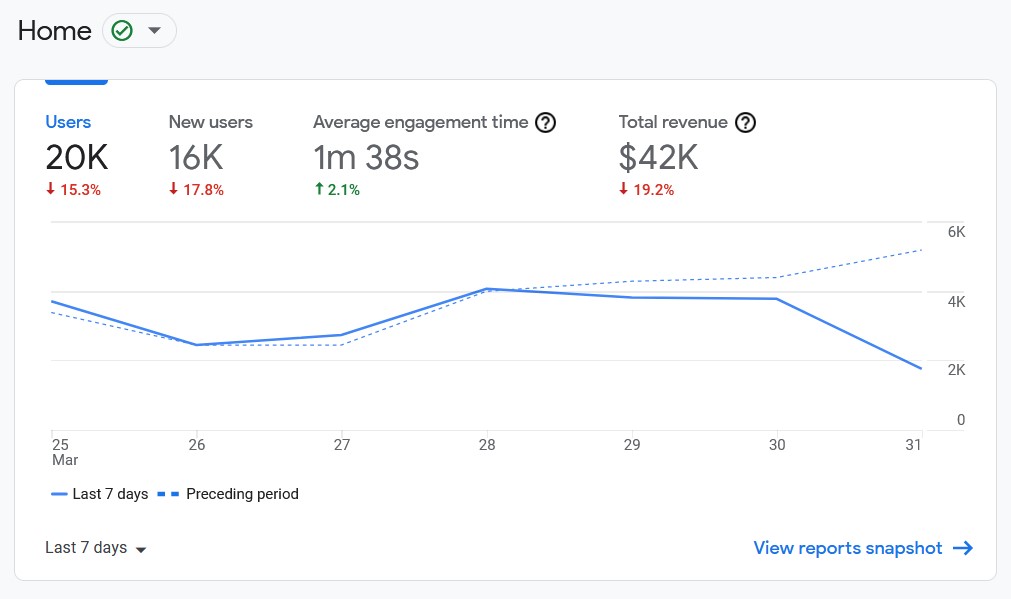
The Overview card shows metrics like users, revenue, and average engagement time:
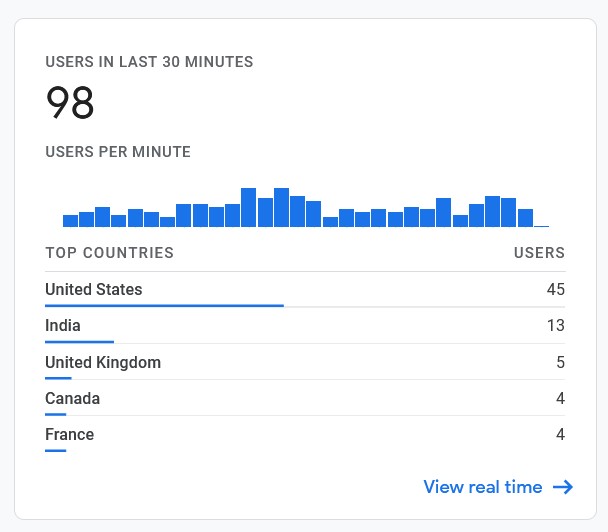
Real time
The Real time card displays the number of users active on your site in the last 30 minutes:
Recently viewed
This section links to areas of Google Analytics you've visited most recently:

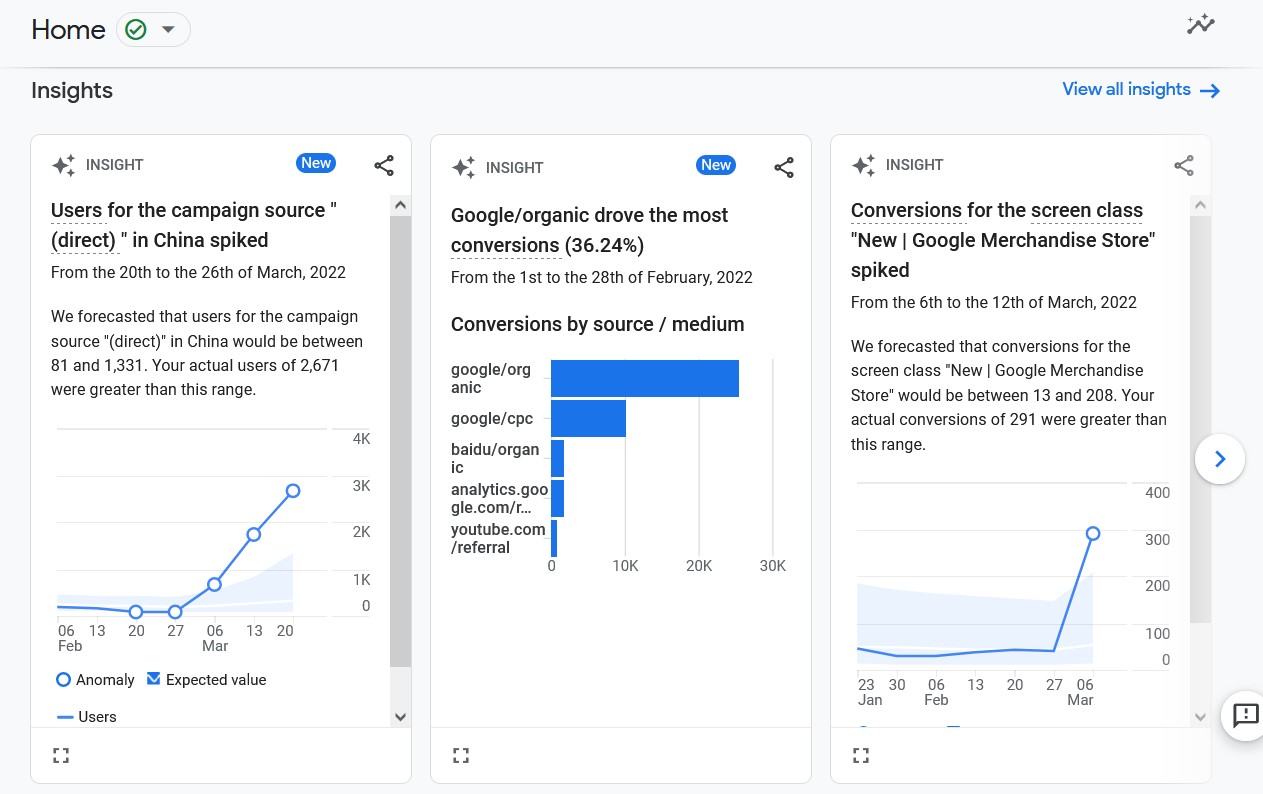
Insights
Insights show cards with emerging trends and irregular changes about your website, which can help you identify things that might need your attention:
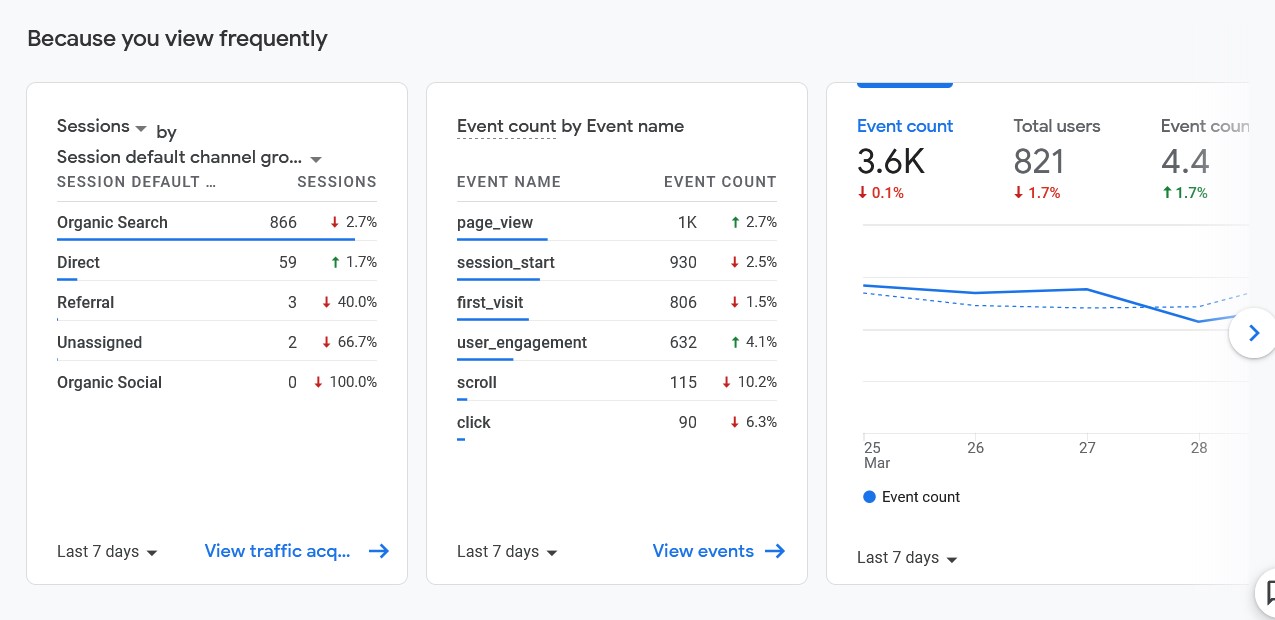
Because you view frequently
This section shows cards you view regularly, making it easier to navigate to them from the home page:
Reports
The reports section is where you view the data collected about your website.
From here, you can monitor overall blog performance and metrics like page views, track blog traffic sources, and top-performing blog content.
Let's take a look at what's available to you in your reports and what you can do with that information.
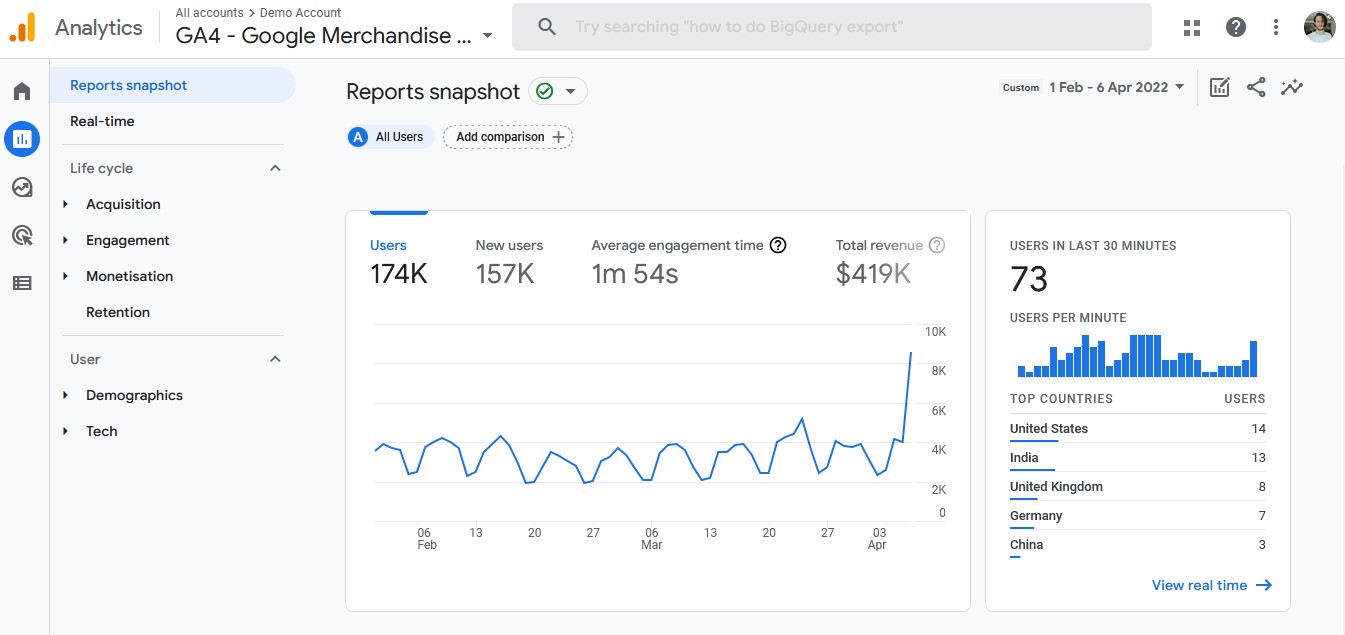
Reports snapshot
Similar to the home page, the Reports snapshot displays cards, insights, and quick links to detailed reporting within the Reports section.
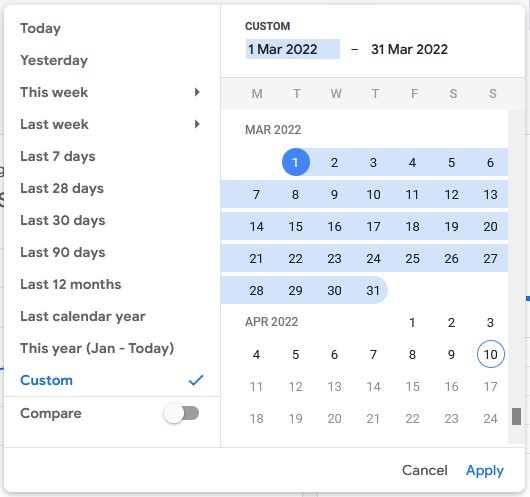
Date selection
Define the time period you want to see data from. You can choose a pre-defined range like 28 days or set a custom range:
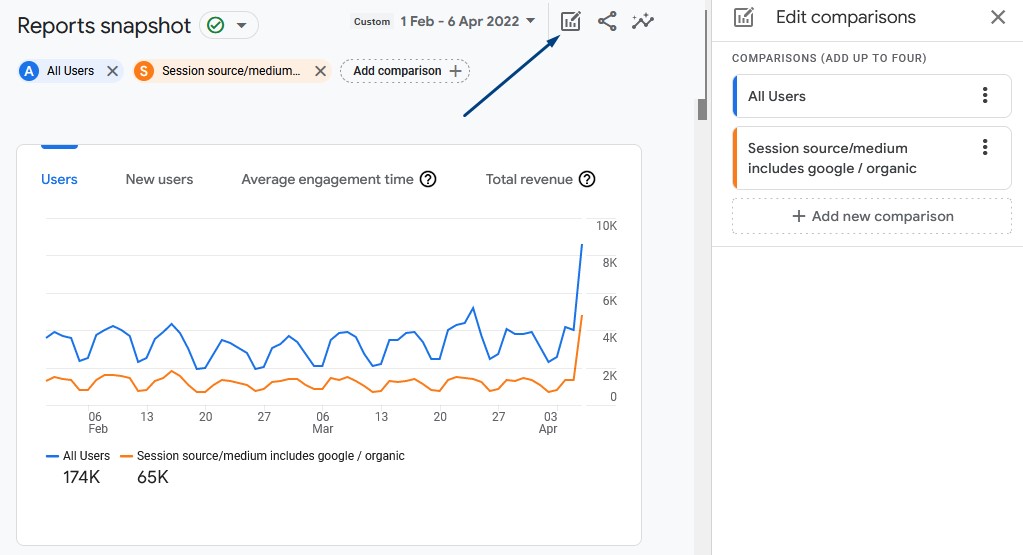
Comparisons
Let's you compare data against different criteria. For example, All Users against Users from the United States or All Users against Organic blog traffic:
Realtime reports
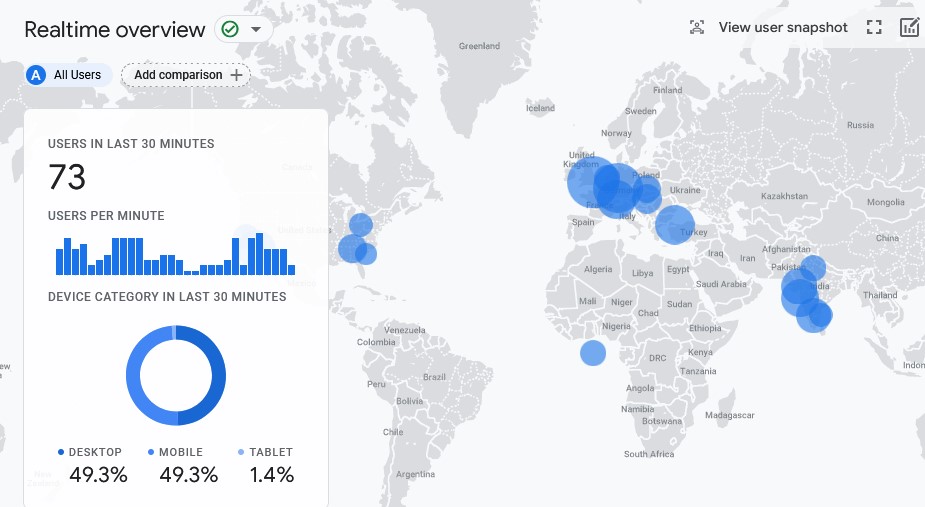
The Realtime reports page shows website activity from the last 30 minutes, 25 minutes longer than what Universal Analytics provided.
The cards on this page include current traffic, device breakdown, track blog traffic source, a breakdown of events, conversions, pages visited, and a map view of your blog readers locations, down to each blog post:
Acquisition
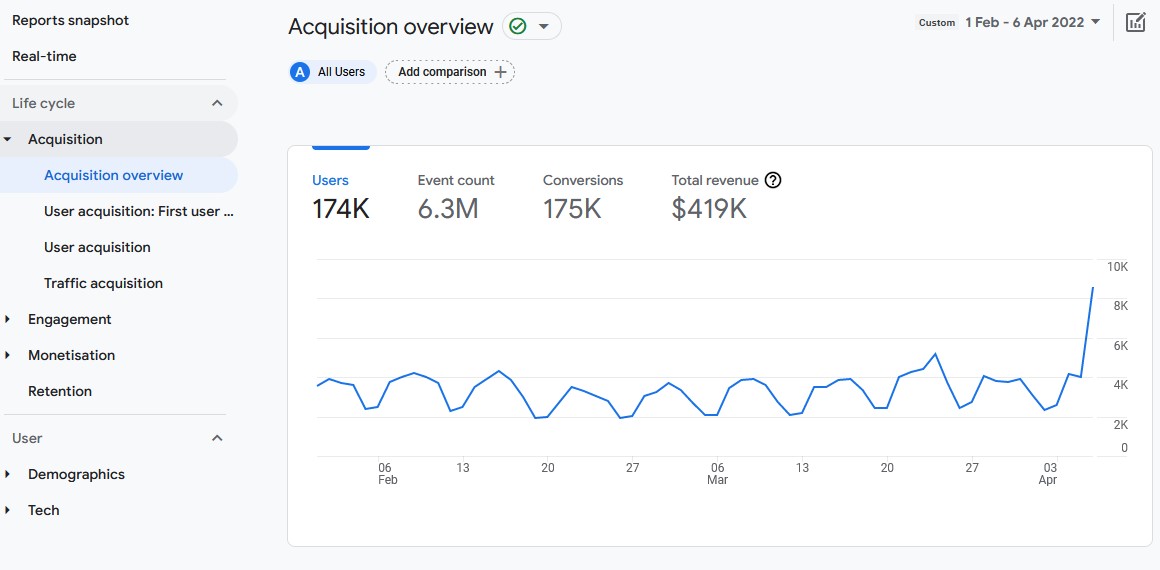
The Acquisition tab is a group of pages that displays a breakdown of user and session source location, such as organic, paid search, social media, etc:
Events
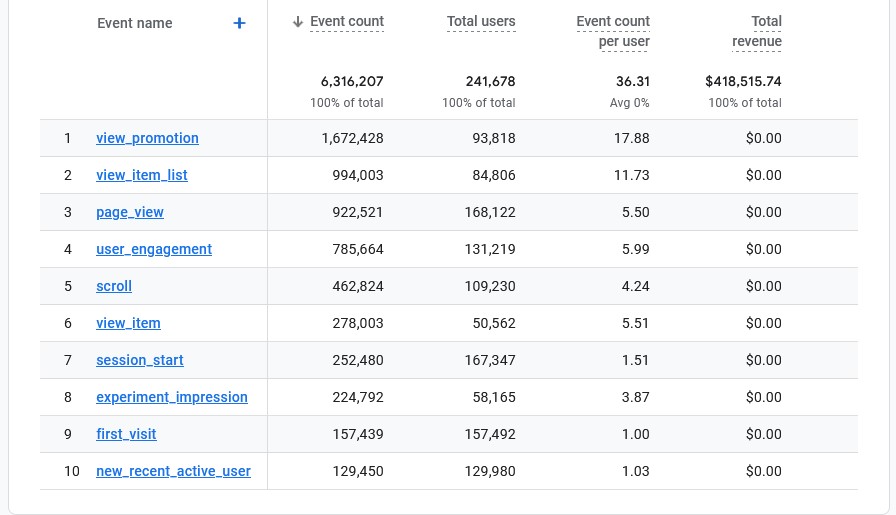
With GA4, everything is now tracked as an event like a page view or a purchase.
When you install Google Analytics 4 on your blog, it will track Automatic captured events (like first blog post visit) and Enhanced Measurement events (like page view, scroll, and outbound link clicks), which can be toggled on and off in the settings.
From the Events tab under Engagement, you'll see a list of events data that's being collected from your website:
Conversions
Conversions are events that measure when your visitors take actions like a purchase or becoming a newsletter subscriber. These types of events replace goals in Universal Analytics and can be found under Engagements > Conversions:

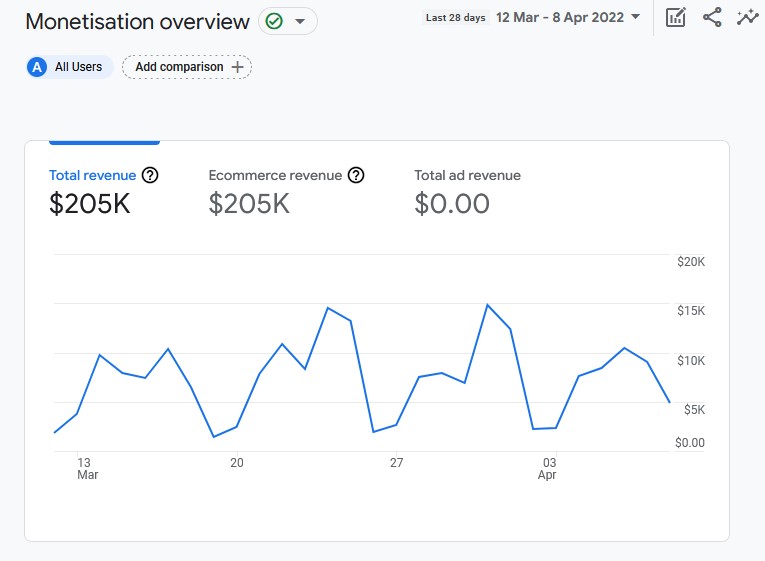
Monetization
If you sell digital downloads (check out our guide for how to sell digital downloads on Amazon), courses, or make any kind of transactions from your blog, then this section is where you can dig into the details of your sales:
Demographics
Get more detailed information of your visitors like gender, interests, age, language, and users by town:
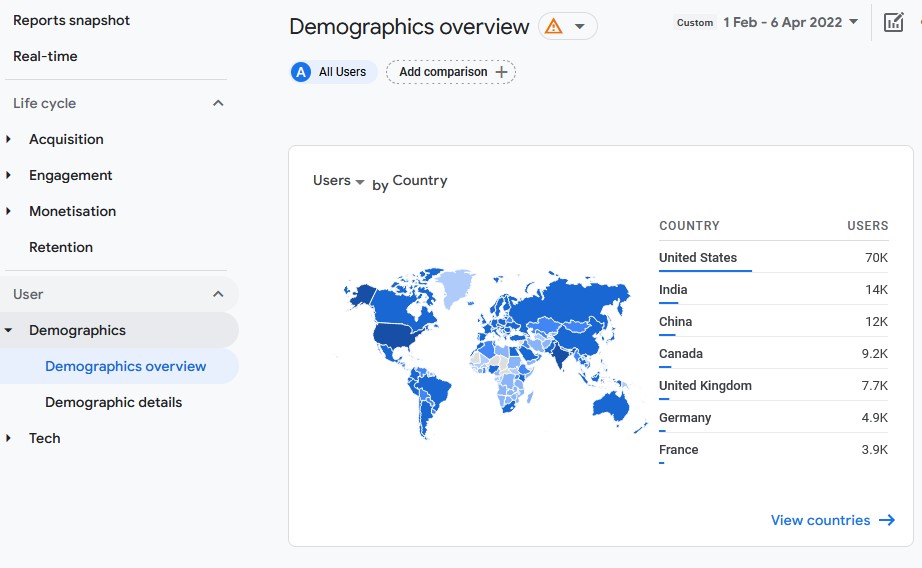
To see this data, you'll need to activate it under Admin > Setup Assistant > Activate Google Signals. Confirm you want access to this data and confirm the User Data Collection Acknowledgement:

Explore
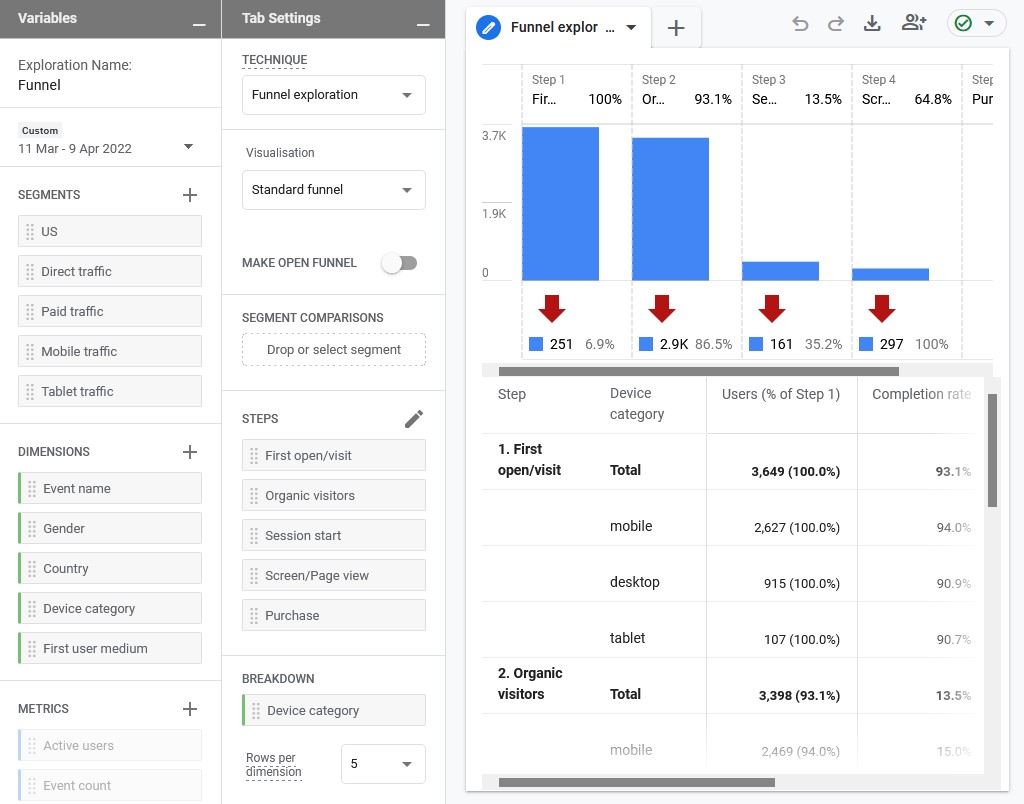
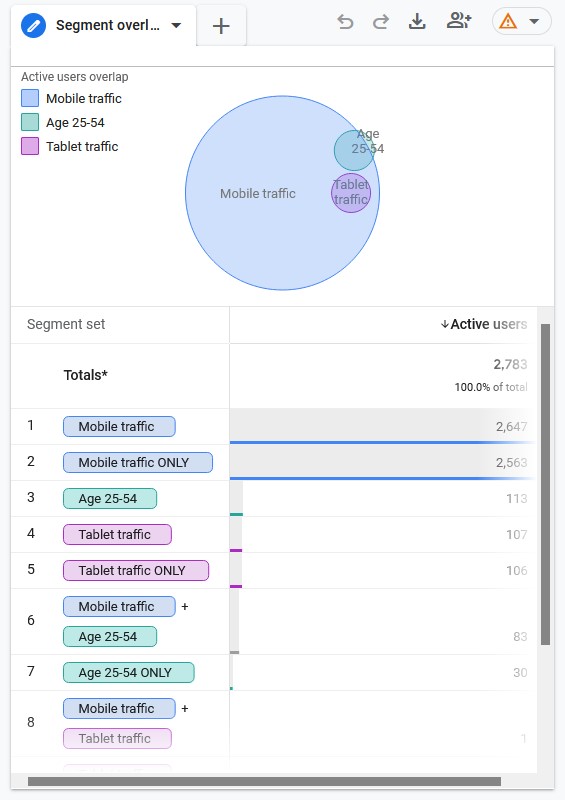
The Explorations section lets you create your own custom analysis based on the dimensions and parameters you choose.

There are different templates to choose from to view data in different ways with different sets of options.
Funnel exploration – Lets you build multi-step funnels to segment and analyze conversion based user journeys:
Segment overlap – Lets you analyze intersections of data. For example, U.S. blog traffic vs. mobile devices blog traffic and the overlap:
Configure
The Configure section lets you mark events as Conversions and configure conversions, set up custom audiences that can be used when targeting ads, and create custom dimensions.
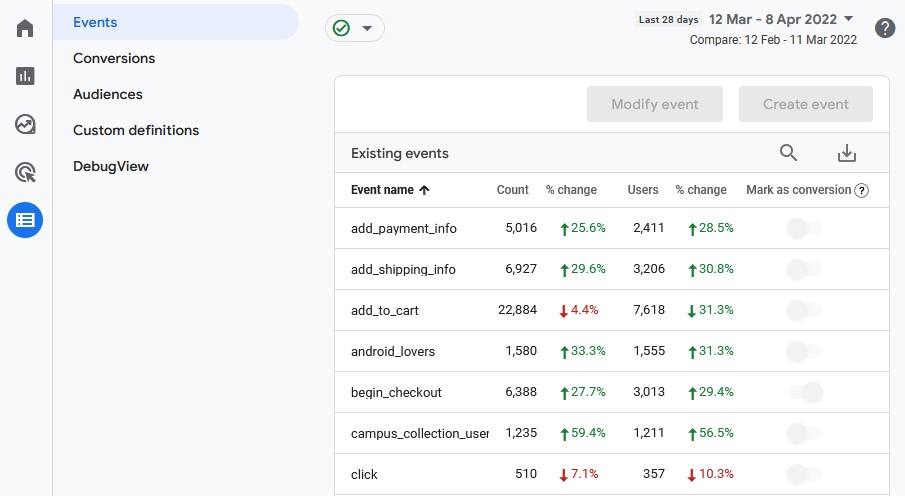
These advanced options go a little beyond the basics a blogger would need, but Google has extensive documentation on these features here.
Important Engagement Metrics
All serious bloggers and website owners need to be aware of key metrics that impact ROI.
If you sell a product, then an obvious metric would be revenue. However, this isn't measurable in the Google Analytics website if you run an affiliate site or monetize with Google AdSense or other ad networks (but you may be interested in how to use keywords in Google Analytics).
So, Google Analytics for bloggers is a necessary free tool with tons of engagement metrics you'll want to monitor and compare their performance over time:
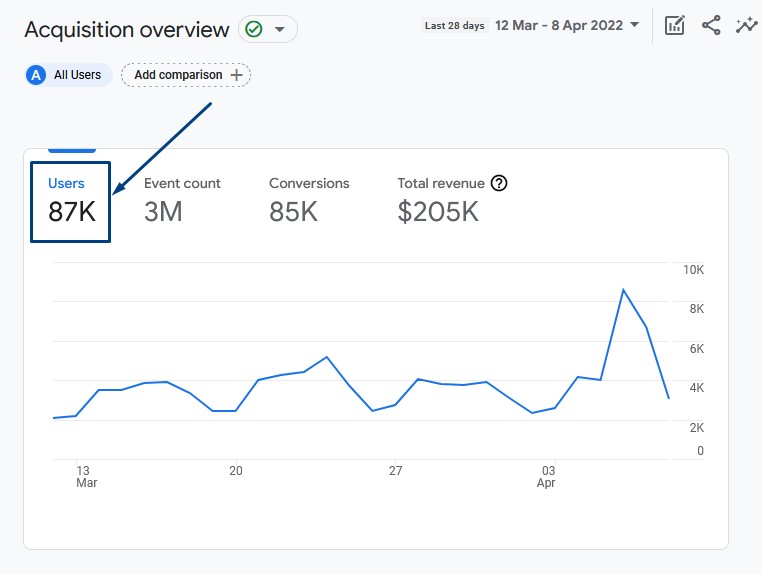
Users
Users are the number of people who visit your website. You can see this metric from multiple screens within GA4, including the home page, Realtime reports, and Acquisition.
Page views
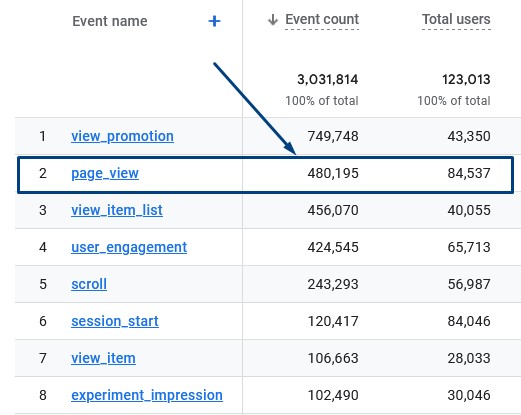
GA4 records page views as an event and measures the number of pages that users view.
You can find page views under Engagement overview and Engagement > Events:
Sessions
A session starts when a user views a page on your website. A session will automatically time out after 30 minutes of inactivity and there is no limit to how long a session can last.
Users flow can trigger multiple actions (or events) within a session, which can help you determine the user experience of your website.
If most of your sessions have low activity, then think about how you can make your site more user-friendly or engaging to keep people on your site for longer.
Google Search Impressions
You can connect GSC and Google Analytics 4 to get extra data inside GA4 (see above).
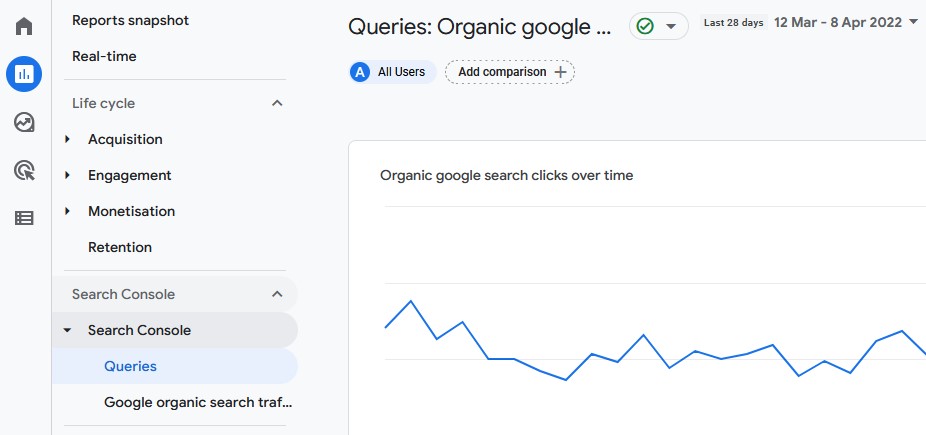
This metric show the number of times people have seen your website in Google search results for a particular keyword.
You can find this data under Reports > Search Console > Queries and under the Organic Google Search Impressions column:
Google Search CTR
You can gain access to this Google Search Console metric inside GA4 by connecting the services together in the settings.
Search CTR stands for Click-Through Rate and measures the number of people who click through to your website from Google search results (check out our article on CTR manipulation for advanced tactics).
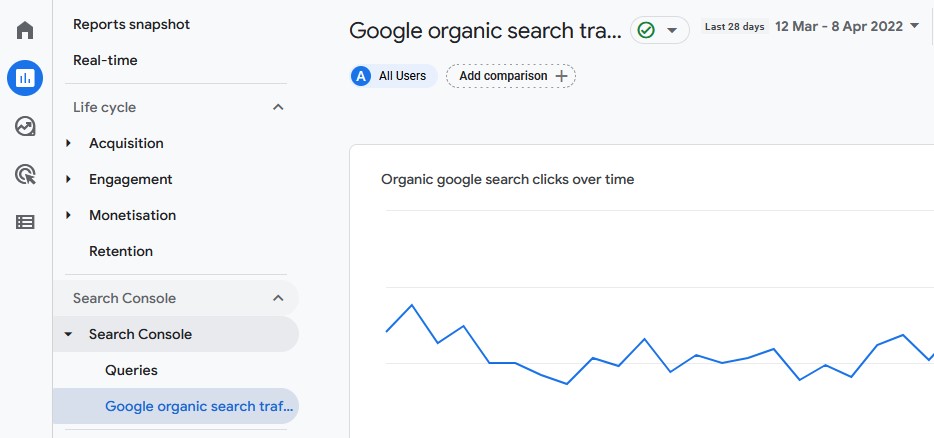
You can find this data under Reports > Search Console > Google Organic Search Traffic and under the Organic Google Search Clicks column:
Revenue
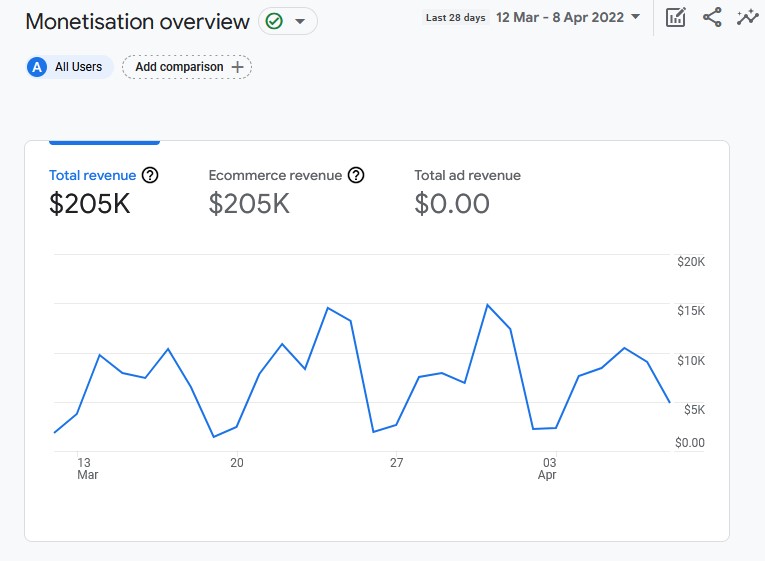
GA4 tracks eCommerce sales and displays them inside this report. If you sell a digital product or course on your blog, then this report can be very useful as it can help show how much revenue you're bringing in.
You can find this metric under Reports > Monetization:
Google Analytics for Blogger Tips In Conclusion
That concludes this guide on how to use Google Analytics for blogs and a breakdown of the new Google Analytics 4 interface (and be sure to check out which kinds of hits does Google Analytics track).
There's a lot you can do with GA4, which may seem a little daunting, but this is mostly because it is a brand new system and layout.
Using GA4 for your blog, affiliate site, or niche site will help you understand exactly how well your blog content is performing and the areas you might want to focus on to achieve your blogging goals.
Want to learn step-by-step how I built my Niche Site Empire up to a full-time income?
Yes! I Love to Learn
Learn How I Built My Niche Site Empire to a Full-time Income
- How to Pick the Right Keywords at the START, and avoid the losers
- How to Scale and Outsource 90% of the Work, Allowing Your Empire to GROW Without You
- How to Build a Site That Gets REAL TRAFFIC FROM GOOGLE (every. single. day.)
- Subscribe to the Niche Pursuits Newsletter delivered with value 3X per week
My top recommendations


