When you buy something through one of the links on our site, we may earn an affiliate commission.
Content creators are often put in an awkward position when it comes to images. They are encouraged to add pictures. In fact, posts with compelling images experience 94% more views on average than their boring counterparts.
There is a downside, though. Having too many images slows down a site by a lot. And 40% of people abandon a WordPress site that takes more than 3 seconds to load.
So, as content creators, we need to find a compromise. We need a WordPress plugin that can optimize all the images we add to posts. And ShortPixel may be the answer.
In this ShortPixel review, we'll discuss how this WordPress plugin can save you from visitors leaving your site due to slow load times.
Sign Up for a FREE Short Pixel Account Right Here!
Click Here to Optimize Your Images Using ShortPixelShort Pixel Overview
-
Ease of Use - 100
-
Stability - 100
-
Customer Service - 95
-
Price - 90
Summary
If you host lots of images on your site, then using Short Pixel is a no-brainer. Compared to other image compressing plugins for WordPress, Short Pixel contains more features to help you decrease the file size of your images and increase your site's loading speed. Sign Up for a FREE Short Pixel Account Right Here!
Pros
- Set and forget – customized the options of the plugin just once and let it do the dirty work of optimizing images for you
- A bang for the buck considering the unique features it has over its competitors
- Compresses images without compromising on quality
Cons
- Setting up the Short Pixel API key on your WordPress site can be cumbersome especially for non-techies
- Optimizing thumbnails count towards your allotted image budget per month – pushing your total images to 2x the original
- Backups take up space in your server. If you remove the plugin, the backups remain. You need to manually remove them.
Contents
- What is image compression?
- Do you have time to optimize images on your own or would you rather automate the whole thing?
- Why is ShortPixel the best choice when it comes to image optimization or PDF compression?
- Features of ShortPixel
- Image compression types
- Supports different file types
- Automatic optimization upon upload
- Optimizes thumbnails
- Back up original images
- Bulk Optimization
- No file size limit
- Compare old and new images
- What is the difference between online image tools and WordPress plugins?
- How to optimize images using ShortPixel WordPress Plugin
- The General tab
- The Advanced tab
- Cloudflare API
- Statistics
- WP Resources
- Bulk Processing
- Optimizing Images
- Will ShortPixel work if your website is using Cloudflare?
- ShortPixel Pricing
- Monthly plans
- One-time plans
- Dedicated servers
- ShortPixel Review: Pros and Cons
- Pros
- Cons
- Which is the best image compression plugin for WordPress?
What is image compression?
You will need a better grasp of what WordPress image optimization means before we proceed.
What happens to the images exactly when we optimize them?
Image optimization is synonymous to image compression. A common misconception is that image compression changes the dimensions of the image. That is not the case at all.
A 1000 x 1000 pixel image, for example, will remain that way (unless you specify otherwise) after it's compressed. What's reduced is the image size. From 25 MB, the image size can be reduced to 2 MB in some cases.
Images can contain data that cause them to have file sizes that are larger than necessary. Removing these data will make the size of the file smaller. And image compression can do this without any visually detectable loss in image quality.
But image compression can only go so far. The more data you remove, the more chances you have of ruining your image. That's why it's important to choose a plugin to optimize your images built on stable technology so your image quality doesn't suffer.
Do you have time to optimize images on your own or would you rather automate the whole thing?
Manually optimizing images is time-consuming. While doing it yourself gives you better control over the final output, that's time better spent working on other tasks.
The process goes like this:
- Choose the images you want to compress
- Go to an online image compression tool and upload the files there
- Download the optimized images and upload them to your WordPress site
While it might not seem like a cumbersome task, it will be if you have lots of images to compress. Some online tools only allow a certain number of images that you can upload at once. Therefore, you will have to complete one batch after another before you can optimize all your images.
Compare this to a WordPress plugin like ShortPixel. Just install the plugin, and it will do the hard work for you. Not only will it optimize the images you're uploading now, but it will also compress the ones in your image library! But let's not get ahead of ourselves just yet.
Ultimately, you want a WordPress plugin to do all the compression for you while retaining image quality. Automation means you get to optimize your site faster.
Why is ShortPixel the best choice when it comes to image optimization or PDF compression?
ShortPixel operates out of Romania with the goal of optimizing images. The team—Alex, Simon, and Dan—improves the site's overall speed and bandwidth footprint through their compression technology. They want users to experience lightning-fast load speeds. But with newer devices taking high-resolution images, the file sizes start to become unmanageable.
That's why the ShortPixel team released their online service in July 2014. They make use of a straightforward API, meaning their own servers handle the compression. Four months later, they released a WordPress plugin version to make the product more accessible.
Features of ShortPixel
ShortPixel does not lack the features that make them one of the best when it comes to image compression. The vast array of options they offer makes it easier to set up your images faster and more efficiently.
Image compression types
Users are able to compress images in three methods. You have lossy, glossy, and lossless. Each type offers an advantage. You need to determine which method would be ideal for you.
- Lossy – The recommended option. It offers the best compression rate among the three. Your images will be compressed as tightly as possible. You run the risk of losing details. But based on reports, ShortPixel does a great job handling lossy compression.
- Glossy – Geared more towards photography websites or people who sell pictures online. Images are still compressed, but most of the details are retained. High-resolution images will retain their image quality.
- Lossless – Barely does any compression. There won't be that much difference between the original and the final file size.
Supports different file types
ShortPixel supports formats outside of JPEG. It can compress PNG, GIF, WebP, and even PDF files. It can even automatically convert PNG files into JPEG files as you upload. There is an option to convert PNG files with transparent backgrounds.
The PDF conversion feature might be useful for websites that frequently offer PDF downloads. You won't notice the difference in quality, but the file size would be greatly reduced by the time the process is done.
Automatic optimization upon upload
Arguably its best feature, images uploaded to WordPress would be compressed automatically. You only need to set up your preferences once. From there, images will be optimized automatically when you drop images in your WordPress Media Library.
Optimizes thumbnails
WordPress would often create multiple-sized versions of the images you upload. These are called thumbnails. If you want your thumbnails to be optimized as well, you can activate the option is the settings menu.
Back up original images
The cool thing about ShortPixel is they allow users to save original copies. So if there is ever a point where you feel like you need to restore the uncompressed version of the image, you can do so.
But be aware that creating backups will eat up your storage space. If your WordPress hosting plan only gives you limited storage options, creating high-resolution backups might not be worth it.
Bulk Optimization
If you're installing the plugin after you uploaded your first image, you can still retroactively fix those images. The Bulk Optimization tool will go through your old images and compress them in one sitting.
If you don't need to optimize all previously uploaded images, you can try optimizing a handful of images instead.
ShortPixel will give you a breakdown of how many images need to be optimized. This gives you a better sense of how many images will be affected.
No file size limit
Some optimization tools have file size limits. This means any image that goes past a certain file size will not be optimized. That is not the case with ShortPixel.

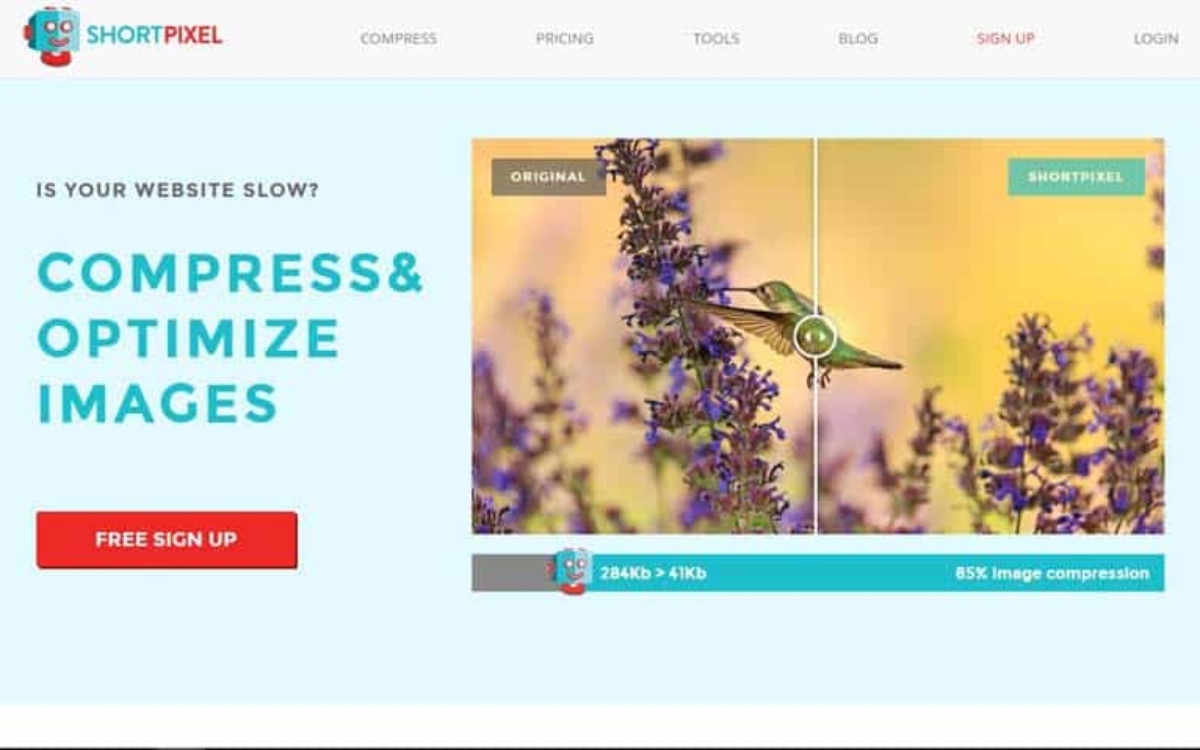
Compare old and new images
It's important to inspect your images after they're optimized. You do this to see if the quality of the image was affected during compression. ShortPixel makes this easy by letting you compare the original and the compressed version side-by-side.
You'd be surprised just how most of the compressed images closely resemble the original except for the file size, of course.
What is the difference between online image tools and WordPress plugins?
There's never a shortage of image optimization tools in the market. There's JPEG Optimizer, Optimizilla, Kraken.io, and ImageRecycle, to name a few. But these sites require users to compress their images before importing them to WordPress.
That is not the case with ShortPixel. Once you have the ShortPixel plugin installed, you can upload any JPEG as normal, and it will compress the image right then and there.
It's definitely more convenient, especially if you're uploading multiple images at any given time.
How to optimize images using ShortPixel WordPress Plugin
You start by downloading the ShortPixel plugin for WordPress. The ShortPixel WordPress plugin works on a freemium model. That means the tool is free to use. But if you want to unlock some of the other features, that's when you pay.
If you want to be extra careful, create a backup for your site first before you proceed.
You should find ShortPixel under Settings if you've successfully installed the plugin. Click the ShortPixel to configure your options.
You will find five tabs: General, Advanced, Cloudflare API, Statistics, and WP Resources. But for the most part, you will be making changes in the General tab.
The General tab
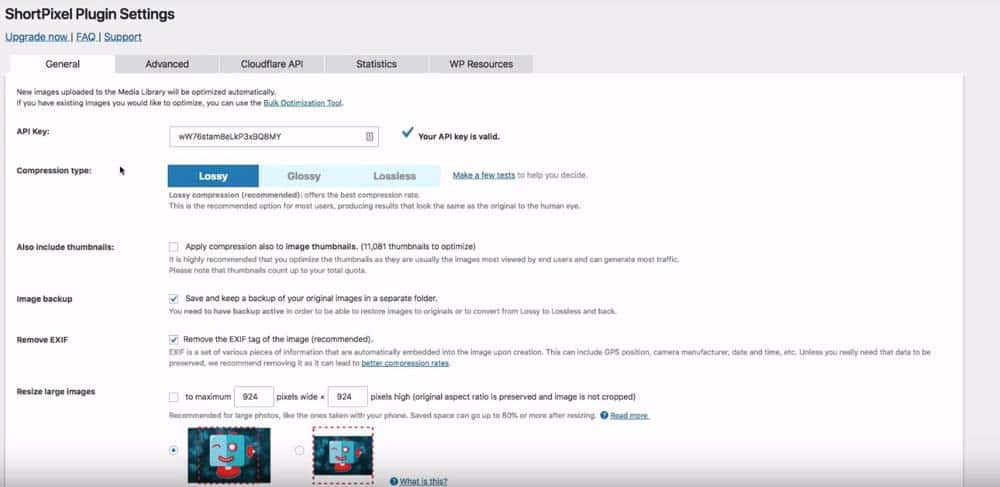
Here are the options you can tinker with under the General tab.

- API Key – You must add an API key. But don't worry. It's free. You get one by creating a free account at ShortPixel. Once registered, you'll be able to secure your API key. Simply copy-paste the API key from ShortPixel to WordPress and save your changes.
- Compression type – Choose between lossy, glossy, or lossless compression. To see the differences between each type, please refer to the Image Compression Type section under Features of ShortPixel.
- Also include thumbnails – You can make ShortPixel compress image thumbnails if you wish.
- Image backup – Enabling this feature lets you save a copy of the original image before it's compressed.
- Remove EXIF – EXIF data are embedded details in your images. These include GPS position, the date and time the photo was taken, and camera settings. Removing these can reduce the file size and remove details you might not want to be made public.
- Resize large images – You can set the maximum size for large photos.
The Advanced tab
There are even more settings hidden under the Advanced tab. Here are a few additional options.
- Additional media folders – You can select specific site folders. ShortPixel will then optimize the images in the selected folder.
- Convert PNG images to JPEG – Enable this option if you want to convert PNG images to a JPEG image file. You can also force ShortPixel to convert PNG images with transparent background.
- CMYK to RGB conversion – CMYK is a format used in printing to produce accurate colors. But is not necessary if the images will only show up online. Converting from CMYK to RGB will reduce the file size significantly.
- WebP versions – WebP versions are three times smaller than PNGs and 25% smaller than JPGs.
- Generate WebP markup –
tags will be replaced with tags for browsers that support the feature.
- Optimize retina images – If you have a Retina plugin installed, ShortPixel can optimize images for those too, along with your regular images.
- Optimize other thumbs – Some third-party plugins also produce thumbnails. You can optimize those as well.
- Optimize PDFs – Automatically optimize PDFs.
Some of the options could be too complicated for the average user. We suggest leaving the default settings as is unless you know what you're doing. Don't forget to save your changes when you're done.
Cloudflare API
This tab is for users of CloudFlare, a service that provides services that improve site security and performance. In this tab, they can add the following details to connect Cloudflare with ShortPixel.
- Cloudflare e-mail – Add the email address you use to log into Cloudflare.
- Global API key – Can be found by logging into your account.
- Zone ID – Found in the overview section of your Cloudflare account.
Statistics
Statistics can be interesting to look at as it holds a lot of information about your images. It displays a lot of useful information, such as the average compression of your files or how much disk space you're able to save.
The data stored here can help you assess if having ShortPixel installed is actually doing anything for you. If you're using one of the paid plans, the numbers found in Statistics can help you justify your decision.
This is also the section where you can review your plan details.
WP Resources
Shows you a list of recommended plugins and tools that work well with ShortPixel.
Bulk Processing
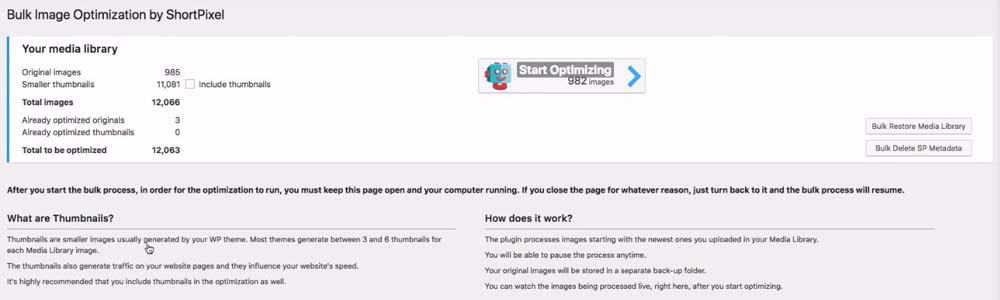
From either the General or Advanced tab, scroll down and click the Save and Go to Bulk Process button. This will bring up the Bulk Image Optimization tool.
Here you're shown how many available images there are that could be optimized. You can also choose to optimize the smaller thumbnails. To continue, click the Start Optimizing button, and you should be good to go.
There are also buttons here that would allow you to bulk restore your media library or bulk delete SP (ShotPixel) data.
Optimizing Images
Once you have your settings configured, you simply upload images as you would when creating a post. Once the image is uploaded to your media library, ShortPixel will begin compressing the image right away. You can see the progress through a progress bar.
Once the bar hits 100%, that means the image has already been optimized. It will use the settings for optimized images you've chosen under options.
Will ShortPixel work if your website is using Cloudflare?
Yes. The ShortPixel image optimizer can work with Cloudflare. However, users will need to turn off Cloudflare's image optimization feature for it to work. You cannot do installs of more than one image optimization tool and have them run at the same time.
ShortPixel Pricing
The ShortPixel plugin offers different plans based on what your needs could be. There is a free version, but that only covers 100 images per month. If you don't think you'll need more than that, the free version might be plenty enough. But for those who need more, here are your choices.
Monthly plans
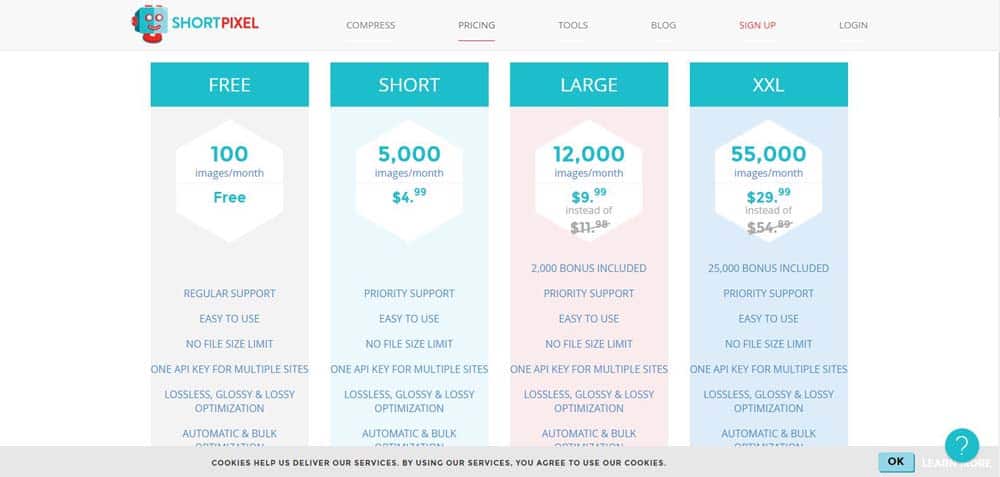
There are four plans under ShortPixel's monthly payment arrangement.
- Free – 100 images per month
- Short ($4.99/month) – 5,000 images per month
- Large ($11.98/month) – 12,000 images per month
- XXL ($54.89/month) – 55,000 images per month
One-time plans

They also offer one-time plans. This is ideal for retroactively optimizing images since you can compress images in bulk.
- One-time 10k ($9.99) – Compress 10,000 images
- One-time 30k ($29.97) – Compress 30,000 images
- One-time 50k ($49.95) – Compress 50,000 images
- One-time 170k ($169.83) – Compress 170,000 images
Dedicated servers
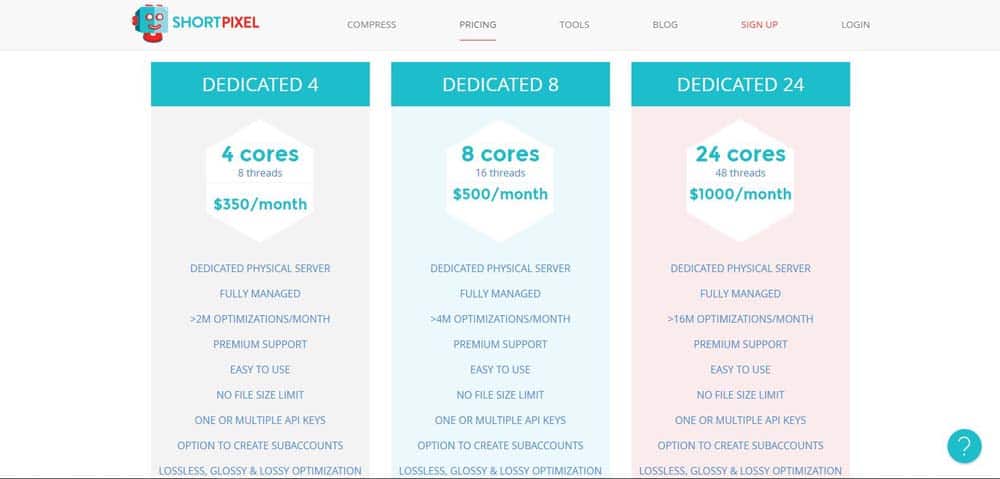
ShortPixel also offers dedicated servers for anyone looking to optimize a large number of images (in the millions) per month.
- Dedicated 4 ($350/month) – 4 cores, 8 threads
- Dedicated 8 ($500/month) – 8 cores, 16 threads
- Dedicated 24 ($1,000/month) – 24 cores, 48 threads
ShortPixel Review: Pros and Cons
Here are the pros and cons of the ShortPixel plugin.
Pros
- Convenient and easy to use – ShortPixel compresses your images as you upload.
- Affordable – Compressing 5,000 images at $4.99/month is a steal.
- Great compression results – Unlike other compression tools, the final output is not that different from the original in terms of quality.
Cons
- API setup – Setting up an API key is required. While easy to accomplish, some users might not understand how to go about doing this.
- Thumbnail optimization – Optimizing thumbnails count toward your allotted image budget per month.
- Backups – Backups are stored in your servers. So storing multiple versions of the same image can hurt you in the long run. It's important to note that you can delete backups if you wish.
Which is the best image compression plugin for WordPress?
ShortPixel is one of the best compression plugins in the market today. Being able to compress images as you upload them in your media library saves you time. The whole process becomes a breeze.
If you're an active blogger who constantly uploads photos, you will need to install this plugin. The same goes for photography site owners.
Click Here to Optimize Your Images Using Short PixelHowever, those who update their blogs once or twice a month and barely use images can stick to compressing images manually. This product is not for anyone who likes to have absolute control over their image files.
The ShortPixel plugin does a wonderful job of staying as close to the original quality as possible. But image compression can be fickle. Eagle-eyed users will notice a few changes in color here and there. If that's something that would bother you, image compression may not be for you.
But for regular users looking to improve their page's load time and keep their image size to a minimum, ShortPixel is the right tool for you.
Related Posts


Want to learn step-by-step how I built my Niche Site Empire up to a full-time income?
Yes! I Love to Learn
Learn How I Built My Niche Site Empire to a Full-time Income
- How to Pick the Right Keywords at the START, and avoid the losers
- How to Scale and Outsource 90% of the Work, Allowing Your Empire to GROW Without You
- How to Build a Site That Gets REAL TRAFFIC FROM GOOGLE (every. single. day.)
- Subscribe to the Niche Pursuits Newsletter delivered with value 3X per week
My top recommendations